Casting bronze art with Liqcreate Wax Castable 3D-printing resin
ANAfoundry was founded with a passion for bronze art and bronze casting. The bronze casting process is utilizing science, technology and experience. ANAFoundry started with casting small hand-carved wax pieces in silver and found that the process was full of challenges that needed a solution. In addition to hand-carving, ANAFoundry also investigated and offered sand-casted parts, FDM casting and recently resin 3D-printing with wax based materials. Bill, founder of ANAFoundry explains: “I sculpted small wax carvings of a Jeep sitting on a rock cliff that I intended to cast using pure copper. As the marketing strategy was in place, all I needed was the copper Jeeps. It is often said, if copper was easy to cast than it would have been called the copper age not the bronze age. And like many others before me, I learned that copper is very difficult to cast in pure form. Now although I continue to cast some pieces in pure copper, the majority I now cast in bronze. I either alloy my own bronze or purchase a Silicon Bronze known as Everdur. Everdur is the bronze of choice for many artists casting bronze statues and art pieces. 3D-printing offers several solutions in part quality and reproducibility when casting bronze parts”
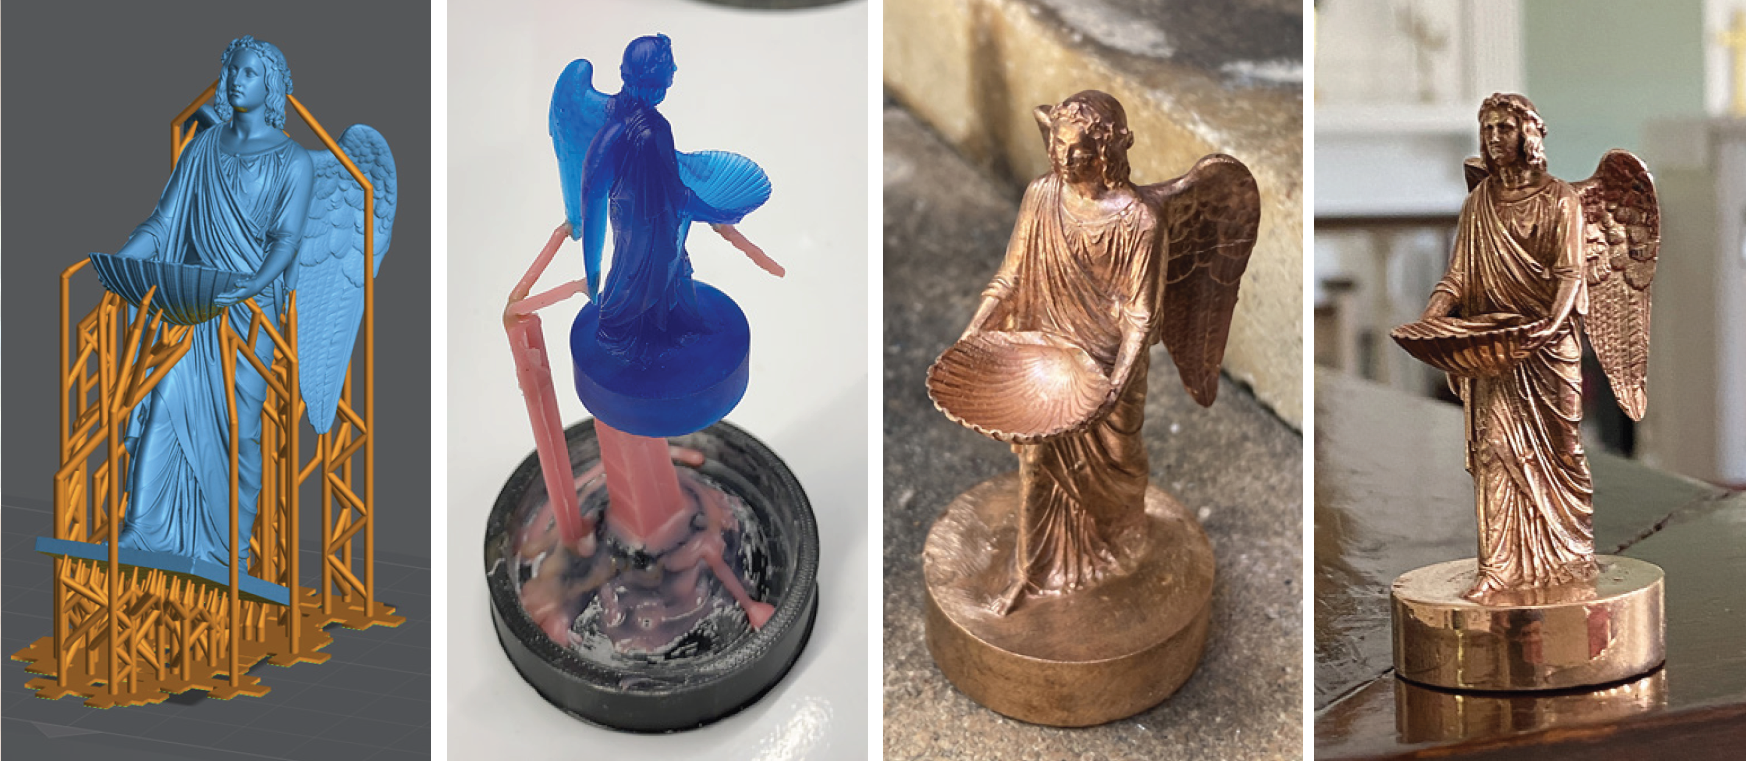
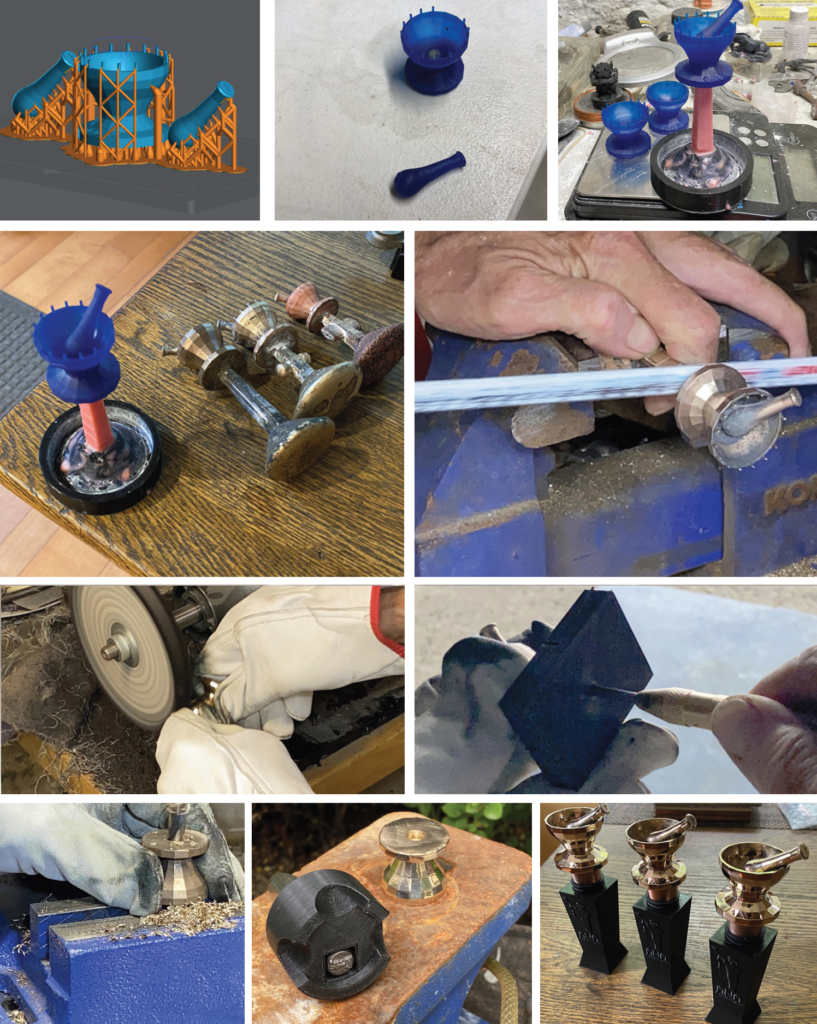
Images of the 3D-printing and casting process from left to right: 1) Model in Lychee Pro with supports. 2) Printed model with Liqcreate Wax Castable resin attached to the wax sprue. 3) Bronze cast, quenched and ready for cleaning. 4) Bronze casting prepared for final polishing.
Casting bronze with Liqcreate Wax Castable has made the casting process much more reliable. After dozens of castings I have yet to see any residual ash or any inclusions within the casting itself.
Bill – Founder at ANAFoundry
Bill continues: “A short introduction to the casting workflow starts with designing the piece. Design for your casting pieces always takes some consideration, particularly if you are carving wax. Your ability to carve something in wax will dictate its complexity and detail of the final bronze casting. From that, I recommend to make a silicone rubber mold of that wax piece so you can repeat casting the model. Once I decided to transition to 3D-printing and chose a filament based (FDM / FFF) 3D-printer. I discovered the design can be much more complex and feature even greater detail but again you still have to design the piece so it can be accurately reproduced with a filament 3D-printer. After some research I decided to buy a Creality CR-10s and start using filaments for my bronze castings.”
Casting with FDM / FFF 3D-printed models.
Before resin 3D-printing, ANAFoundry worked with hand-sculpted wax, sand-casting methods and filament 3D-printed. Switching from a hand-craft to digital manufacturing increased output and maintained a level of quality for casting high quality bronze pieces. Although casting of bronze with filament worked well, the level of detail in these castings was not sufficient for high quality bronze parts. Resin on the other hand has an incredible accuracy and with the right processing, a reliable process for bronze casting can be obtained.
During testing, I have tortured Liqcreate Wax Castable resin in a few ways most people would not even consider. It is a pretty sturdy resin. I am always amazed at how clean and ash free this resin burns out.
Bill – Founder at ANAFoundry
Transition to Resin 3D-printing and the use of Liqcreate Wax Castable resin
Bill founder of ANAFoundry continues: “The transition to resin was essential to maintain my vision. Once I was committed to printing with resin I chose three very intricate and detailed files to print and test. All three are outstanding museum pieces and can be found as examples during this use-case study. This would be a personal challenge to hold and maintain the detail while casting high quality bronze parts. What I found was that I can produce far superior castings with Liqcreate Wax Castable resin than any previously tested 3d-printed piece. In the initial week of printing, I used a basic resin to acclimate myself to the mechanics of resin printing. I found the transition from a basic resin to a premium resin was very easy with Liqrcreate Wax Castable resin.
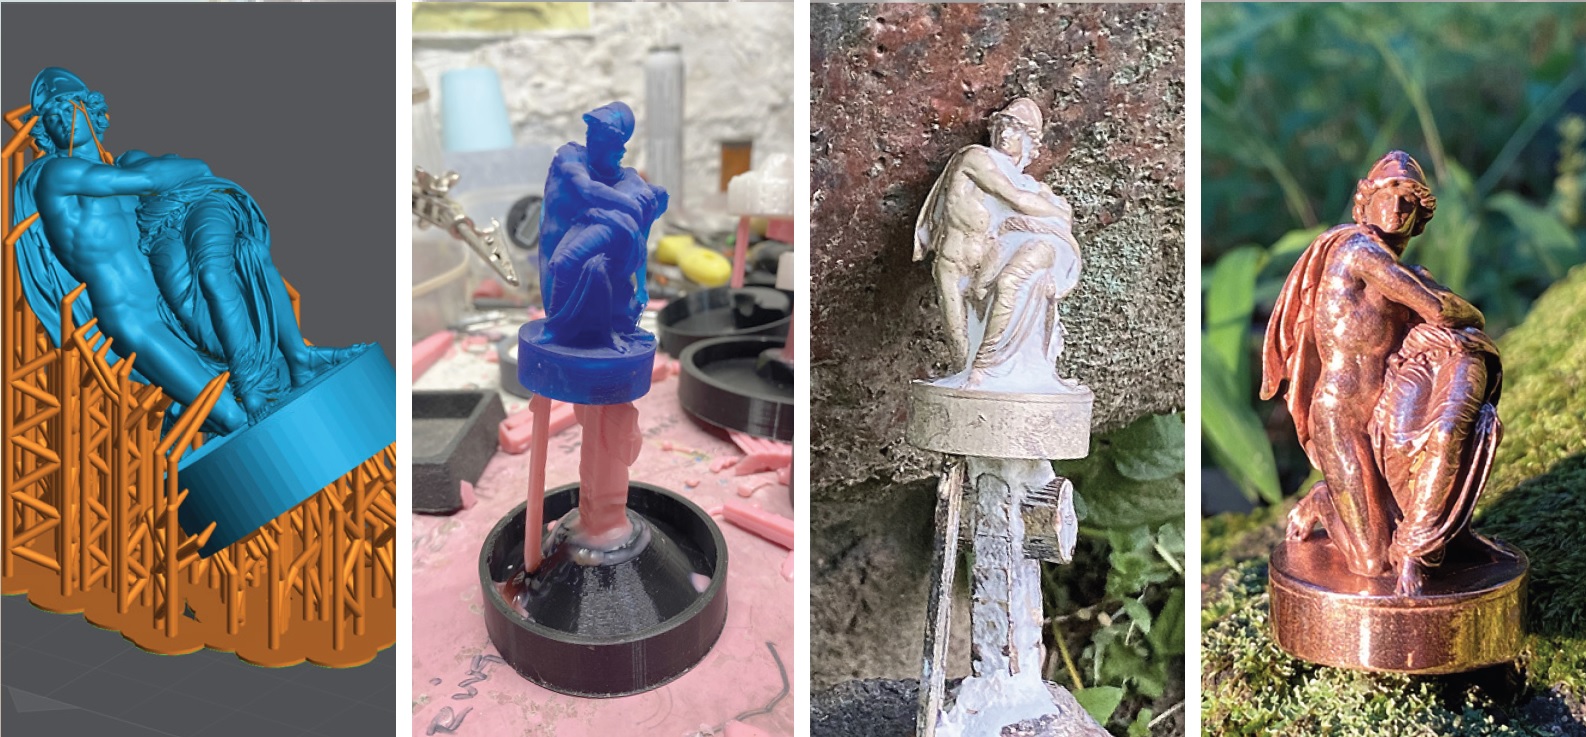
Images of the 3D-printing and casting process from left to right: 1) Casting model in Lychee Pro with supports. 2) Printed model with Liqcreate Wax Castable resin attached to the wax sprue. 3) Bronze cast, quenched and ready for cleaning. 4) Bronze casting prepared for final polishing.
3D-printing of Liqcreate Wax Castable resin
ANAFoundry is currently using an Anycubic Photon Mono 4K resin 3D-printer to print the bronze pieces for casting. This printer was chosen due to its good resolution to price ratio. A large print area was not needed since all parts and casting were rather small. The resolution was the main consideration to capture the detail required for high quality bronze castings. Additionally the ability to adjust the LED power was quite beneficial for many reasons. The same settings used for the work in this use-case is duplicated for Liqcreate Wax Castable resin. A basic resin like Liqcreate Premium Black can be used for sizing and printability before printing the final part in wax-based resin. Once the dimensions are right and the design is validated with a basic resin, the part can be printed in Liqcreate Wax Castable resin with the settings below. It was a choice to print at a slower speed to maximize for accuracy. If needed these settings could be faster with Liqcreate resin.
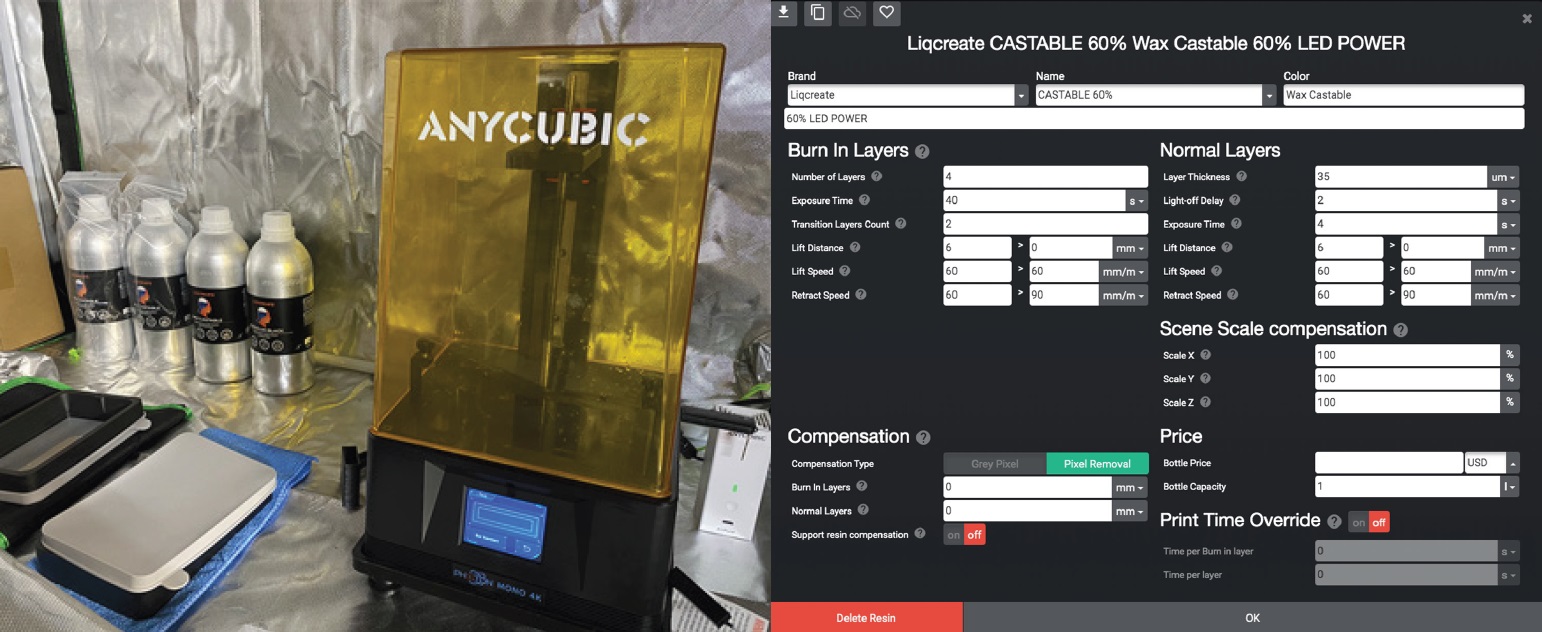
Images from left to right: 1) Printer in a temperature controlled closed environment. 2) Settings for Liqcreate Wax Castable Resin in Lychee slicer.
Washing and curing of 3D-printed Wax Castable parts
Bill continues: “Because I operate my printer almost 24/7, I’m not always present when the print is completed. I’ve gotten in the habit of allowing the print to just drip sometimes for hours. It never seems to make a difference. Once I remove the build plate from the printer I easily remove the print from the build plate thanks to good base layer exposure. They never fall off the build plate and I never have to work very hard at getting them off. Once extracted, I put them into a washing container and use a variety of brushes with different bristle firmness. Anything from a paintbrush to a soft toothbrush but nothing too hard. the following steps are maintained:
1) I start cleaning off all of the print supports. Usually everything gets brushed off pretty well.
2) I use a syringe to rinse the inside of any hollow model.
3) I put it in my first wash tank filled with IPA and process it for 10 minutes.
4) I transfer that to the second wash tank filled with fresh IPA and wash it again for 10 minutes.
Learning how to dry the pieces was a little trickier than I expected. I started placing print after print into a dehydrator. However, I noticed that the accumulating drying times we’re starting to crack and split the older pieces. This became an issue when I pre-printed models to be casted at a later date. Now I use this process: After the last wash cycle I take the print out of the wash tank and use an airbrush with a small air compressor “20-40psi” and blow dry all of the parts. At this point I remove all of the supports. If the model is hollow I will rinse the cavity again to remove any residual resin that may be inside. I repeat the drying process with compressed air then place it in the dehydrator to air dry at room temperature. When the model is needed for casting, or after twenty four hours , it is removed from the dehydrator and cured for 15 min.”
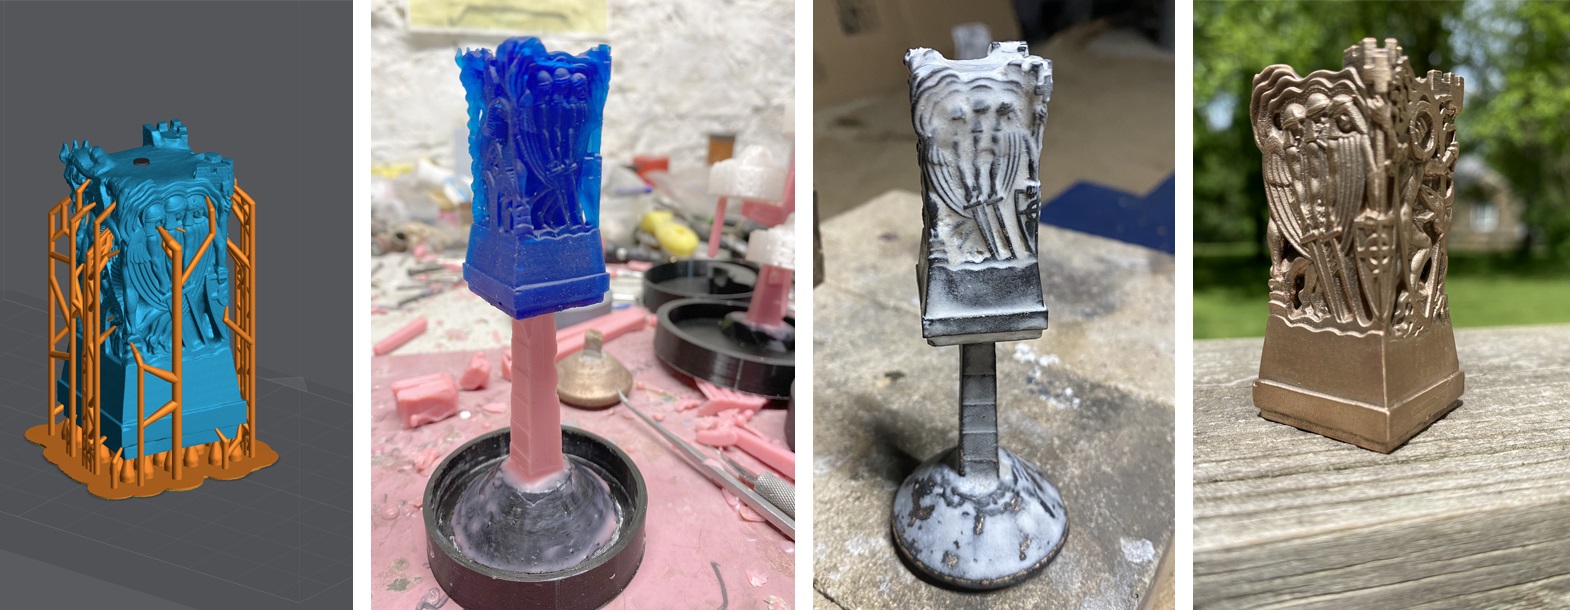
Images of the 3D-printing and casting process from left to right: 1) Casting model in Lychee Pro with supports. 2) Printed model with Liqcreate Wax Castable resin attached to the wax sprue. 3) Bronze cast, quenched and ready for cleaning. 4) Bronze casting prepared for final polishing.
Preparing Liqcreate Wax Castable resin parts for bronze casting
“Preparing for bronze casting is actually pretty easy once the model is properly processed, dry and cured. The resin print can be wet sanded or worked with a Dremel tool to achieve the desired finish and remove any undesirable marks. I prefer to leave the finish untouched with its satin-like feel. Dimples created from supports should be avoided if at all possible. I will then take it over to my wax station and start to analyze the piece. The first thing I need to determine is whether the piece printed hollow or was it printed solid? Typically I want some hollowness to relieve any pressure once the plastic starts to swell and expand inside the mold. The pressure continues to build prior to melting and burning out. If the model was printed hollow it will need to have the holes filled to prevent investment from entering the model. I tried filling the print with standard casting wax to make it solid but had undesirable results. At this point I treat the model as if it were wax and prepare it accordingly. I always follow the instructions for the investment I use. I weigh the water and investment using a standard gram scale and I mix according to the manufacturers recommendations. Because the model can be hollow, the investment can only be degassed once. Pouring the investment into the flask requires a slow and deliberate speed. The investment will trap air and create bubbles if poured to quickly. Hollow models will pull away from the sprue if degassed at this stage. Certus, the manufacturer of Prestige Optima, recommends that the flask should sit for 90-120 min before burn-out.” According to Bill, Founder of ANAFoundry
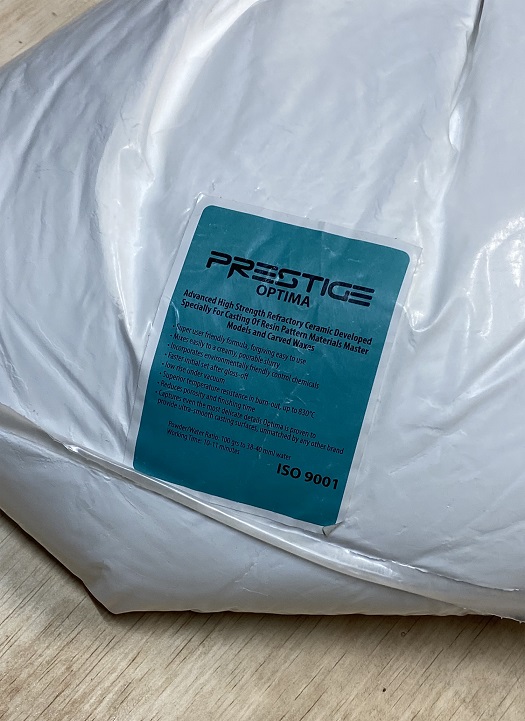
Investment plaster for Bronze casting with Liqcreate Wax Castable
Bill continues: “Years ago I tried to cut costs by creating my own investment. I would not recommend this approach because it’s a waste of your time and money and will not increase your success rate. Success is greatly improved when using a commercially available investment. Initially, I found Prestige Oro investment was perfect for my needs. At that time I was only using wax for the models. When I started using PLA filament, I switched to Prestige Optima for its higher temperature range and it’s specialized formula for resin printing. Resin and PLA need higher temperatures and create more pressure inside the mold compared to wax. Prestige Optima was designed to handle increased pressure and temperature needed for resin casting. I currently use Optima for all of my bronze casting with Liqcreate Wax Castable resin with good success rate.”
Oven specifications for casting Liqcreate Wax Castable resin
ANAFoundry uses an electric oven with a PID temperature controller. The controller allows to set temperature and the necessary time needed at that temperature. Proper venting is very important when working with resins or filament. There must be adequate venting to allow oxygen to reach the burning resin or filament. Without oxygen, it will not reach the combustion required to burnout correctly. Consistent issues with ash is most likely due to the lack of oxygen in the oven and this will need resolved to get good results. According to Bill: “in my opinion, without proper venting successful burnouts will be difficult.”
The burnout process for casting Liqcreate Wax Castanle resin with bronze
Bill, founder of ANAFoundry continues to explain their casting process: “The burnout process starts with steaming the wax sprue and vents out of the mold. I place the flask in the steamer for an average of 25 min. Steam will remove all of the wax without the smoke and oder associated with starting this process in the burnout oven.
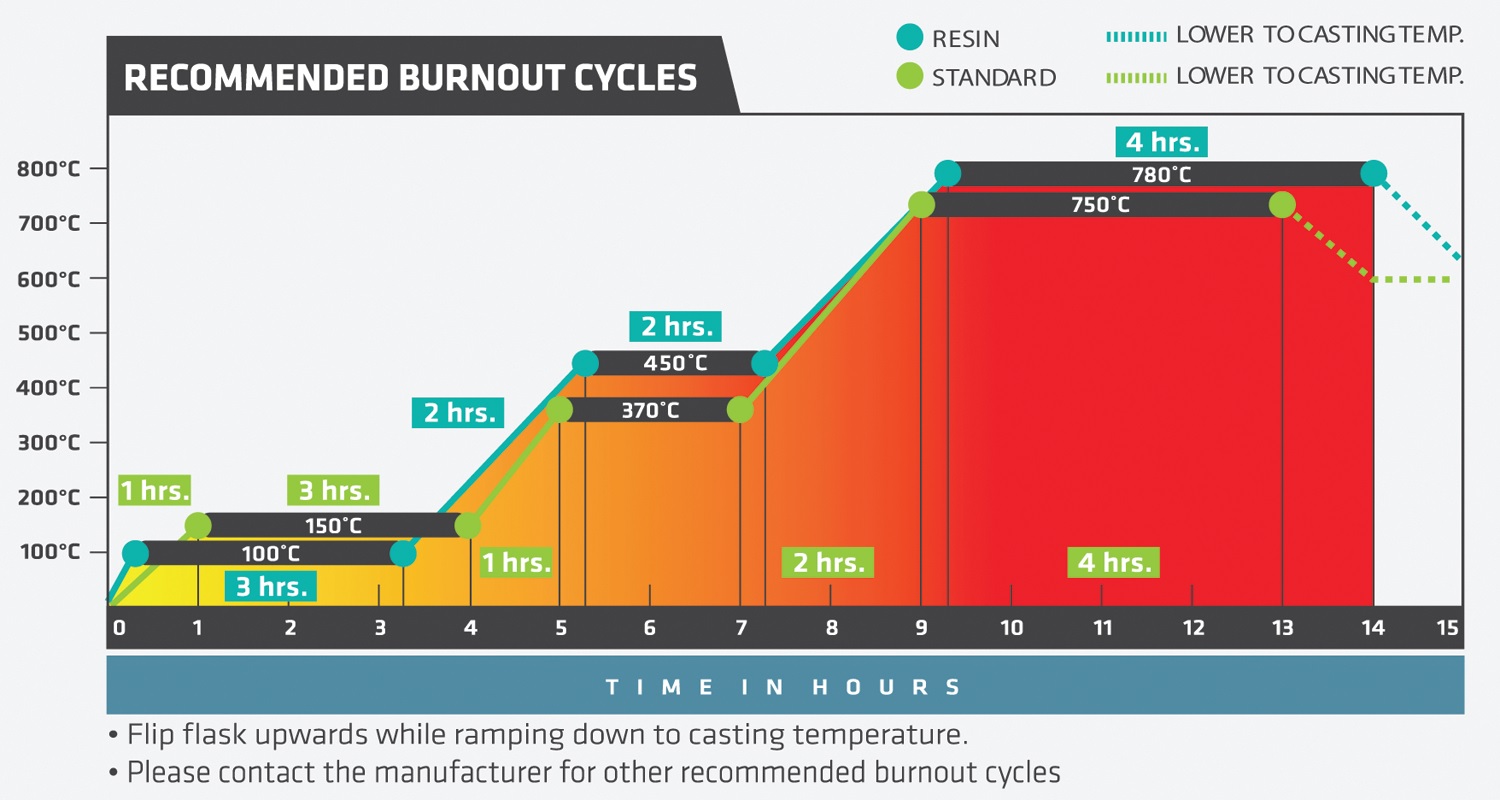
Image: recommended burn-out cycle presented by the plaster manufacturer for Prestige Optima.
Here is the recommended schedule for Prestige Optima. You will have “SOAK TIMES” the amount of time you hold at a certain temperature and you will have “RAMP TIMES” the time it takes to reach the next set temperature. However I do not follow this schedule exactly as recommended. I use the recommended temperatures but not the soak or ramp times. First of all I believe most manufacturers assume your flask size will be a standard 4×8.5 inch perforated flask like this one below.”
Bill continues “The above schedule uses longer soak times to reach the inner most portion of the investment. I use flasks that are about half that size. 2.25” x 6”. I make my own flasks from standard stainless steel tubing custom cut to fit the model or models. I do use different sizes but none of my flasks are 4×8.5”. When I first started I decided to insert a K type thermocouple into one of my flasks and monitor the time and temperature at every stage of the burnout cycle. What I found was it took about one hour for the inner most area of the investment to reach the desired temperature. I was able to create more of custom schedule based on this data.”
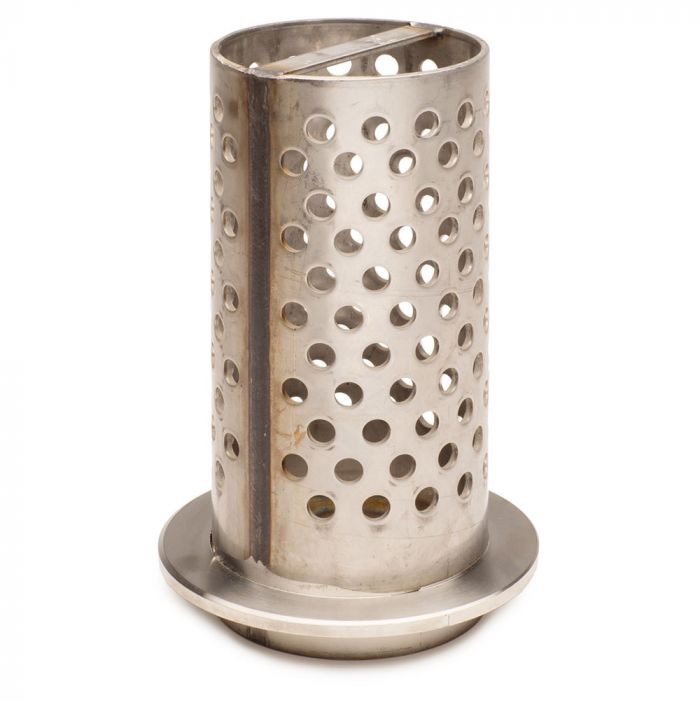

Image: used burn-out cycles by ANAFoundry.
“This burn-out cycle what I use for my flask size. I do limit the temperature to 1382°F (750°C) due to the temperature difference between the top and bottom of the oven. My oven has a differential of 35°F when ramping the temperature and then stabilizes while soaking. Also I do not flip the flask over as suggested. This step is not practical with my oven and I personally do not know anyone who does this. I assume this is for venting.” According to Bill, Founder of ANAFoundry.
Alternative burn-out schedules suggested by Prestige tested by ANAFoundry
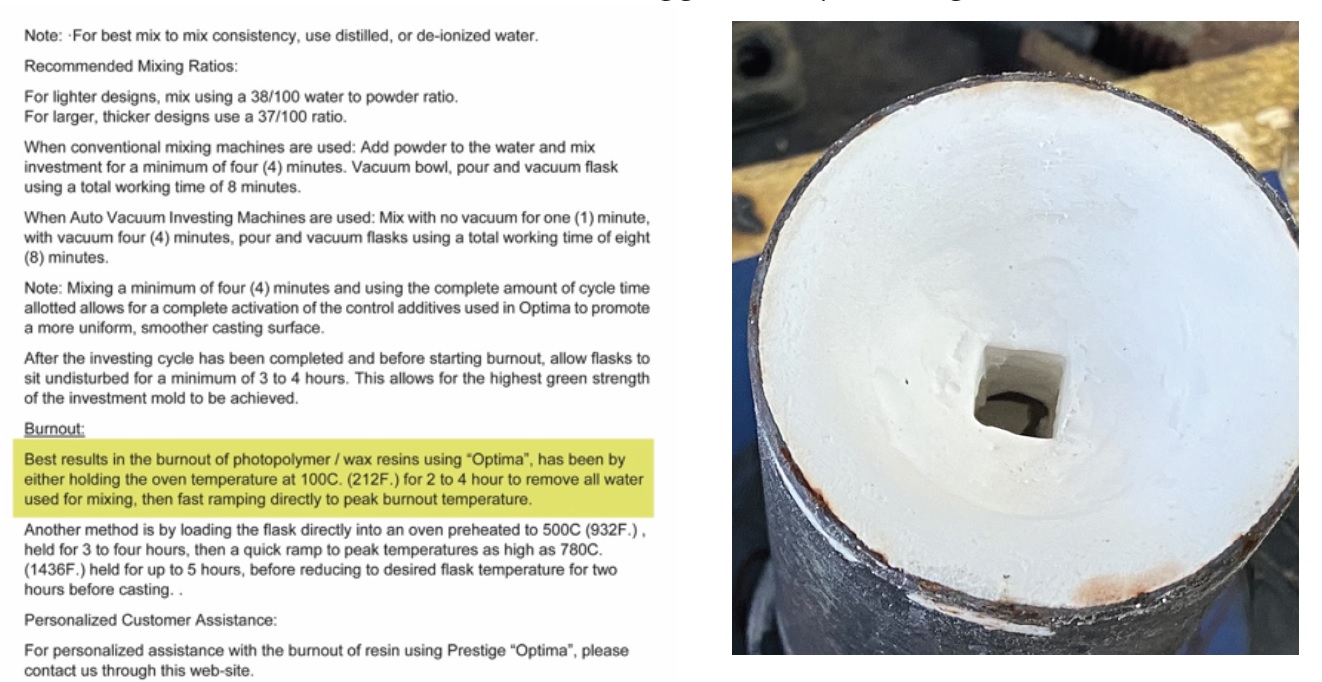 Image: alternative burn-out cycles by ANAFoundry.
Bill highlighter one of the steps in yellow. It worked well and has been used many times when by ANAFoundry when there was a need to shorten the process. However usually they start at 300°F (~150°C) and not 212°F (100°C) as stated in their instructions. Additionally ANAFoundry uses a soak time for two hours not four hours. It must be said they have not tried the schedule starting at 932°F (500°C).
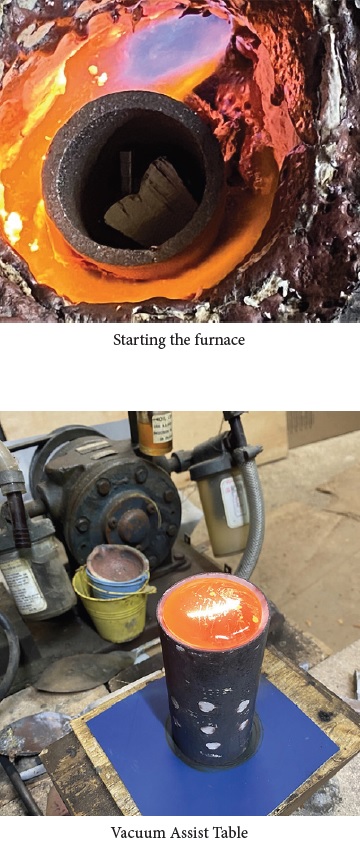
Casting bronze with Liqcreate Wax Castable resin
Bill continues to explain the casting process used with succes by ANAFoundry: “Casting bronze with Liqcreate Wax Castable has made this phase of the process much more reliable. After dozens of castings I have yet to see any residual ash or any inclusions within the casting itself. I use a variety of different metals for the art pieces. I cast mostly two types of silicon bronze; “Everdur” and “Herculoy”. I also alloy my own bronze using Copper, Tin and Antimony. I can vary the tin content to create the color and characteristics required. One hour before the burnout schedule is complete I start gathering foundry tools and the crucible needed. Each metal require its own specific crucibles. I also weigh the metal I plan to use for the casting and preheat the furnace with the crucible and the metal to about 300°F (~150°C). Once the furnace is above 300°F (~150°C) I close the top and monitor the rise in temperature. I use a specialized pair of safety glasses (UVEX-32-08LFB6-0000 ) which allow me to observe the molten metal at any temperature. I monitor the melting process from a solid state to the liquidous state and note the temperature reading from the thermocouple at different stages. Once the metal has melted and dropped to create a puddle, I will note the temperature reading. I will allow the metal to rise 100°F-150°F ( ~50°C) above the melting point. I’ve been using this process for years and it’s pretty reliable. I always cast at 100°-150°F above the melting temperature.
The temperature will vary depending on the size of the piece and if there are thin surface areas. When the temperature of the melt is 10°F below the pouring temperature, I remove the flask from the burnout oven and place it on the vacuum pad. The flask is rotated to the optimal position to reduce turbulence created from pouring the molten metal. The crucible is carefully positioned over the flask and pouring cup. At this point, the vacuum pump is turned on and the vacuum pressure noted. The rate and speed of the liquid metal entering the flask is steady and uninterrupted. This will reduce any turbulence and air inclusion. Vacuum is only used while pouring. Once the pour cup is just starting to fill with metal, the vacuum is turned off. The casting must sit until the metal begins to solidify then it can be removed from the pad. At this point the casting is complete. Quenching the casting is done when the button is barely seen in a darkly lit area or between 700-800°F (370-430°C).”
Finishing bronze casting with Liqcreate Wax Castable resin
Bill explains: “Finishing of the cast bronze parts starts when the casting is quenched in water. The amount of cutting, sawing, wire brushing, grinding, filing, welding (if need be), sanding and then the polishing would surprise most people. This is metal after all.”
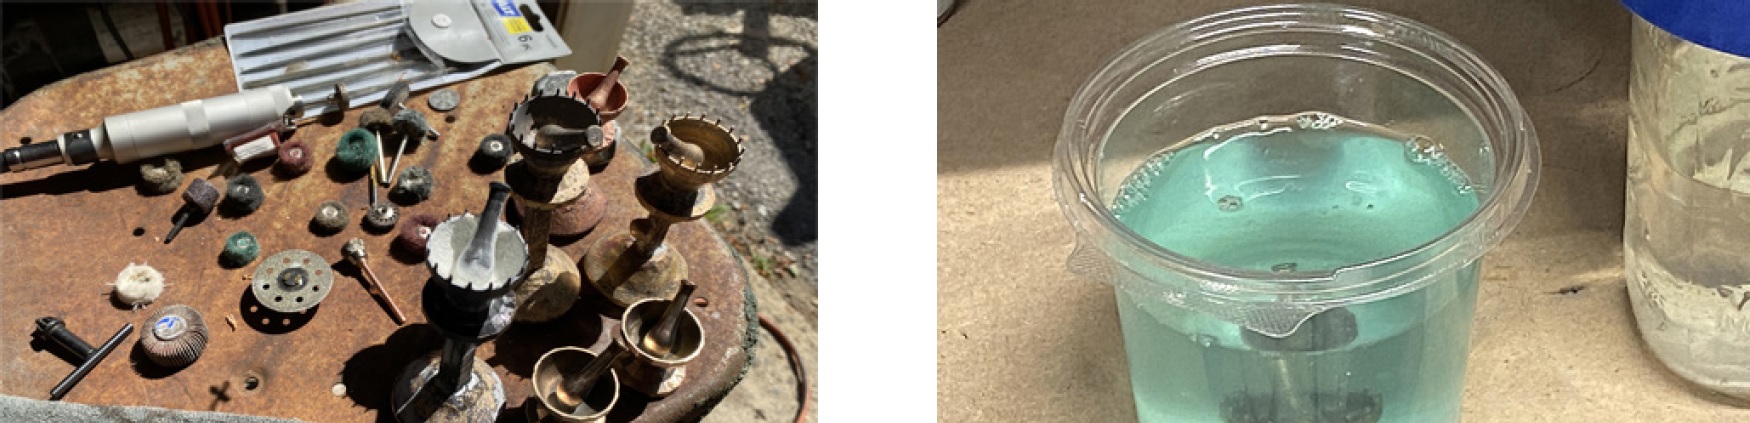
Image: preparations for finishing bronze parts cast with Liqcreate Wax Castable resin.
“Finishing actually starts with the bronze cast model itself. The surface finish on the model before investing will dictate the amount of effort needed afterward. A smooth surface on the bronze cast model should result in a smooth casting. All of the bronze test pieces printed with Liqcreate Wax Castable Resin have a very smooth finish after casting. For me, finishing is always the hardest phase because there are so many ways to finish a piece. Not every piece can be polished to a high luster. Pieces that will have a patina applied may not need the same attention as those that will be polished. Questions I always ask myself: Should it go into a tumbler? Can it go into a tumbler without damaging the piece? If it goes into a tumbler what media should I use? Should this metal go into a pickle solution or another type of solution for cleaning? Will it have a patina applied to the surface and how much, what color and where?
But let’s start with the basics. After the bronze cast piece is quenched I will use one of two approaches.
1) I use a Double Arrow spot remover water gun to remove any leftover investment on the bronze casting (High Pressure Water-Jet).
2) I use a soda blaster to remove some of the oxidation from the casting process.
3) I place the bronze piece into a pickle solution to remove any left over oxidation.
4) At this stage I will either place in a tumbler with one of several different media (unless it is too delicate). than I will use a ultrasonic cleaner or use a wire wheel and dremel tool to start the cleanup of the bronze casting.
5) At this stage we are sanding with abrasive pads starting with 180 grit. up to 1800 grit.
While working on the museum pieces I was commissioned to design and create a special wine stopper for the Phi Delta Chi Organization. This organization is the largest academic fraternity for all pharmacy students. We were able to create and cast three pieces to be auctioned at a fund raiser for their National Conference held in Dallas Texas. Below are photos of some of the steps taken to finish the castings.”
Liqcreate would like to thank ANAFoundry for for testing & optimizing the bronze casting process with Liqcreate Wax Castable resin and supporting this use-case.
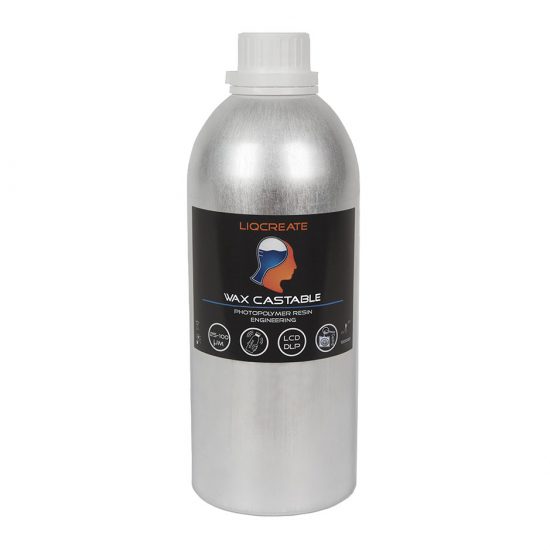
About Liqcreate Wax Castable resin
Liqcreate Wax Castable is a wax based 3D-printing resin, perfect for manufacturing jewelry, dental and industrial parts using the direct investment casting method. Liqcreate Wax Castable is easy to use on open LCD/MSLA, DLP and laser based 3D-printers in the range of 385 – 420nm. 3D-printed parts from this material captures intricate features and show crisp details. This wax based material offers smooth surfaces with clean burnout for a reliable casting process when working with bronze and othe precious metals. Create custom made elegant organic geometries according to your preferences with excellent casting for positive and negative engravings.
Key benefits |
3D-Printer compatibility |
| · High precision | · Asiga Max and Pro 4K |
| · Wax based | · Phrozen3D series |
| · Clean & ash-free burnout | · Elegoo & Anycubic series |
| · Excellent casting of engravings | · And many more |
Background information on the 3D-printed by ANAFoundry with Liqcreate Wax Castable resin
Lost wax casting is an ancient art and craft. The first evidence of gold lost wax casting is a small gold stud or “Terminal” found in Syria and dated at 4200 BC. A statuette of a female figure was among six cast objects found on the Amug Plain in North Syria, made around 4000 BC. In 1961, four hundred objects of bronze, ivory and hematite were found in a cave near Masada in Israel. The cache included crowns, standards, scepters, disks, horns, jars, mace heads and tools. They were wrapped in a fiber mat and have been carbon dated to between 4000 and 3500 BC. Many of these objects are lost wax castings made of a bronze alloy of copper, antimony and arsenic. (Reference: Lost Wax Casting. Old, New, and Inexpensive Methods by Fred R. Sias, Jr., Ph.D.)
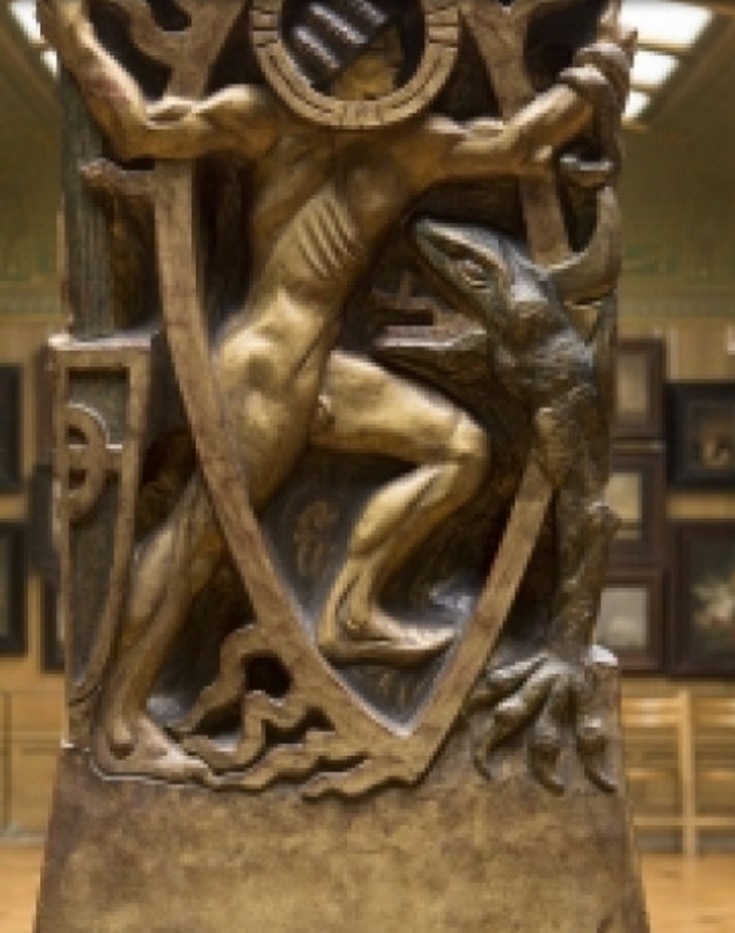
Description
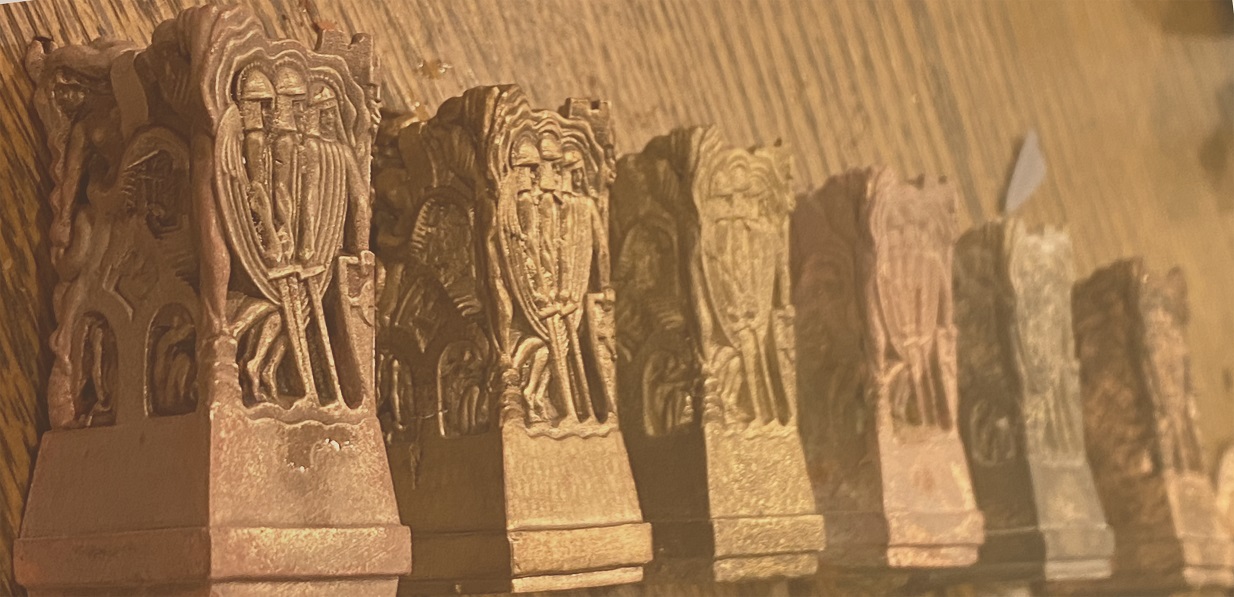
Ellen Roosval von Hallwyl was a Swedish painter, sculptor and composer, and the daughter of Count Walther and Countess Wilhelmina von Hallwyl. Many of Ellen’s sculptures are found in the Hallwyl Collection in Stockholm, which follow references to modernism and religious stories. This capital (Kristus i Dödsriket), for instance, reads a narrative on each side showing Christ descending into the Realm of the Dead on Easter Eve to release the lost souls. The capital is built like a castle. Christ is seen surrounded by a radiant mandorla, depicted as a glorious muscular young man whose arms embrace the corner tower of the castle. He is depicted in close combat with the dragon; the ruler of the castle and the realm of the dead.
| Title | Christ in the Realm of Death |
| Date | 1913 |
| Dimension | Height 64 cm; Width 33 cm |
| Accession | Inv. Nr. S.LV:III:Aa07 |
| Period | Modernism |
| Medium | Polychrome and gilded wood |
| Credit | Hallwyl Collection |
| Artist | Ellen Roosval von Hallwyl |
| Place | Hallwyl Museum |
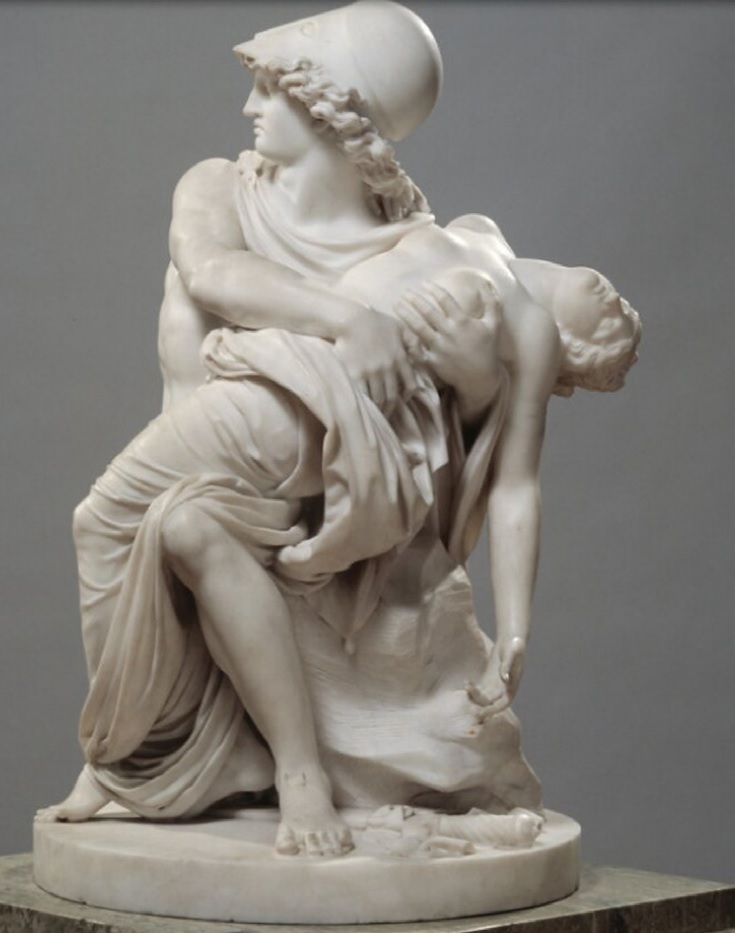
Description
Sergel was inspired by Homer’s The Iliad in several works. Here he depicts the story of the wounded love goddess Venus’ rescue by Mars. The war god is made to represent vigorous power, ready to defend the helpless Venus, who complains of her pain. Sergel began the group in 1775 in Rome, but finished it in Stockholm in 1804. It is intended to be viewed from all sides; the various angles of the composition differ in character.
| Title | Mars and Venus |
| Date | 1914 |
| Dimension | Height 93 cm |
| Accession | NMSk 1113 |
| Period | Neoclassical |
| Medium | Marble |
| Credit | Bequest by Countess Elisabeth Wachtmeister 1918 |
| Artist | Johan Tobias Sergel |
| Place | Nationalmuseum |
Description
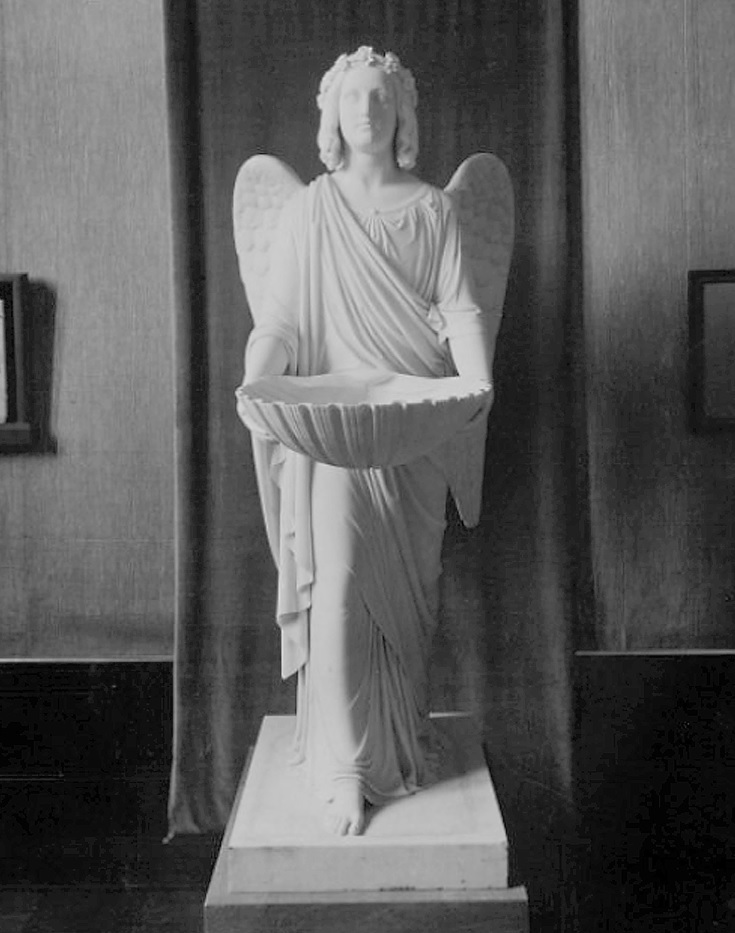
The Angel is a baptismal font by Thorvaldsen for the Vor Frue church in Copenhagen. It was located in front of the altar at the end of the central aisle, giving the impression that the angel greeted the visitors, making them a part of the community through baptism. It was later replaced by a kneeling angel in front of a monumental figure of Christ with open arms. Thorvaldsen was, in addition to Antonio Canova, the foremost sculptor of his time.
| Title | Baptismal Angel |
| Date | Unknown |
| Dimension | Height 181 cm |
| Accession | NMSk 1363 |
| Period | Neoclassical |
| Medium | Marble |
| Artist | Bertel Thorvaldsen |
| Place | Nationalmuseum |