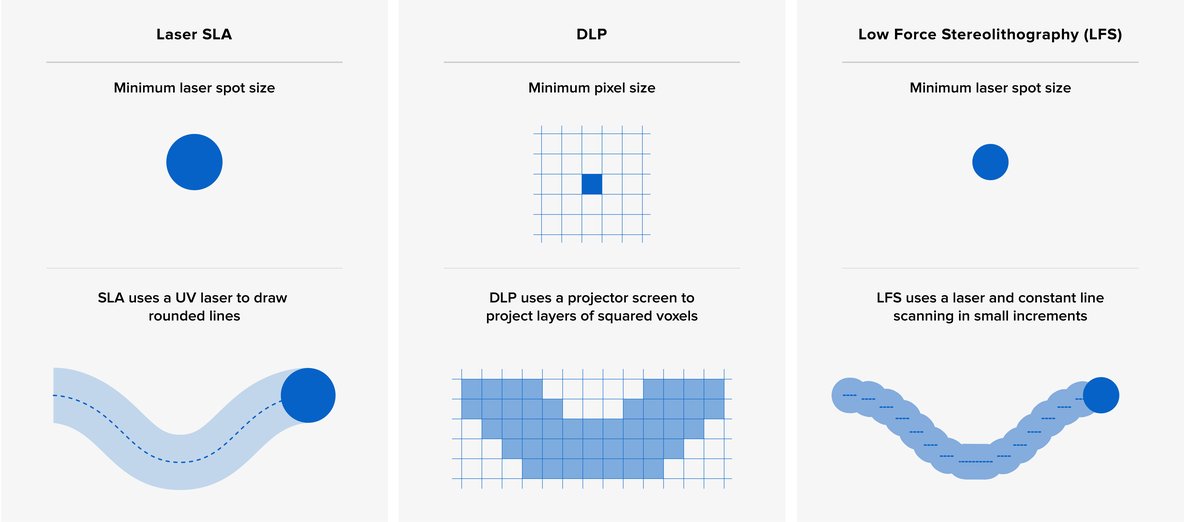
Several 3D-printing techniques like SLA, MSLA and DLP are used to cure photosensitive resin layer by layer and form a 3D-printed object. To get a 3D-printed part, a DLP printer uses a DMD chip to expose the right pixels in each layer. In a MSLA 3D-printer, this is done with an LCD screen. Both images are build-up by pixels. Each pixel can be turned-on or turned-off individually. At the pixels that are turned on, the light-source will expose the resin where it gets cured locally. The pixels that are turned-off, will block the light and resin will not get cured. A perfect print will therefore always have a pixelated surface when looking at the surface from up-close. The pixilation can be reduced with new exposure techniques like Anti-Aliasing (AA) and blur. However, when using it wrong, it can reduce dimensional accuracy or give a bad surface finish.
What is Anti-Aliasing (AA) and Blur?
There is a lot of information online, for instance by software developer Chitubox. As not all information is clear, we decided to perform our own test and publish the results it in this article. A lot of the theory is based on the study performed by the Autodesk Ember team. They studied how a single voxel is made and how grayscale works. They lined the pixels up from dark gray (nearly pure black) to pure white to cure a resin. Their research showed that when a gray level is below a certain value, there would be no reaction (curing). However, from dark gray to a certain critical brightness, semi-circular cured parts started to be formed in the resin. In practice, a gray pixel (semi-circular cured voxel) would merge into adjacent (fully cured) voxels. By controlling the brightness of the pixel, any size of voxel can be produced and sub-pixel accuracy can be achieved (in theory). Learn more about the Autodesk test and theory in the video below.
Companies with closed DLP systems like EnvisionTEC / ETEC have been working with this and similar pixel manipulation tools for a long time to achieve higher resolution prints. Only recently it has been integrated in open resin 3D-printers and it is worth to read the results before entering random values in your slicer.
Test set-up for Anti-Aliasing (AA) and Blur with Liqcreate resins.
For this test we selected a fully open resin 3D-printer, the Elegoo Mars 3 in combination with Liqcreate Clear Impact. 50 micron settings were used in every test according to the setting database. Both the Chitubox software (free version) and the Elegoo Mars 3 firmware were updated to its latest version (Chitubox V1.9.1 and Mars 3 firmware V4.5.0-1.0-e13_LCDE1_4098X2560_F21.28). Chitubox has two settings that can be set for the Mars 3. First is Anti-Aliasing (AA) which can be switched off, or set to a number between gray level 0 and 8. Additionally, the level of Blur can be switched off, or set between factor 2 or 4.
How does Anti-Aliasing and Blur work for resin 3D-printing?
Pixelated surfaces are most visible on curved areas of your printed part. We used a 50mm tall half sphere for this test. When showing a sliced image later in this article, it is always halfway the sphere on the curved area of the part.

Image: Half sphere and cross-section halfway the sphere.
Let’s see what kind of images are generated in Chitubox when playing with the Anti-aliasing (AA) and blur settings. Original sliced image when switching off AA and blur looks like this. Pure black and white pixels.
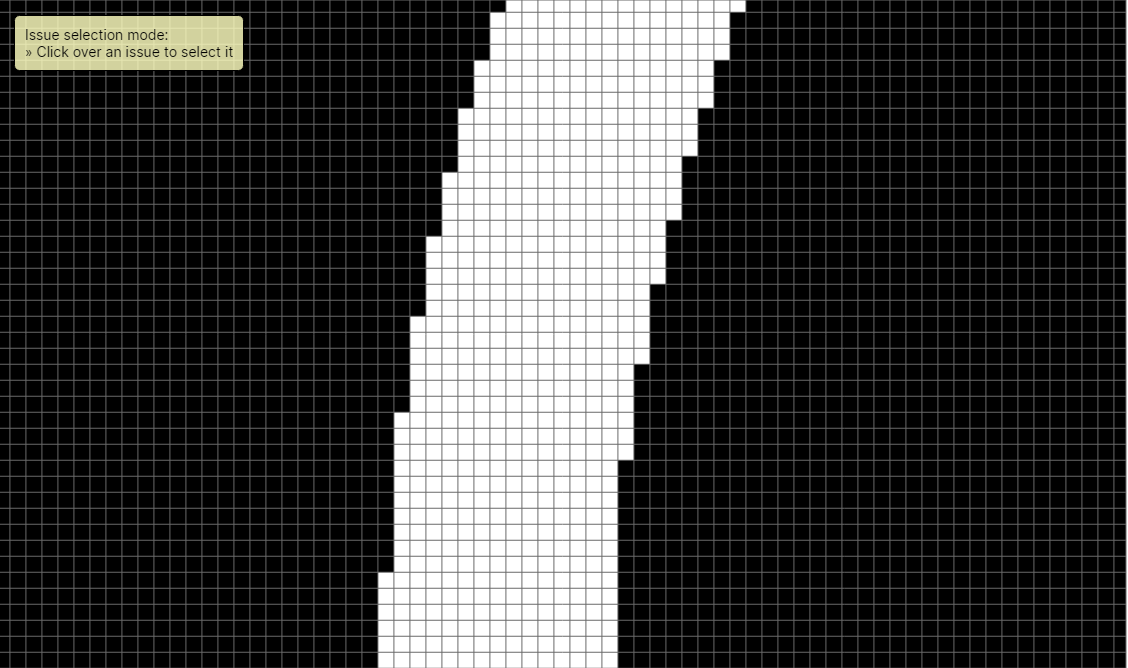
Image: Pure black and white pixels when switching off AA and blur.
When switching off AA and Blur, a spherical shape will look pixilated like the image below.
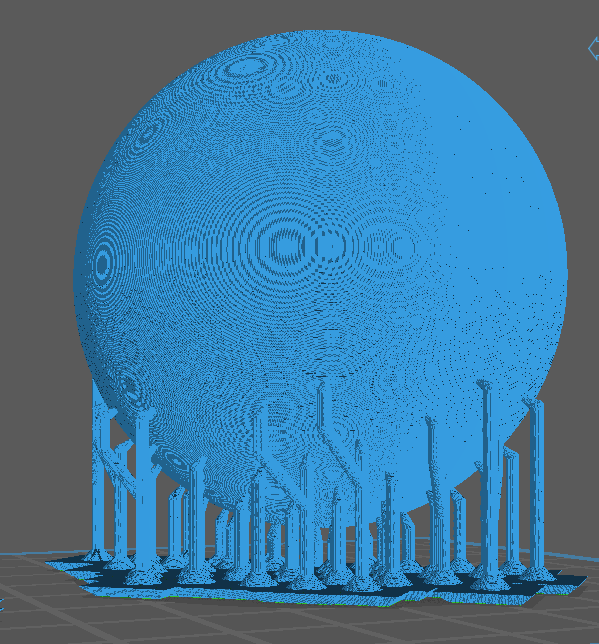
Image: The slicer will calculate pixels for each layer and the outcome is a pixilated surface, especially visible for spherical shapes.
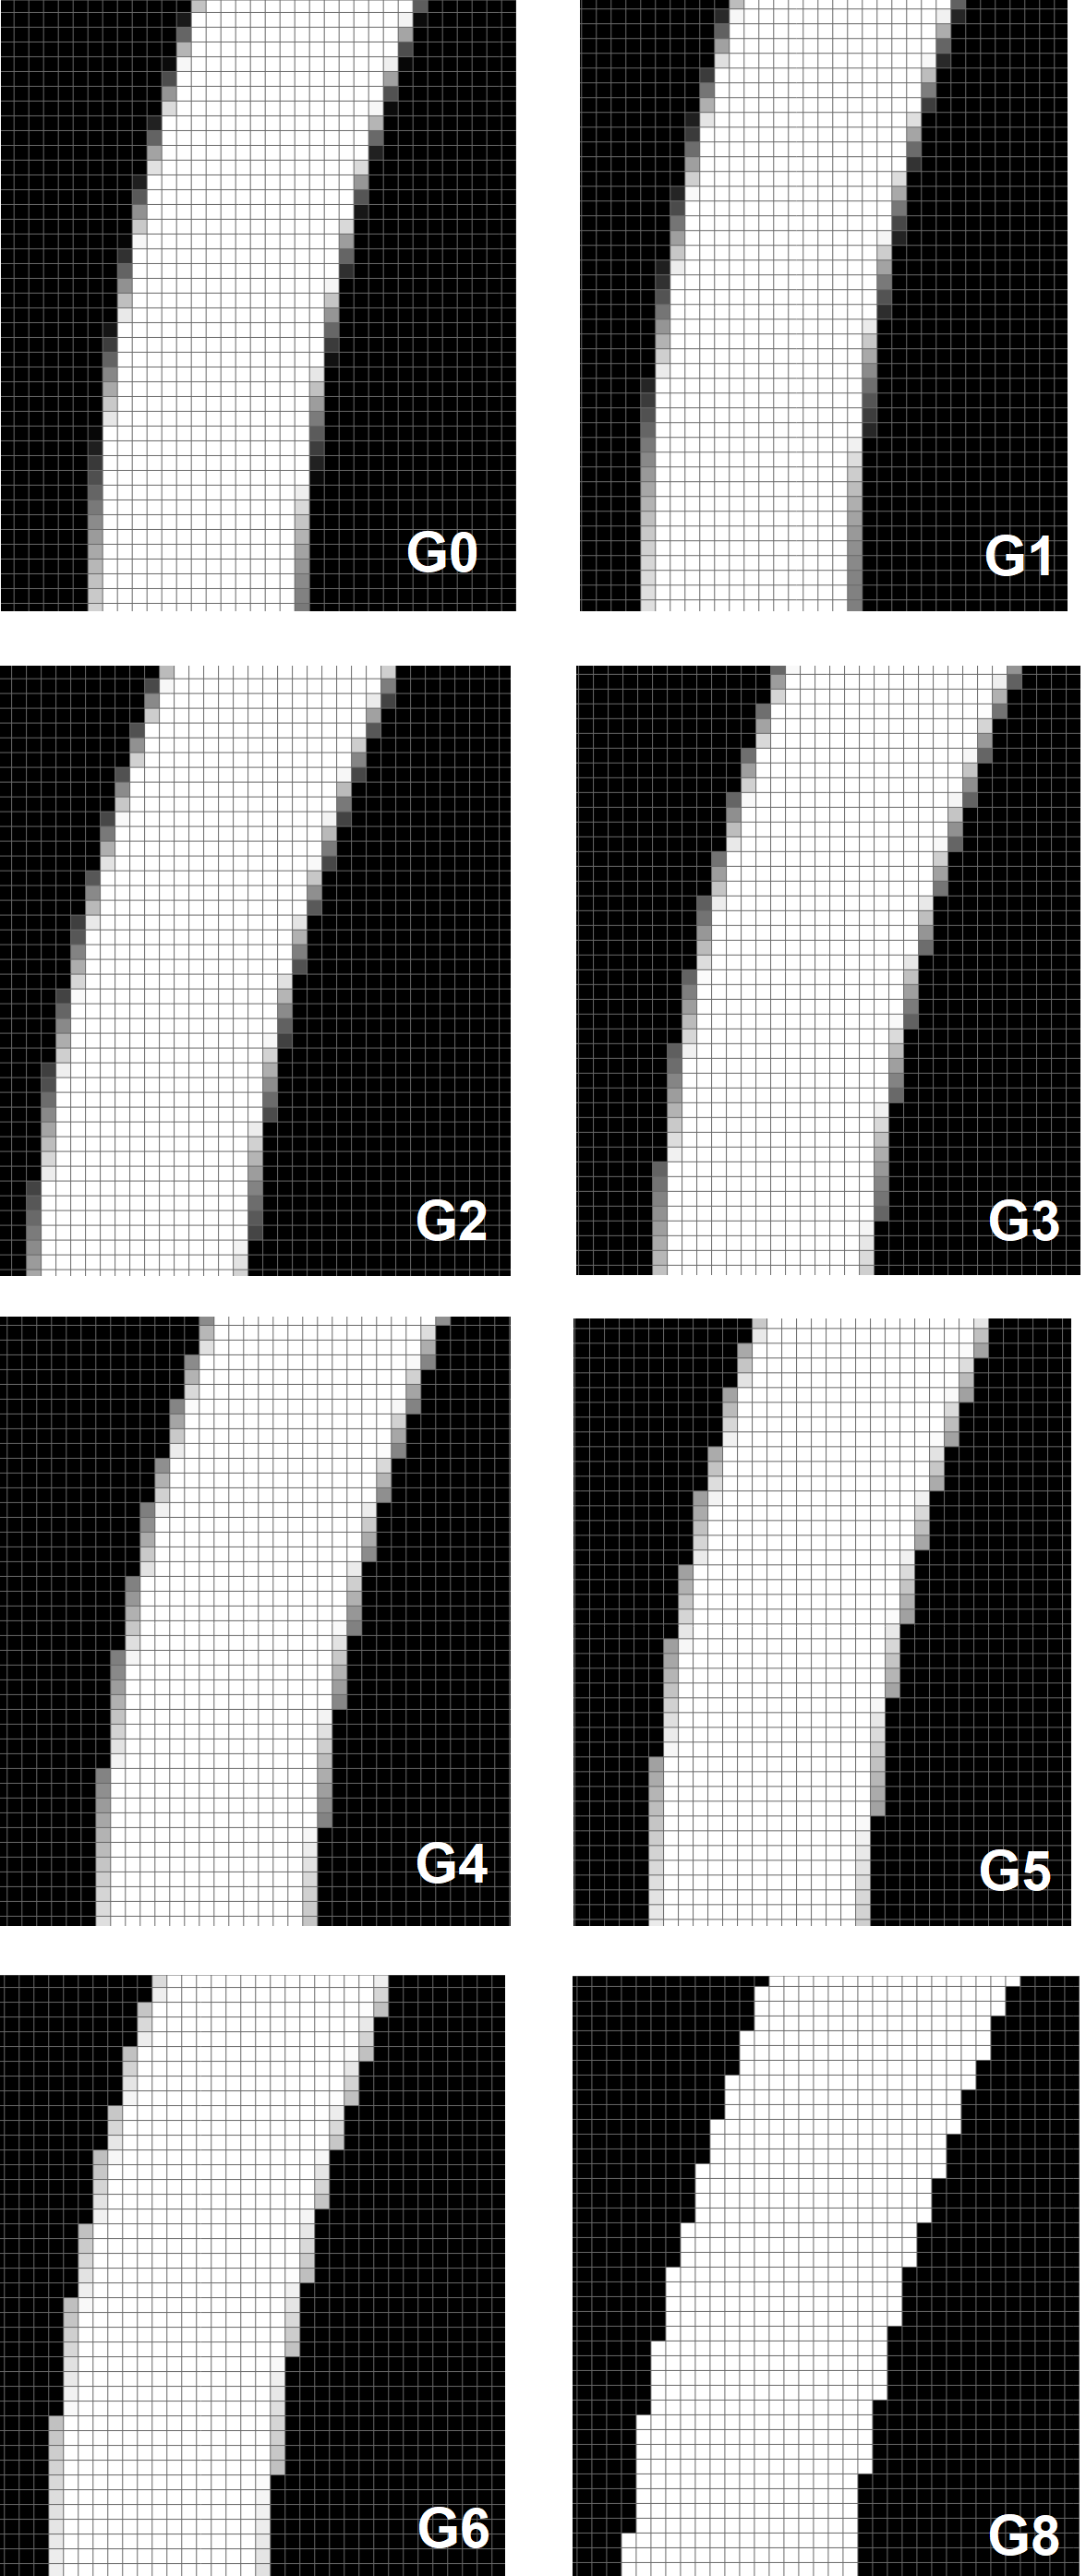
This pixilated surface can be manipulated with Anti-Aliasing (Greyscale) and blur settings when using it right. In the image below you can see what grayscale does when the Anti-Aliasing option is selected. G0 means Gray level 0 (this is the lowest gray level) and a higher number means a higher Grey level. In the images it is visible that the outer edges gets an extra layers of gray pixels. Until Gray level 2 the amount of gray shades increases, while from Gray level 3 and up only the intensity of the pixel is more bright. All the pixels are black and white again at Grey level 8, which is quite useless. In all cases the blur function is turned off.
Let’s see how the blur function works. In this example the anti-aliasing (AA) option is enabled on Grey level 0 and the blur function is changed from Blur off on the left to Blur 4 on the right.
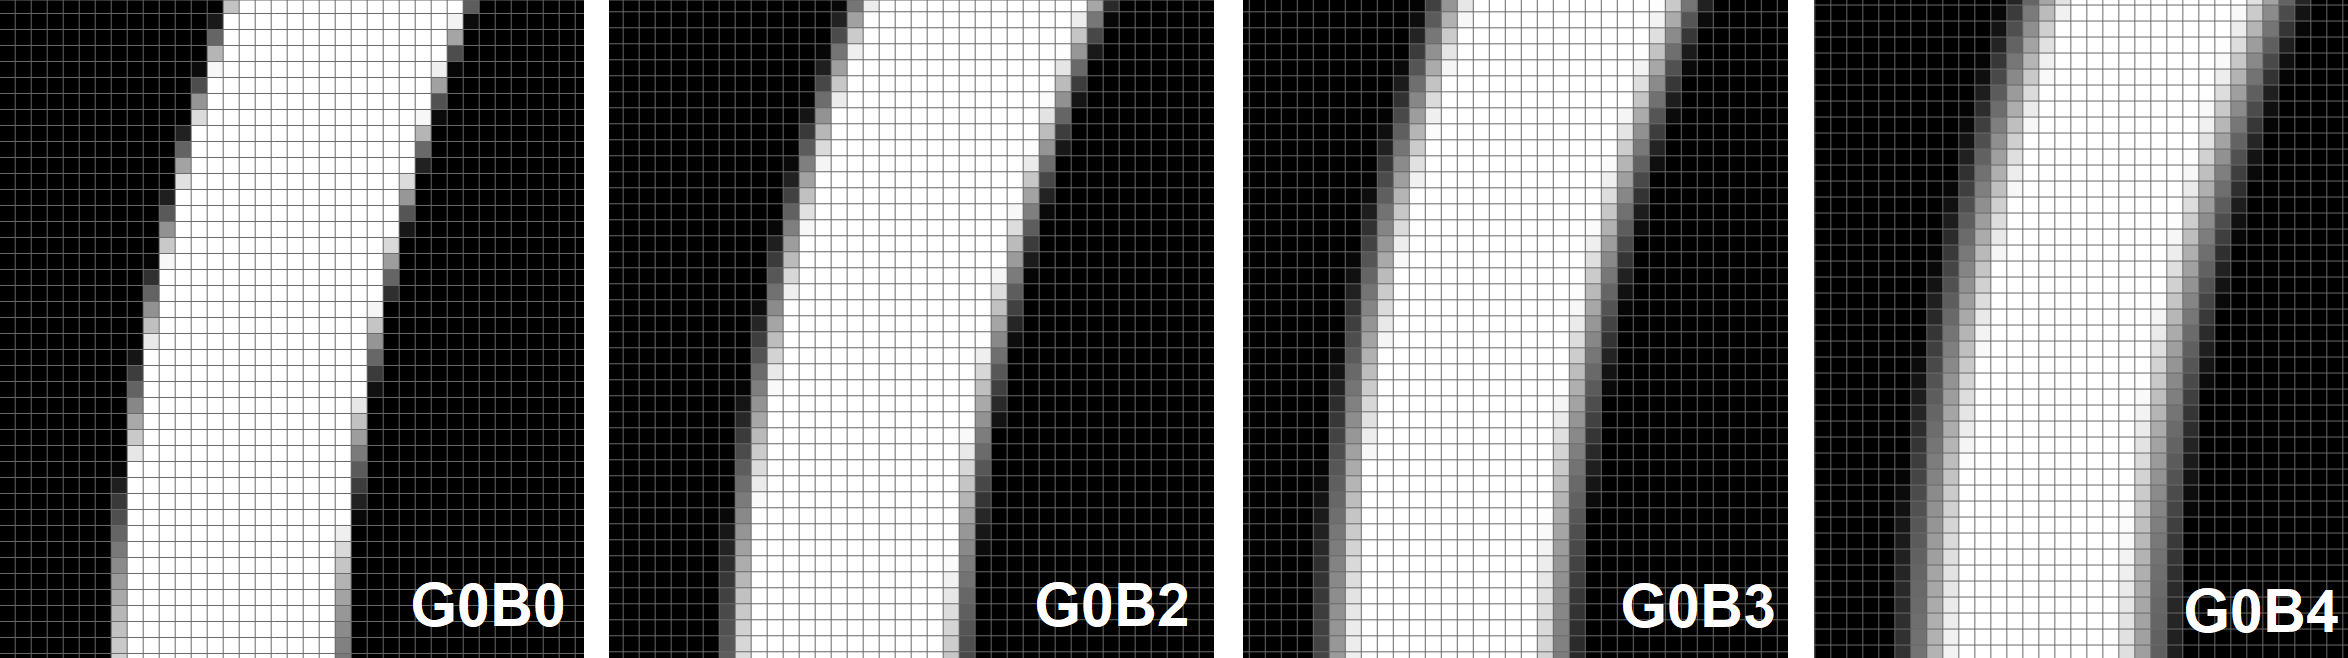
Image: example of sliced file were the anti-aliasing (AA) option is enabled on Grey level 0. The level of blur changed from Blur off on the left to Blur 4 on the right.
As seen in the previous test, the grey level function will manipulate the gray scale of the outer pixel only. The blur function will manipulate how many outer layers will be influenced by gray scale. It should be noted that a in high level of blur, the grayscale starts to render inward at the same time, resulting in the original white pixels in the central area becoming gray. This may cause insufficient light power and may lead to problems with curing. When selecting image blur level, be careful when selecting higher levels.
How does a printer respond to Anti-Aliasing and Blur?
It is great to see that the Chitubox slicer works quite well with anti-aliasing and blur, but it is also important that the hardware works as well. In a study from February 2021, an Anycubic Photon Mono user tried anti-aliasing on their printer and found out that the specific printer did not work as expected. Instead of gray levels, the printer interpreted the gray scale as shorter exposure time at 100% brightness. While it should be 100% exposure time at a lower level of brightness.
With the UV tools from Github, we designed a file with different levels of grayscale to test if the updated Elegoo Mars 3 would process it properly.
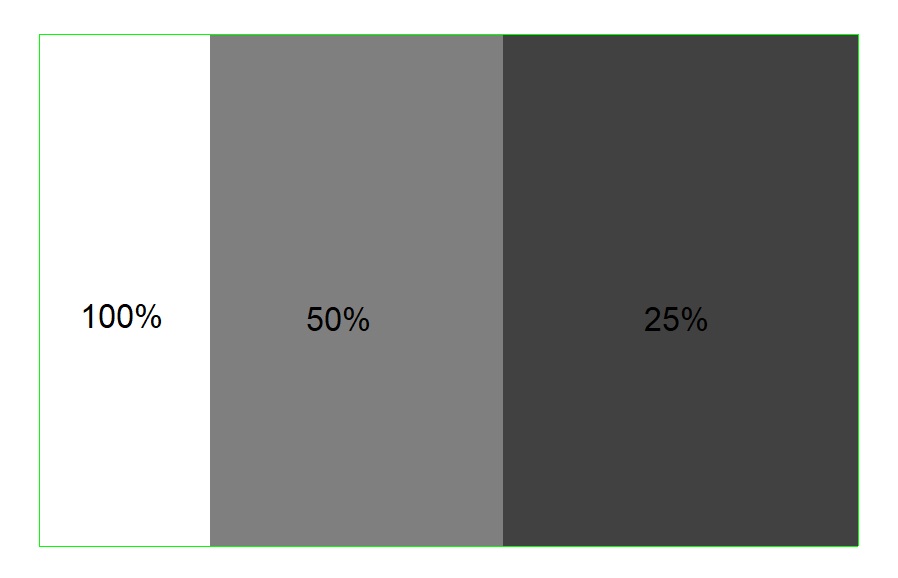
Image: Designed file with different level of grayscale / brightness
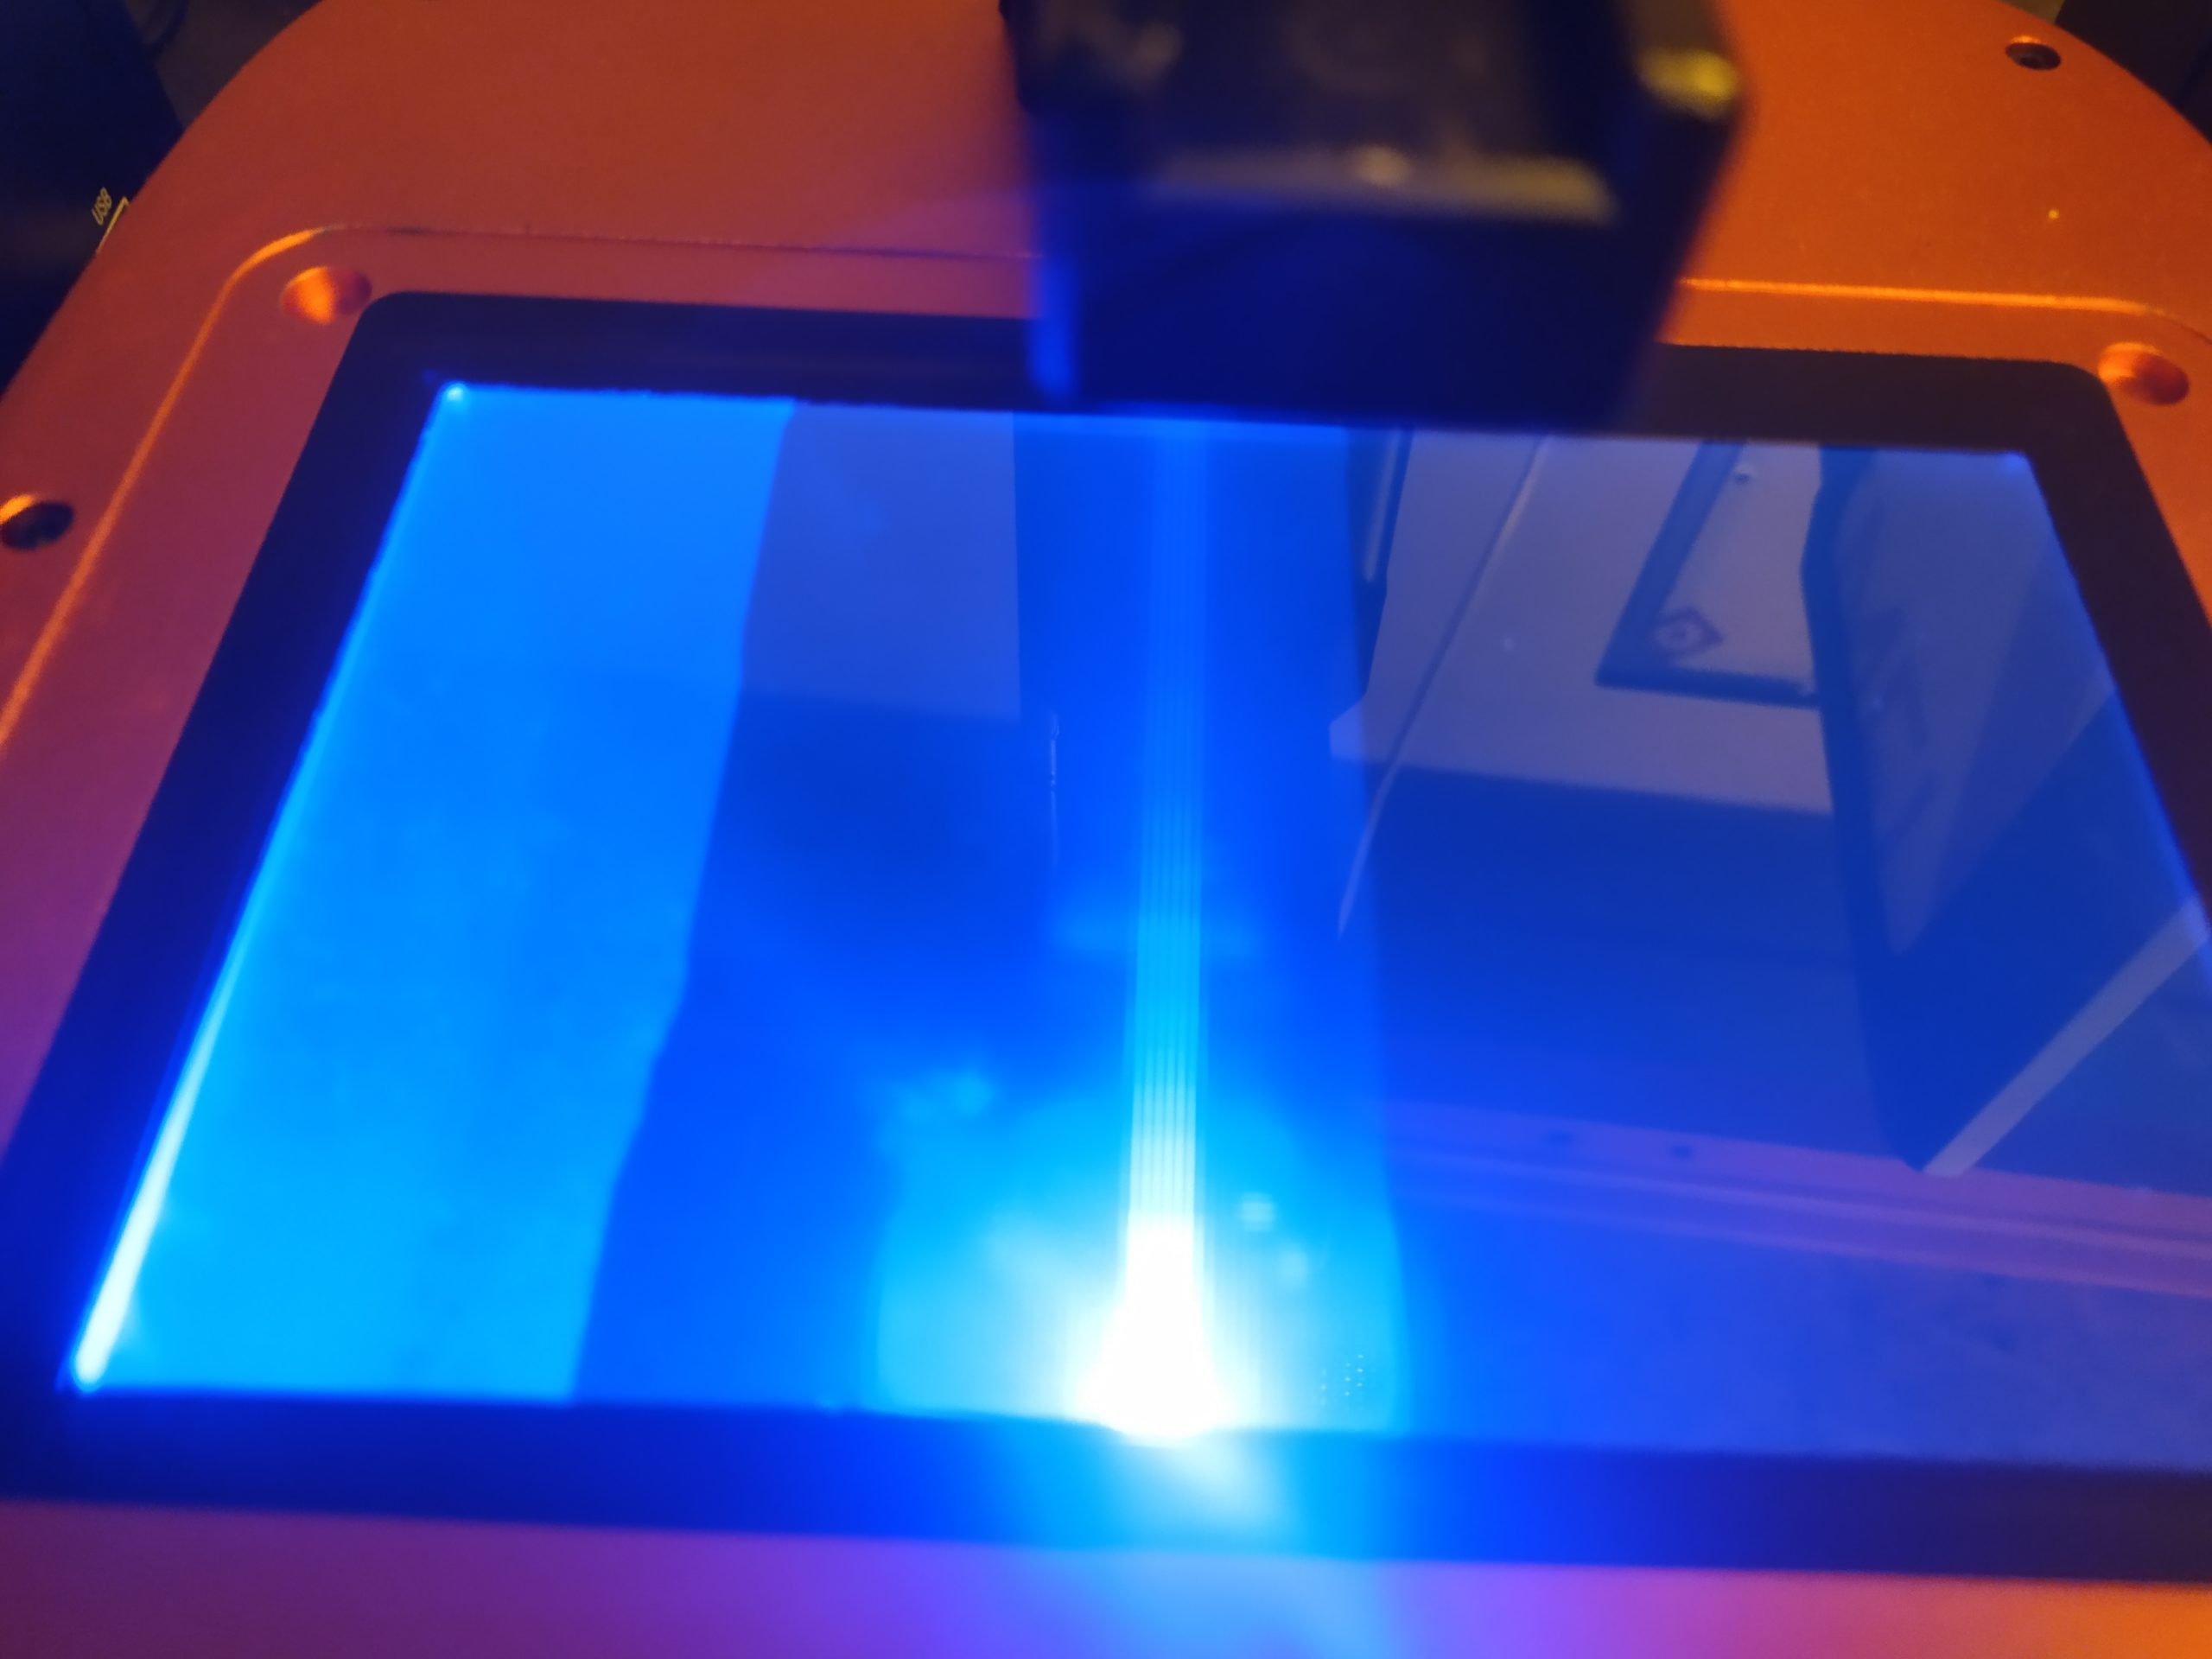
Image: Elegoo Mars 3 exposing 3 different brightness levels at once when Anti-Aliasing (AA) or grey levels are enabled.
From the images and tests above, it can be seen that the grayscale does work on the latest version of the Elegoo Mars 3 in combination with Chitubox. Next step is to see the actual result.
Anti-Aliasing in practice with resin 3D-printing
18 different configurations were tested in this article with a total printing time of over 144 of hours. We sliced the half spheres at 50 micron layer thickness with a wide range of different AA and blur settings, starting with the reference. When Anti-aliasing is switched-off, a pixelated surface is visible.
![]()
Image: Anti-aliasing switched off, pixelated surface as a result (AA=off;B=off). Left the 3D-printed part, right the cross section of a sliced layer in the middle of the part.
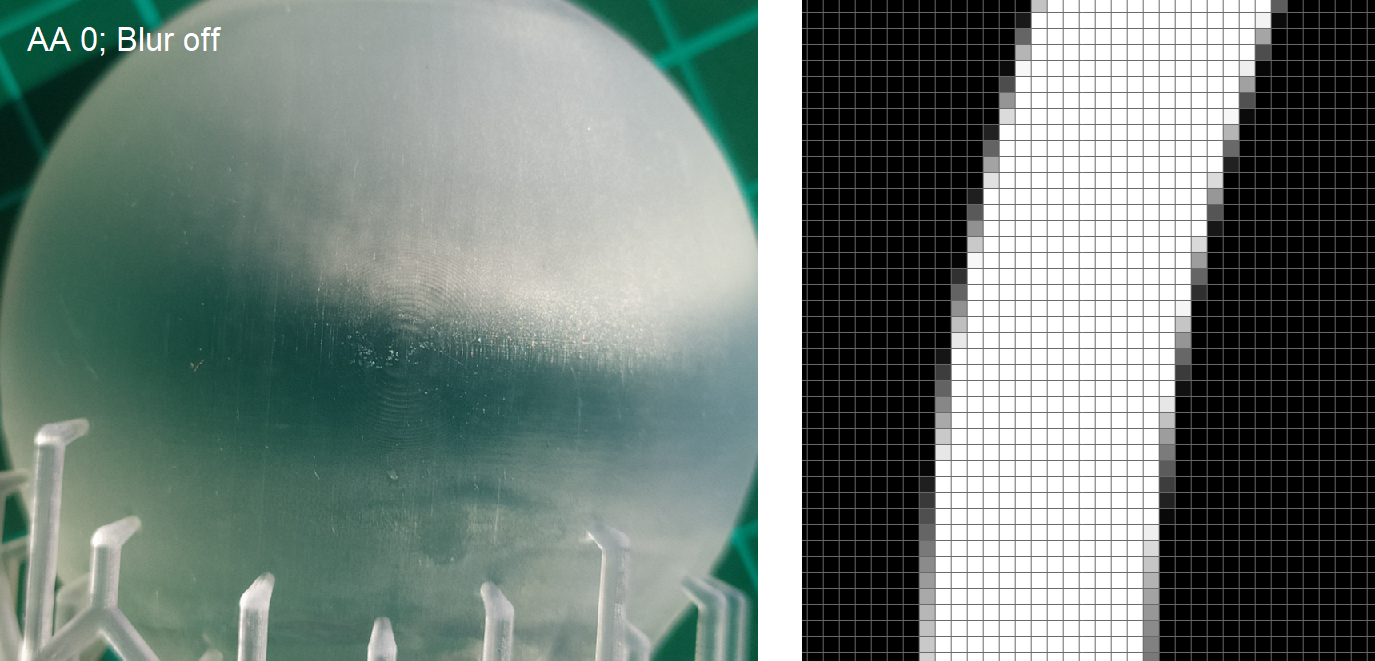
Image: Anti-aliasing switched on at level 0 and blur switched off (AA0;B0). Left the 3D-printed part, right the cross section of a sliced layer in the middle of the part.
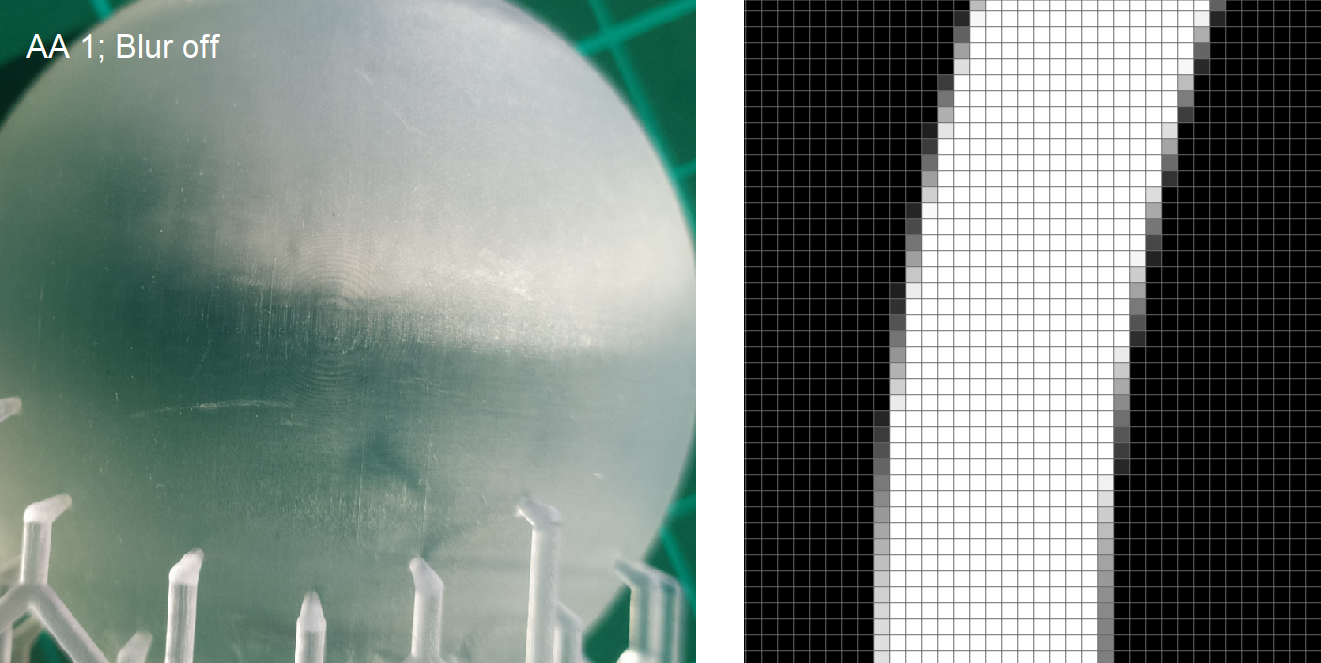
Image: Anti-aliasing switched on at level 1 and blur switched off (AA1;B0). Left the 3D-printed part, right the cross section of a sliced layer in the middle of the part.

Image: Anti-aliasing switched on at level 2 and blur switched off (AA2;B0). Left the 3D-printed part, right the cross section of a sliced layer in the middle of the part.
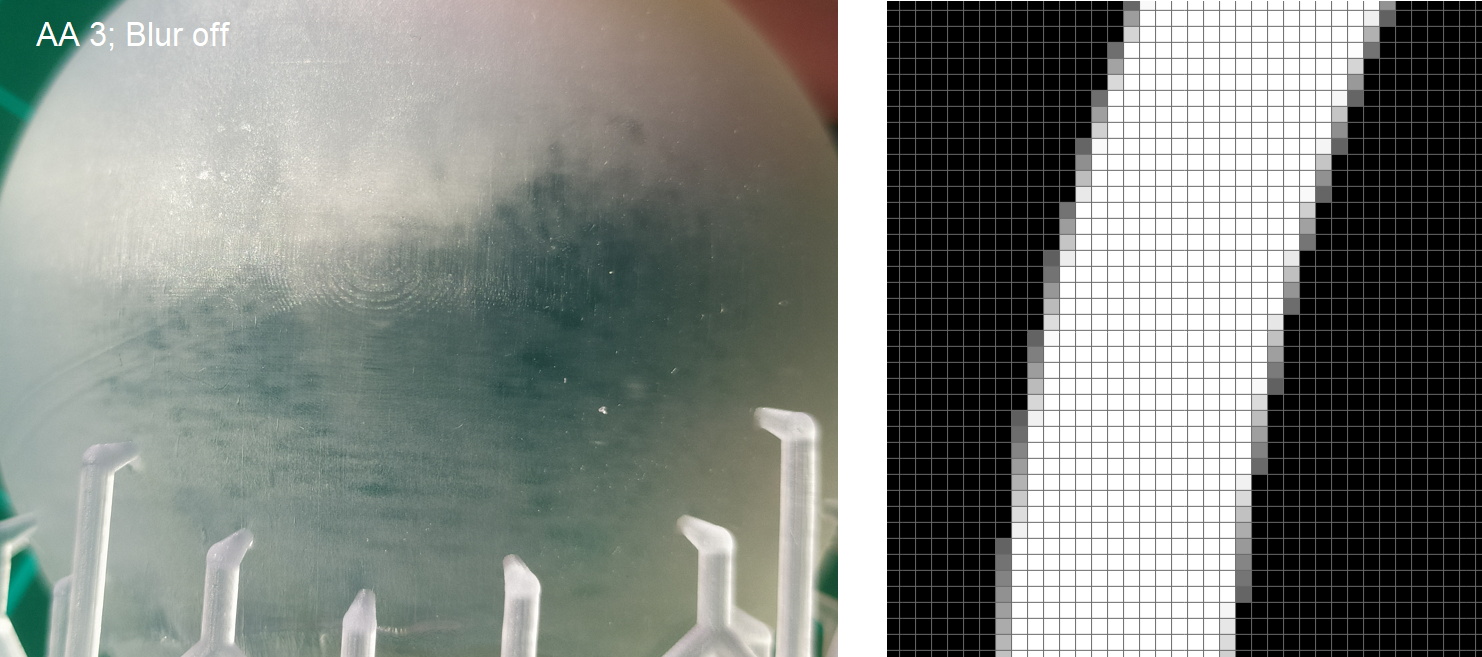
Image: Anti-aliasing switched on at level 3 and blur switched off (AA3;B0). Left the 3D-printed part, right the cross section of a sliced layer in the middle of the part.
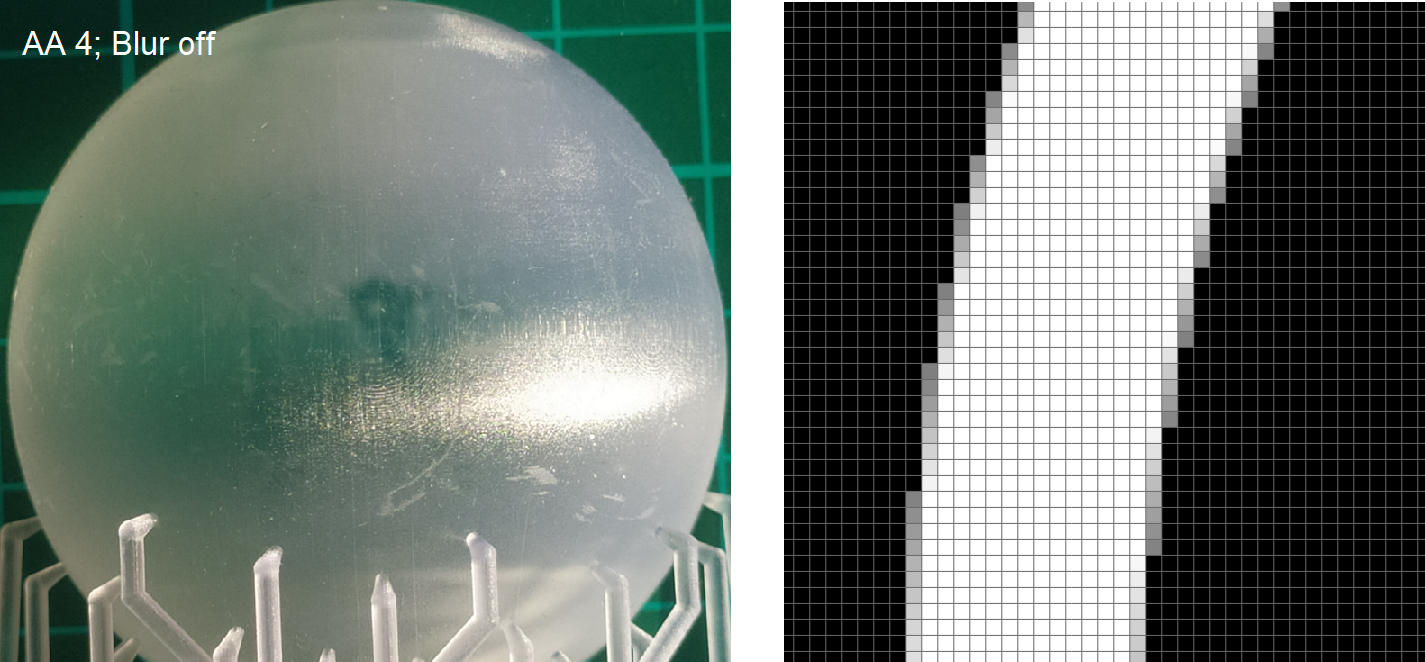
Image: Anti-aliasing switched on at level 4 and blur switched off (AA4;B0). Left the 3D-printed part, right the cross section of a sliced layer in the middle of the part.
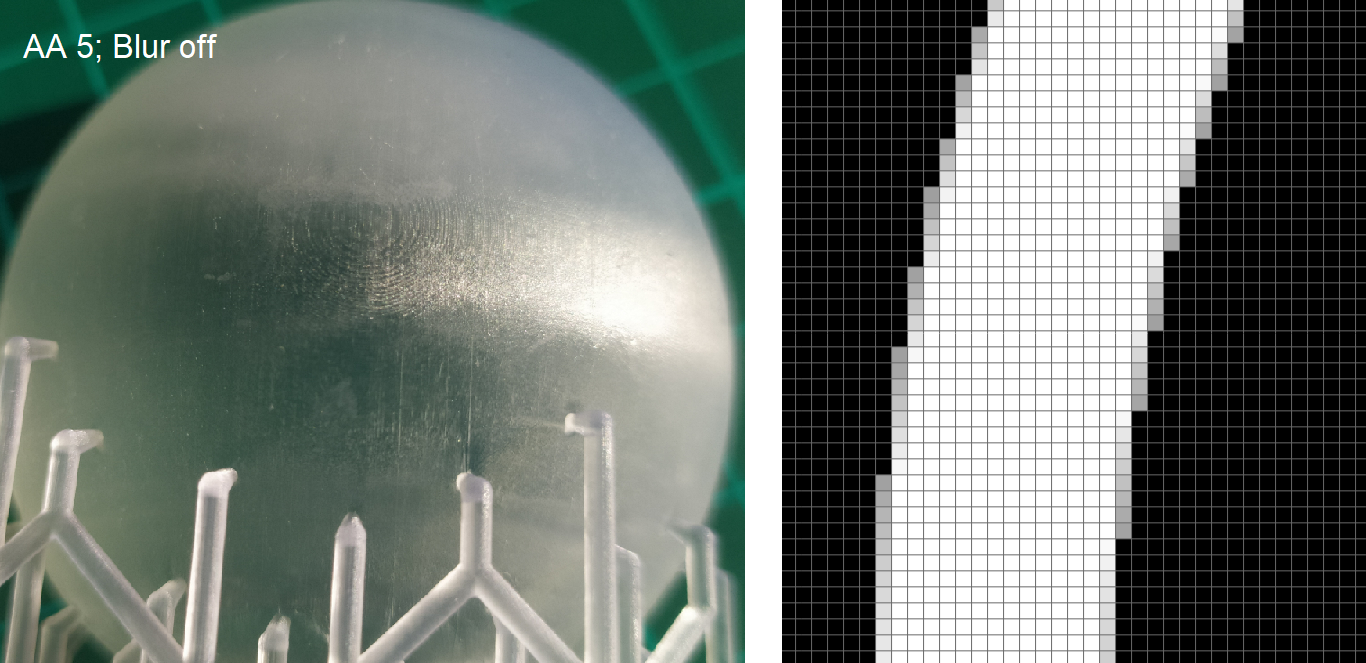
Image: Anti-aliasing switched on at level 5 and blur switched off (AA5;B0). Left the 3D-printed part, right the cross section of a sliced layer in the middle of the part.
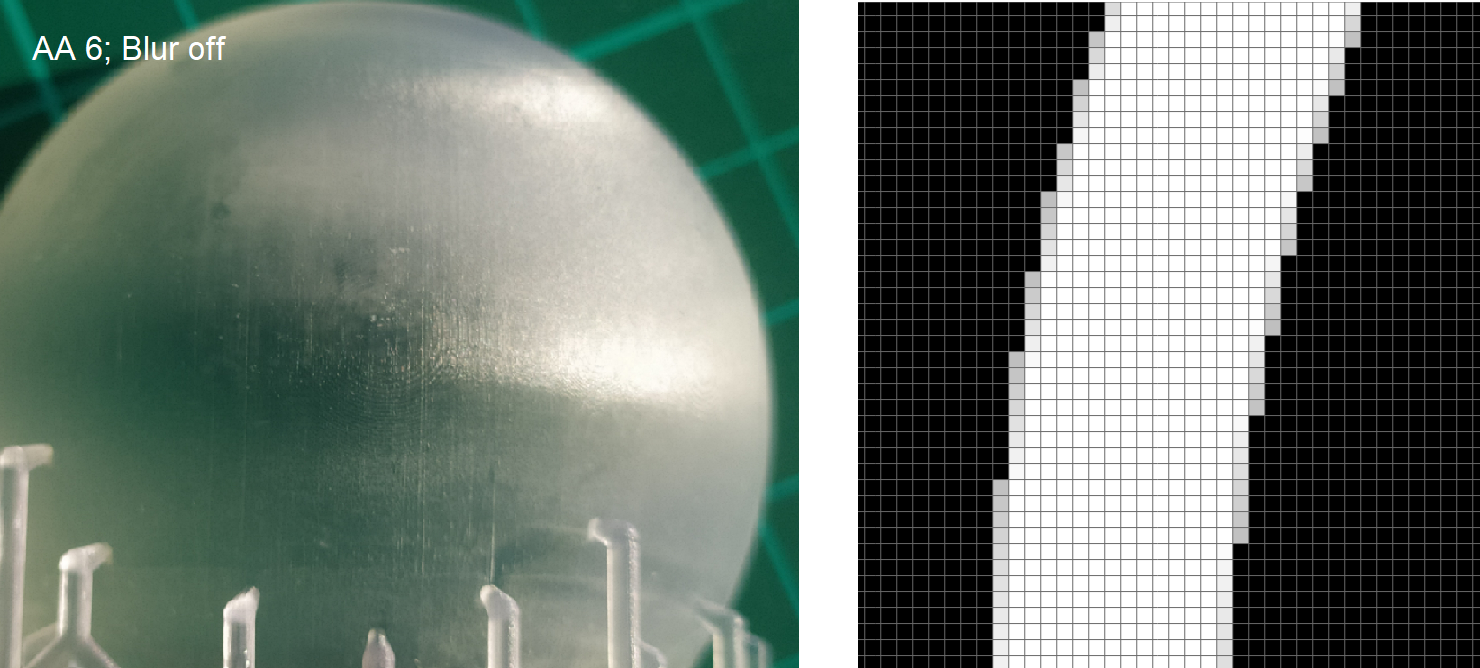
Image: Anti-aliasing switched on at level 6 and blur switched off (AA6;B0). Left the 3D-printed part, right the cross section of a sliced layer in the middle of the part.
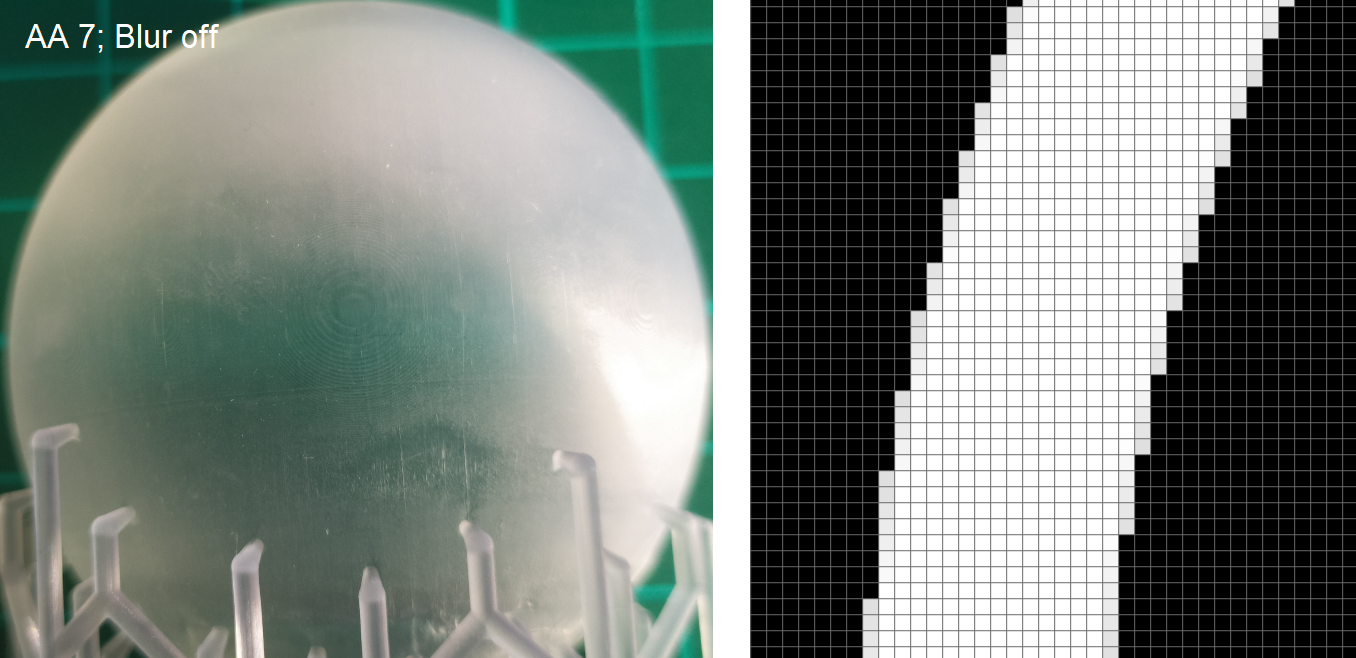
Image: Anti-aliasing switched on at level 7 and blur switched off (AA7;B0). Left the 3D-printed part, right the cross section of a sliced layer in the middle of the part.
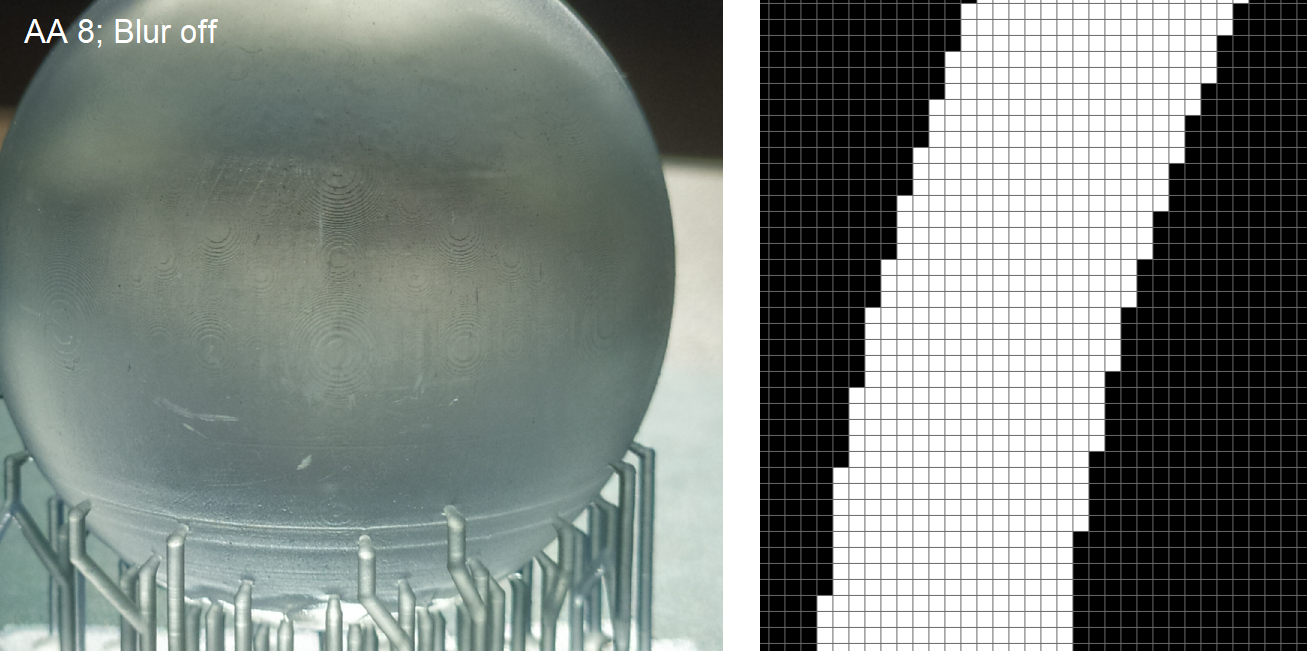
Image: Anti-aliasing at max level (level 8) and blur switched off (AA8;B0). Left the 3D-printed part, right the cross section of a sliced layer in the middle of the part.
Conclusion on Anti-Aliasing (Greyscale)
Unfortunately it is very difficult to capture pixeks in a picture and compare all parts under similar conditions. When looking at the parts next to each other, on all parts there are pixels visible on the surface when Anti-Aliasing is enabled and blur is switched off. Looking at the pixels on the upper side of the part, Anti-Aliasing level 2 and 3 perform best and Anti-Aliasing levels 7, 8 and switched off, perform worst. Let’s see what happens if we combine this with blur.
Blur in practice with resin 3D-printing
Next to Anti-Aliasing (or grayscale), the blur option is available in most resin based 3D-printers. Anti-Aliasing influences the outer pixel layer around the object and creates different levels of gray pixels. The Blur function will work together with Anti-Aliasing and will influence how many outer pixels get a grayscale. In this test, blur level 2 is tested on top of different levels of Anti-Aliasing. Blur level 2 is the lowest available blur level at the time of writing. Higher levels tend to render inwards as well and are not tested.
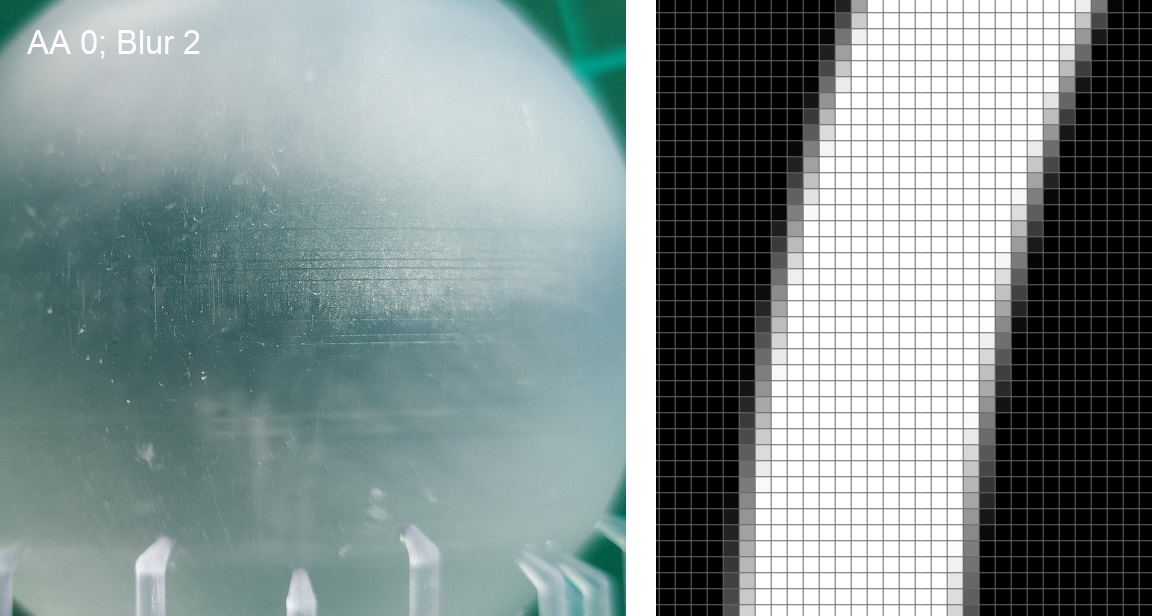
Image: Anti-aliasing at lowest level (level 0) and blur at level 2 (AA0;B2). Left the 3D-printed part, right the cross section of a sliced layer in the middle of the part.
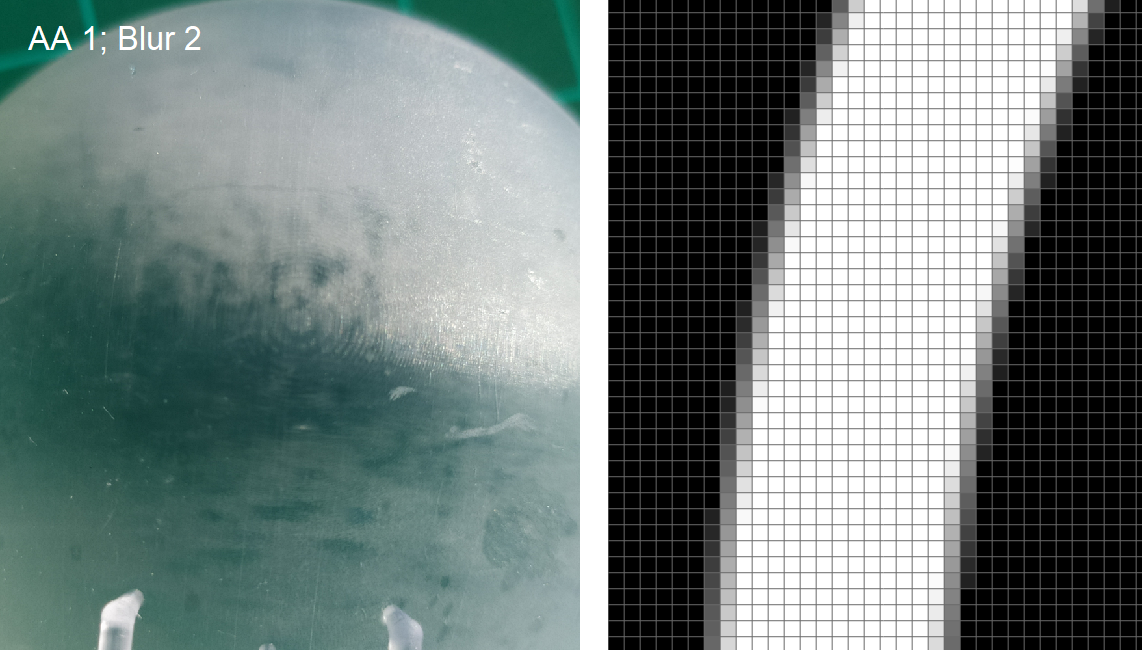
Image: Anti-aliasing at level 1 and blur at level 2 (AA1;B2). Left the 3D-printed part, right the cross section of a sliced layer in the middle of the part.
![]()
Image: Anti-aliasing at level 2 and blur at level 2 (AA2;B2). Left the 3D-printed part, right the cross section of a sliced layer in the middle of the part.
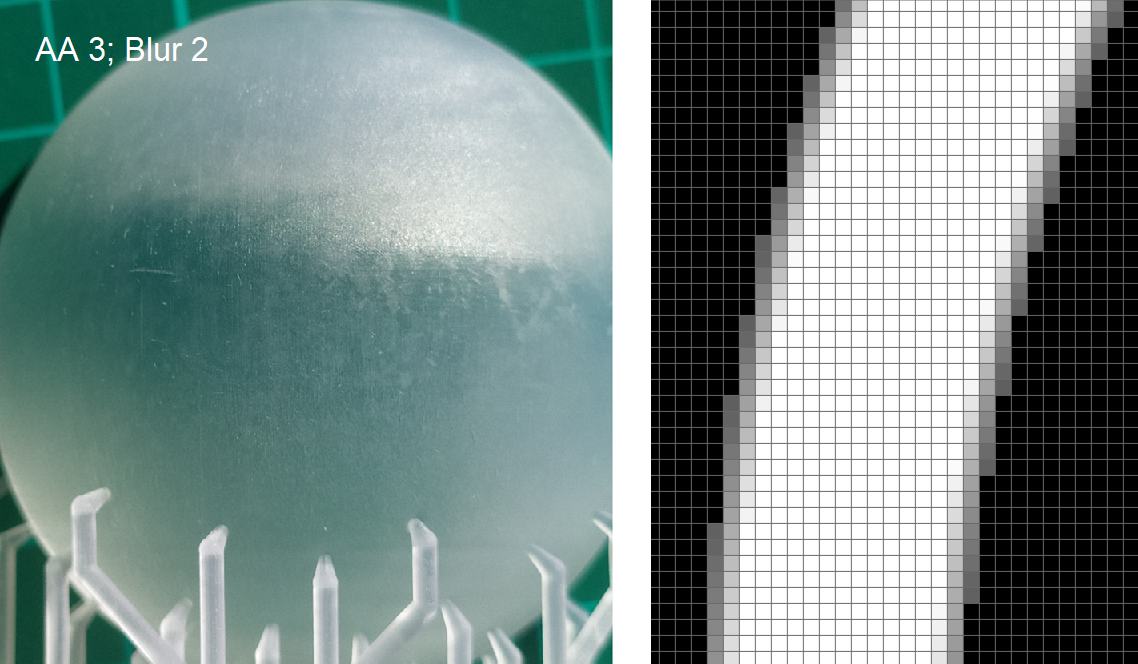
Image: Anti-aliasing at level 3 and blur at level 2 (AA3;B2). Left the 3D-printed part, right the cross section of a sliced layer in the middle of the part.
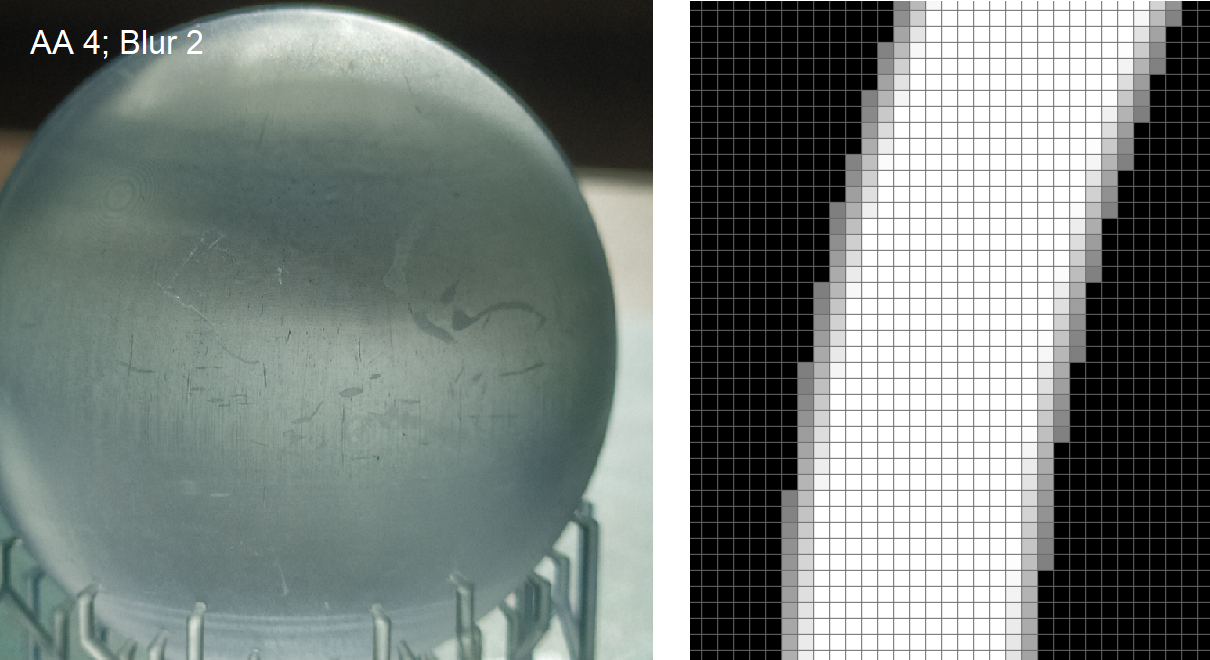
Image: Anti-aliasing at level 4 and blur at level 2 (AA4;B2). Left the 3D-printed part, right the cross section of a sliced layer in the middle of the part.
Conclusion on Anti-Aliasing (AA) and Blur
AA and Blur can help reduce the pixilation of resin 3D-printed parts. It should be investigated per resin and application what the best setting is. The best accuracy is obtained by switching Anti-Aliasing (AA) and blur off, but pixels will be visible when the resin is dialed in properly.
If it is needed to reduce the pixilation, it is always good to stay at a Grey level between 0 and 4 and either switch blur off, or use at maximum level 2 blur. The surface will have less defined pixels when using Anti-Aliasing and blur, and some other minor defects like stripes of a fuzzy surface can appear.
Looking at our results, were we used Liqcreate Clear Impact resin on an Elegoo Mars 3 and Chitubox as a slicer. We found that the best results were with an Anti-Aliasing (Greyscale) level of 3 in combination with Blur level 2. Some minor detailed (at pixel level) are washed out together with the pixels. If this is acceptable for your application, then it is an option to work with Anti-Aliasing and Blur settings.
We hope this was an interesting and educational read, if you have any questions, comments or ideas, send us an e-mail at info@liqcreate.com
Support
Do you need any help with 3D printing our SLA, DLP or LCD resins? We can help you! Just look for the question you have below. If you can’t find it, let us know by contacting us!