Next to Photon workshop, Lychee Slicer and the Prusa Slicer, Chitubox slicer is one of the mostly used 3D-printing programs to prepare a print job. Most entry and middle-level resin based 3D-printers can be operated through Chitubox and after a few upgrades, even its free version has some powerful tools.
What is the best slicer for resin 3D-printing?
It is difficult to give a straight answer to this question, as this is dependent on the type of 3D-printer you are using and your actual requirements for the software. If you don’t want to edit anything to the file, then all of the above mentioned slicers can work fine. For the entry level machines in our lab, it is easy to use Chitubox as a lot of printers can be linked to this slicer. More detailed comparisons can be found in the articles from all3dp.com, 3dsourced, 3dprinterly and 3DSolved.
How can I change settings in Chitubox?
Changing settings in Chitubox is easy when you know what each setting does. In this part we explain how to change the Chitubox settings, but first you will have to update your Chitubox to the latest version and add your 3D-printer. You can add your resin 3D-printer in Chitubox by clicking on “settings”. A new window opens and on the left top side there is an icon with a +. Click on this and choose the brand and model. Most of the printer related settings are correct if you want to print good parts. For extremely high accuracy needs, it can benefit to experiment with settings in the machine or advanced section. Otherwise you can leave them and go the “print” section
Chitubox settings explained and how to adjust them for Liqcreate resins?
The main settings for Chitubox are listed in the “print” section. Some advanced options like Anti-aliasing, blur and tolerance compensation can be found in the “advanced” section. Most of the time we disable all the advanced options, as these are often still in beta and do not work perfectly. In this article you can find how to read the settings listed and use them in Chitubox.
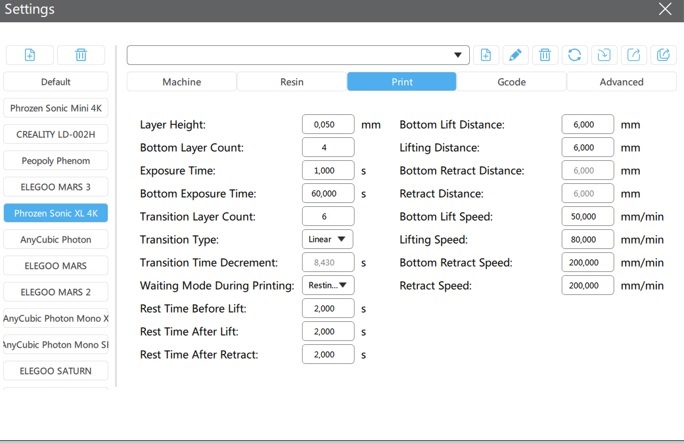
Settings in Chitubox V1.9. with the rest time and transition layer improvements
Layer height
This is the height of each layer in millimeters. Sometimes settings are given in micrometers / microns / µm. If you have this value in micrometers, then divide it by factor 1000 and your value is in millimeters. The smaller number you fill in here, the thinner the layers. This will give a bit more detail but also increases print time significantly. For most applications 0,1mm is accurate enough. For some detailed dental applications we would advise 0,05mm layer height. Super accurate jewelry applications sometimes require a layer thickness of around 0,025mm.
Bottom layer count
This is the amount of bottom or base layers in Chitubox. These layers are exposed for a longer time to get a good adhesion to the build plate. Often a value between 1 and 5 is enough.
Bottom exposure time
This is the increased exposure time of the bottom / base layers. The bottom layers are often exposed factor 5-20 compared to the regular layers. The better your build plate is calibrated, the lower bottom exposure time you would need. This value is always given in the settings list.
Transition layer count
This new feature in Chitubox helps the regular layers attach to the bottom layers. What happens is that if the difference between bottom layer exposure and regular layer exposure is too big, the regular layers do not attach properly to the bottom layers. To prevent this, you can add a number of transition layers to gradually go from the bottom layers to the regular layers. We often use 1-2 bottom layers and then 6 transition layers.
Transition type
We have not experimented much with this. Linear basically always works for us.
Transition time decrement
This value is automatically calculated by Chitubox. It is basically the interval of seconds that the transition layers change per layer.
Waiting mode during printing
This new setting in Chitubox helps increase surface quality in high demanding applications. Always set it to “resting time” and not to “light off delay”. Light off delay was always a bit vague setting as it waited on top of the lift and the value for most printers should be higher than the combined exposure and moving time. With the option “resting time” you can actually set a time in seconds that it will wait at each step. For flexible resins, dental materials and very demanding applications, a rest time of 2,0 seconds in each step is advised.
Bottom lift distance
This is the distance in millimeters of the bottom layers. For rigid resins 6,0 mm is sufficient. For soft and flexible materials 10 millimeters is advised.
Lifting distance
Distance in millimeters of the regular layers. For rigid resins 6,0 mm is sufficient. For soft and flexible materials 10 millimeters is advised.
Bottom retract distance & retract distance
This setting is automatically calculated and you can not change it in Chitubox. It is the same value as the lift distance.
Bottom lift speed
The bottom lift speed is the speed the build plate moves up in mm / minute for the bottom layers only. For regular materials 50 mm/minute is sufficient. If you happen to have adhesion issues, reducing this value might help.
Lifting speed
The speed in mm/minute the build plate moves up for the regular layers. Usually a lift speed of 90 mm/minute works fine. For rigid resins and parts that do not require high accuracy you can even move up. For soft and flexible resins it is advised to reduce it to maximum 60mm/minute in Chitubox.
Bottom retract speed
The bottom retract speed is the speed the build plate down up in mm / minute for the bottom layers only. For regular materials 100 mm/minute is sufficient. If you happen to have adhesion issues, reducing this value might help.
Retract speed
The speed in mm/minute the build plate moves down for the regular layers. Usually a retract speed of 150 mm/minute works fine. For rigid resins and parts that do not require high accuracy you can even move up. For soft and flexible resins it is advised to reduce it to maximum 60mm/minute in Chitubox.
Help with Chitubox settings
If you need help with Chitubox settings with Liqcreate resins, contact us or send an e-mail to info@liqcreate.com and our technical team will reach out to help.
Support
Do you need any help with 3D printing our SLA, DLP or LCD resins? We can help you! Just look for the question you have below. If you can’t find it, let us know by contacting us!