it is possible to reduce the power of the LED’s in almost all professional 3D-printers and also in some new entry-level MSLA / LCD 3D-printers. We sometimes get questions why we would not always advise to print at 100% UV LED power. In this article we explain the reasons and how to use this setting properly. 3D-printing parameters of a lot of printers, including % UV power settings are available in this link.
Reasons to reduce the % UV power of a resin 3D-printer explained.
The technology to reduce the % of UV power inside a resin based 3D-printer dates back to the origin of DLP 3D-printers. 5 years ago and before, the stability of the LED’s was not too great over its lifetime. With full-time production you would already see LED power degradation after roughly a year. To be able to cover this, manufacturers would print at ±60% LED capacity. If degradation sets in, the LED’s could always be re-calibrated back to the required power. If printing at 100% already, this would not be possible anymore after LED degradation and longer exposure times should be needed. Nowadays with improved LED’s and better cooling, this issue is mostly solved.
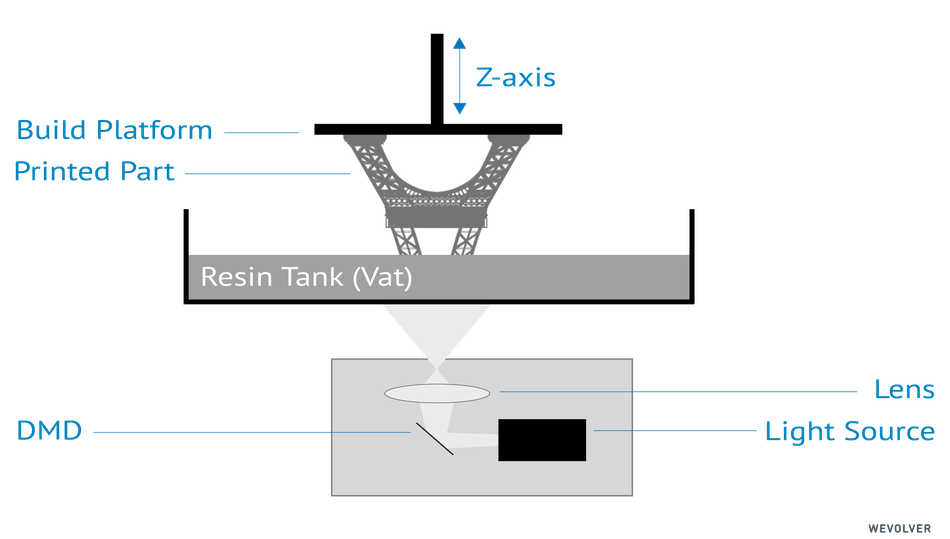
Image by Wewolver: schematic representation of a DLP 3D-printer.
Reduce % UV power of a resin 3D-printer to increase print quality.
There are other benefits in reducing the % UV power of a resin based printer. At lower % UV power, you would need a longer exposure time to get the desired cured layer thickness for all resins. This improves the process window and accuracy of a printed part. Additionally, for transparent materials like Liqcreate Premium Tough, some high power machines tend to give through-cure or bleeding in 3D-printed parts. By reducing the % UV power in these machines, a larger process window is created and through-cure or bleeding is minimized. For slower resins and high-speed prints, it is usually advised to print at high % UV power.
Why does a lower % UV power increase accuracy?
A lower percentage of UV power gives a larger working area. A good calibrated printer can still vary in light output by +-5% and some minor resin deviations can be covered by this as well. This is easiest to explain when measuring the reactivity of a resin. Usually we measure it by exposing resin to different amounts of light power (in mW/cm2). When we expose resin with for 2; 6 ; 8; 12; 20 and 40 mW/cm2 and measure the thickness of the cured resin, it can look somewhat like this:

At +- 6mW/cm2 this resin starts to polymerize, first rapidly and at higher layer thickness in a slower pace. If we set the light-source in the printer at 8mW/cm2 power, this means that we have to divide the amount of power on the x-axis by 8 to get to an amount of seconds of exposure. When we do that for this resin it looks like this.
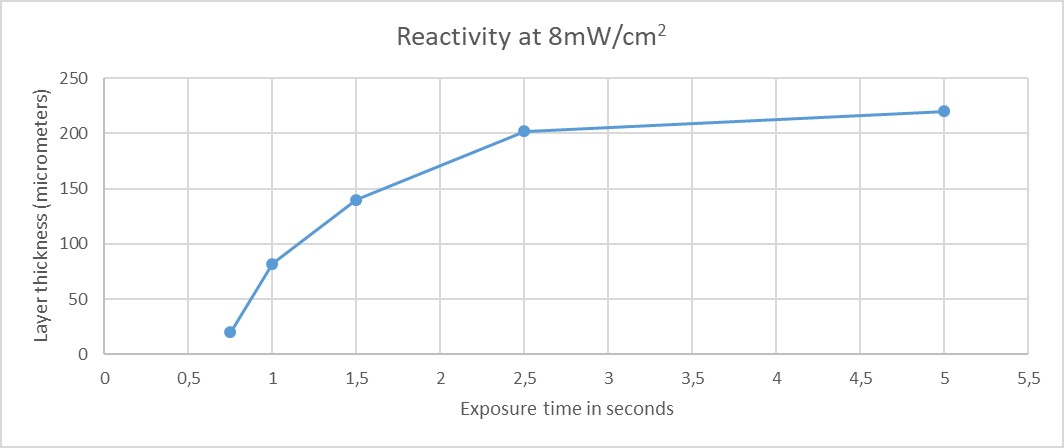
Meaning that after 0,25 seconds the resin starts to cure. When printing at 0,05mm layer thickness you want to over-cure the layers a bit and print with the time needed to cure 0,07mm layers. In this case it would be close to 0.95 seconds. With slight deviations like printing at 0.9 seconds, you would cure just 0,055mm layer or on the plus side with deviations at 1,0 seconds exposure time you would cure 0,082 mm layers. This means a small difference in exposure time, resin reactivity or light output homogeneity of the printer results in a big difference on how the resin reacts.
When we would lower the % UV power to 50% this would mean we would print at 4mW/cm2. This would immediately double our process window and also increase the printing time as can be seen in the graph below.
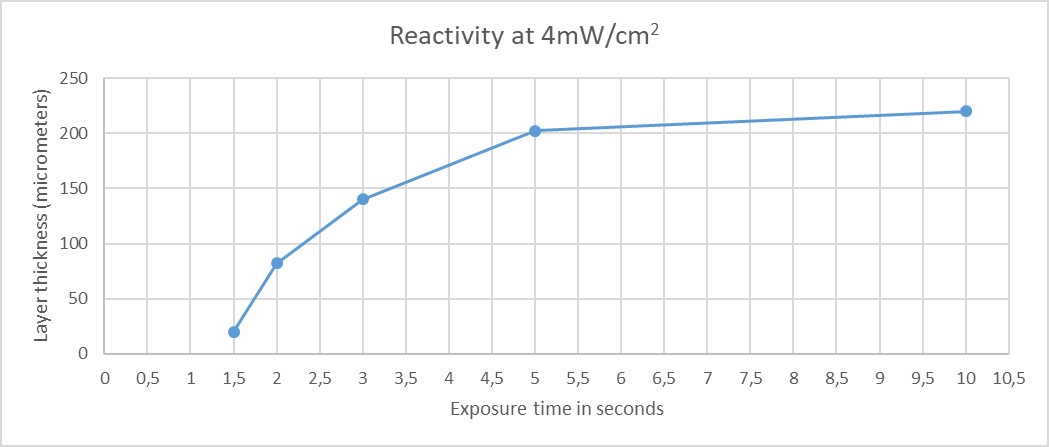
The exposure time needed to cure 0,07mm layer thickness (and actually print at 0,05mm layers) is in this case 1,9 seconds. Deviations to 1,95 seconds would mean 0,075 micron layer thickness and deviations to 1,85 seconds would mean 0,065mm layer thickness. So differences in output or minor differences in the resin are easily covered. Doubling the process window will increase accuracy as less under-cure and over-cured spots are present.
3D-printing resin settings of a lot of printers are already prepared and available on our website, including the % UV power in for some printers. Hope this was an interesting and educational read. If you have any questions about changing the % UV power or other resin related questions, feel free to reach out to us at info@liqcreate.com
Support
Do you need any help with 3D printing our SLA, DLP or LCD resins? We can help you! Just look for the question you have below. If you can’t find it, let us know by contacting us!