Early 2023 we wrote chapter 1 of this article about the new function in Chitubox V1.9.4 and the shrinkage (offset-compensation). We liked the setting, but it seemed incomplete compared to the more professional printers were you have a scaling factor and an off-set to reach extreme high accuracy. I would almost expect that Chitubox read the article as in this latest update we see that Chitubox V1.9.5 has all these options. Read about it in Chapter 2 on the bottom of this article.
Chapter 1: Chitubox V1.9.4 – shrinkage compensation
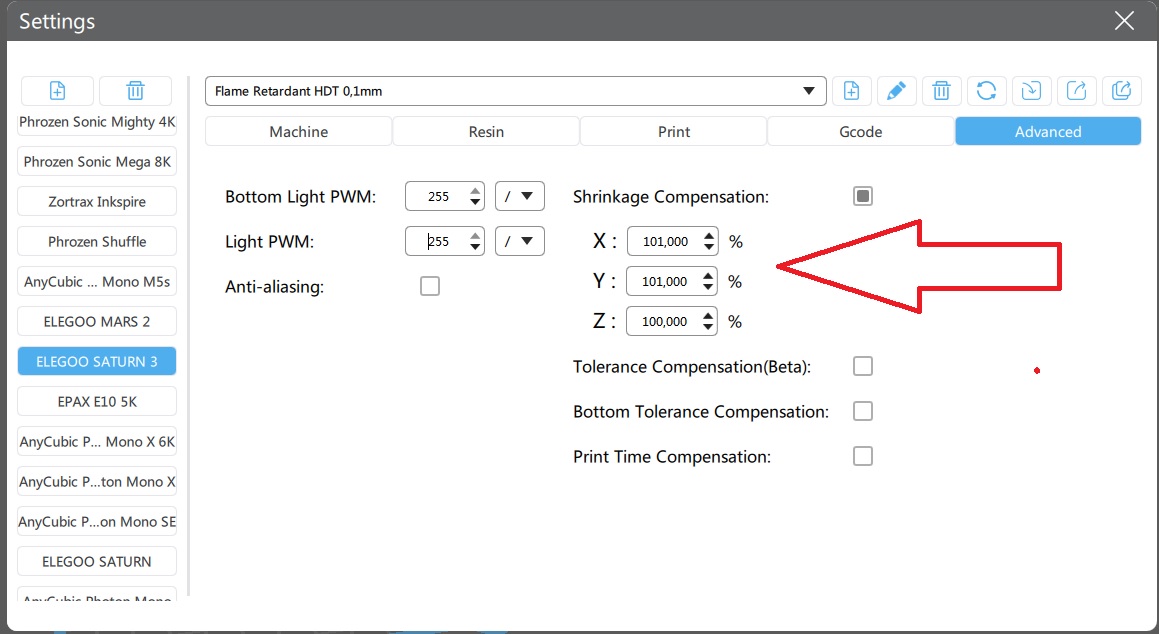
In the lastest version of Chitubox (V1.9.4) there are extra options for shrinkage compensation for resins. this is a long awaited update to increase accuracy of resin 3D-printed parts on entry-level MSLA printers. For some machines it is available, if you scroll to the advanced section there is “tolerance compensation” and “bottom tolerance compensation” available.
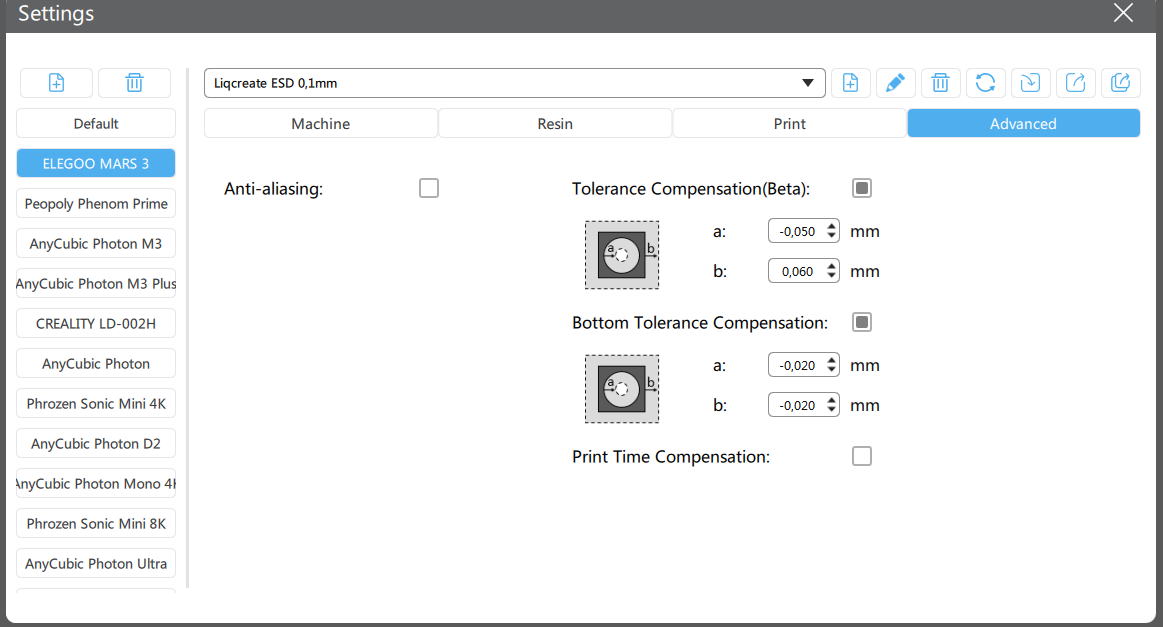
This looks like a simple offset to each slice of the part. Meaning that it will add or reduce a set amount of millimeters from the part. In this article we are testing how this works and how to set it for the new Liqcreate ESD resin on the Elegoo Mars 3 and Anycubic Photon D2.
Without noticing, the bottom tolerance compensation is not in beta anymore, so it must be there for a while. After testing, what it does is the following. If you put a negative number in there, it will make the exposure area of the bottom layers a set amount of millimeters smaller. Usually the bottom layers are always over-cured and bigger (so called elephant foot). When setting it to -0.3mm for a and same for b, you will get a part that looks like the image below. The original part is perfectly square. So it looks like the bottom layers and transition layers are smaller.
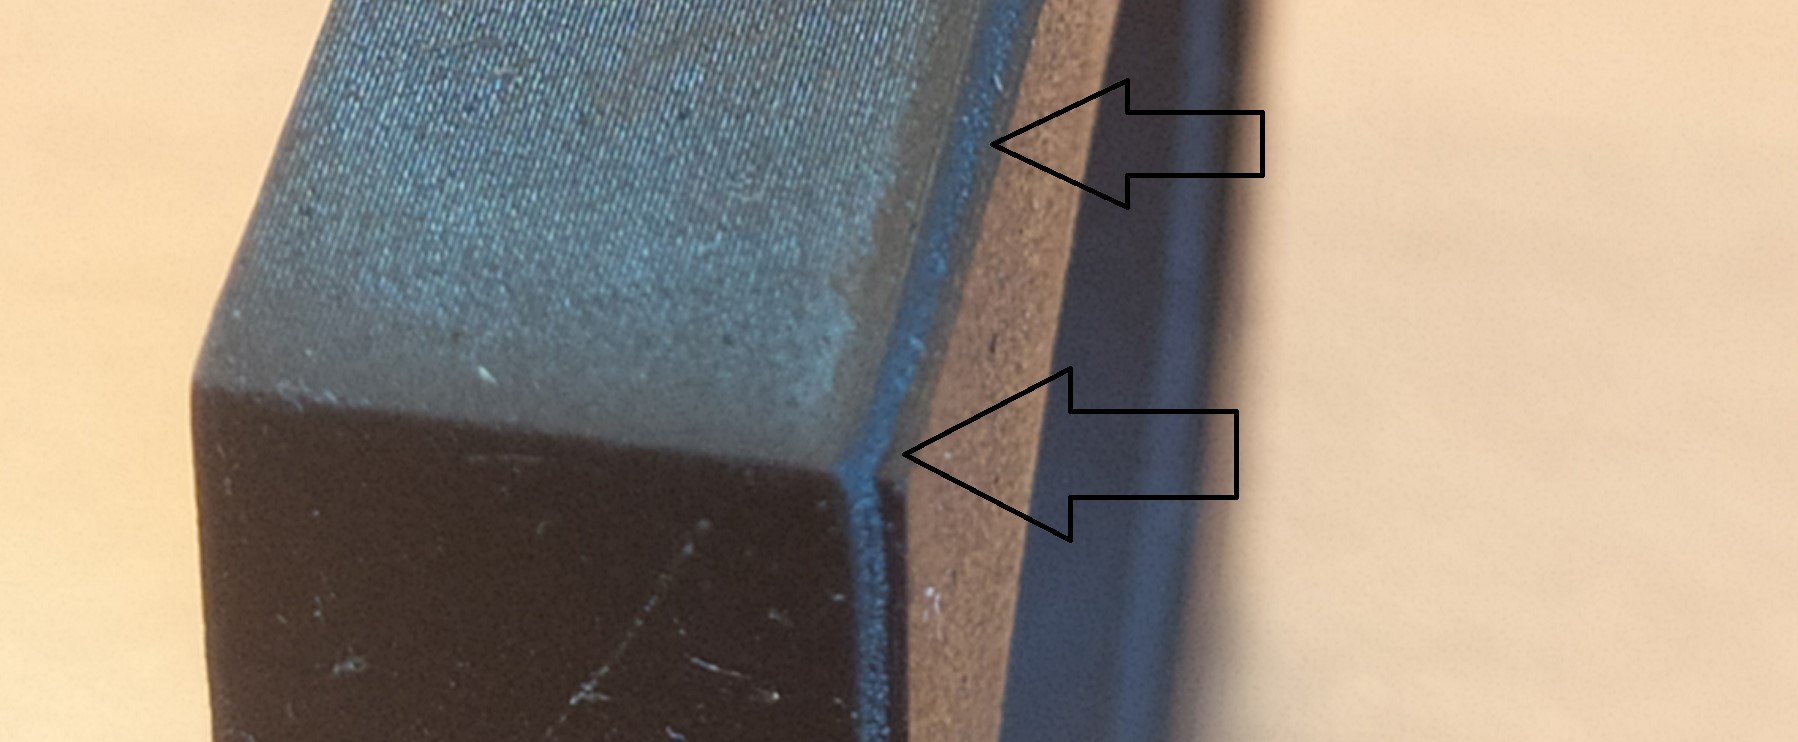 Image: print by Liqcreate with Liqcreate ESD resin and a negative bottom tolerance compensation
For a first test this is way too extreme, but it visualizes perfectly what the setting does. Setting it to -0.02mm for a and same for b works well on most parts to reduce the thicker first layers.
In the professional printers, you have two values to compensate for shrinkage, one is a percentage and one is an off-set. The percentage (scaling) will make the part x% bigger. So you actually print a slightly bigger part and if it shrinks during printing, your dimensions will be spot on. But this factor alone does not cover the complete compensation. What you will see is that thin parts have a bigger percentage shrinkage compared to thick parts. Meaning if you compensate percentage of shrinkage on thin parts, it will be too much compensated for thick parts, and vice-versa. To add one other factor, offset does fix this in professional printers. This setting will add or delete a set amount of microns off the exposed model, regardless of the cross-section of the model. To combine both parameters you can actually compensate at a very detailed level.
In resin 3D-printing, a part will shrink during polymerization when the liquid cures into a solid. it makes totally sense that this is a percentage of shrinkage as thicker parts usually shrink more than small parts. To compensate a bit extra, next to the percentage they an off-set to compensate in more details. See how it works in practice in this article.
Support
Do you need any help with 3D printing our SLA, DLP or LCD resins? We can help you! Just look for the question you have below. If you can’t find it, let us know by contacting us!
Technical →
Now Chitubox has one of the two features in there, just the off-set. Let’s see how it works in practice. We selected to test methods for this. The one from chitubox is focused on blocks and holes (b compensation is for outside compensation, a compensation is for the inside of closed parts, like these holes below:
Before optimizing for shrinkage, make sure your exposure settings are spot-on. If you over- or under-cure parts, you are optimizing for other things then for shrinkage. Alternatively, we used our standard block calibration method.
Measuring shrinkage and compensating for it on the Elegoo Mars 3.
In the first test, we measured the parts without any compensation, one part on supports and one part without supports and averaged all the values. Is can be found that we were between 117 and 192 microns too short on the outside of the parts and that the holes were 82 to 185 microns too narrow. After compensation, the hole diameter looked worse as we made a mistake and did not put in a negative value. On the other hand, the outside of the blocks were quite spot-on and in the average of the 40mm blocks were just 22.5 microns off compared to the input value.
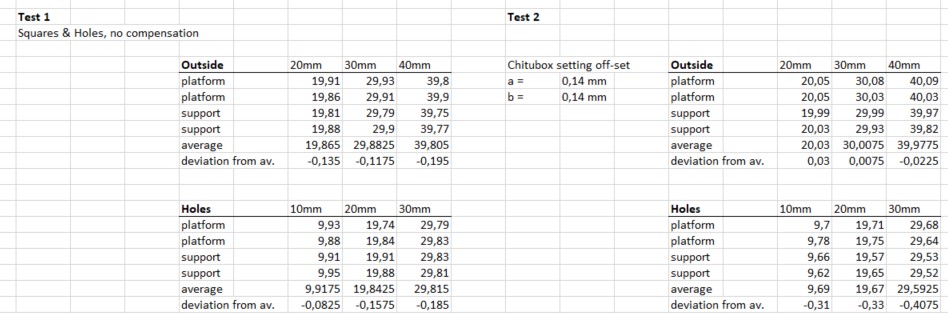
After fixing our mistake and making the outside of the parts slightly smaller (10 microns lower offset). You can see the values in test 3. The outside of the blocks in average, were maximal 47.5 microns off and the inside diameter was now too big with a plus of around 185 micron. Somehow it seems that these a and b values interfere.
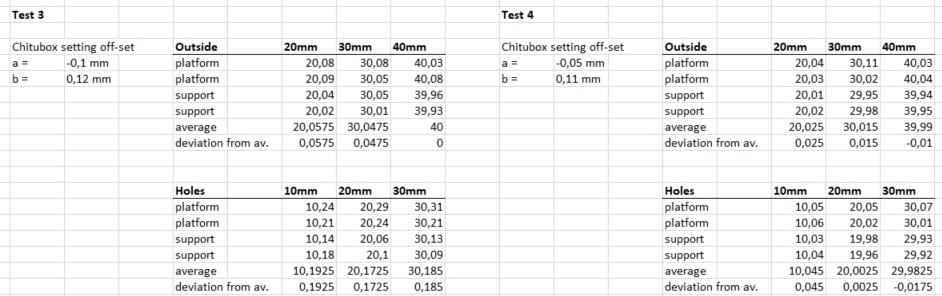 Test 4 is our final test with an offset for a = -0.05mm and b = +0.11mm. the average deviation on the outside of the part was 25 micron and on the inside of the part 45 micron. Quite close to the 35 micron pixel size of the Mars 3. So it seems like this value and method works well and within these part sizes, a percentage of shrinkage setting is not needed.
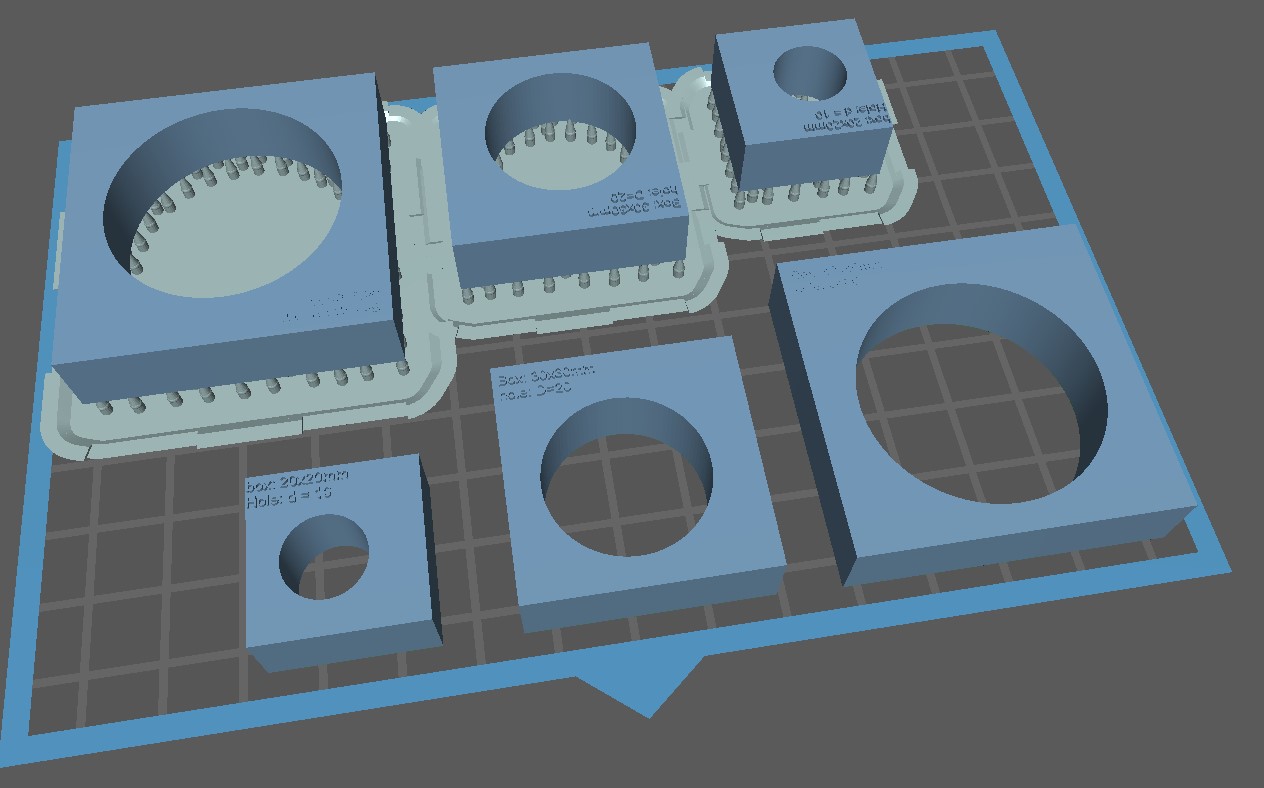
Now we are using our regular part to test this
When printing the blocks, we can’t measure the “a” value for off-set in the chitubox slicer. When printing this without any compensation, the results look like this:
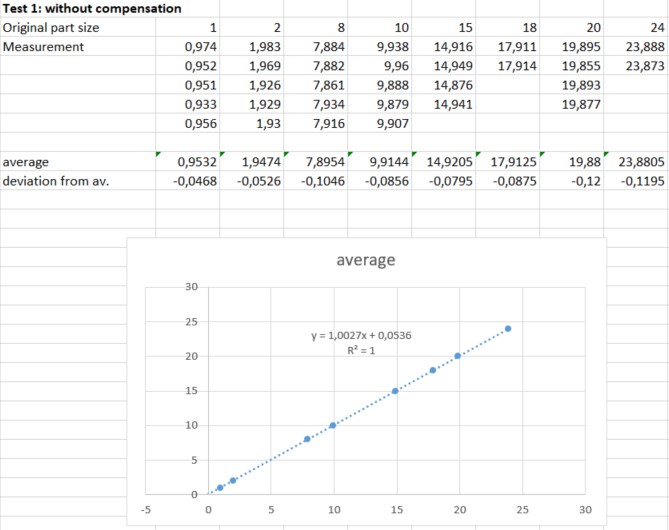
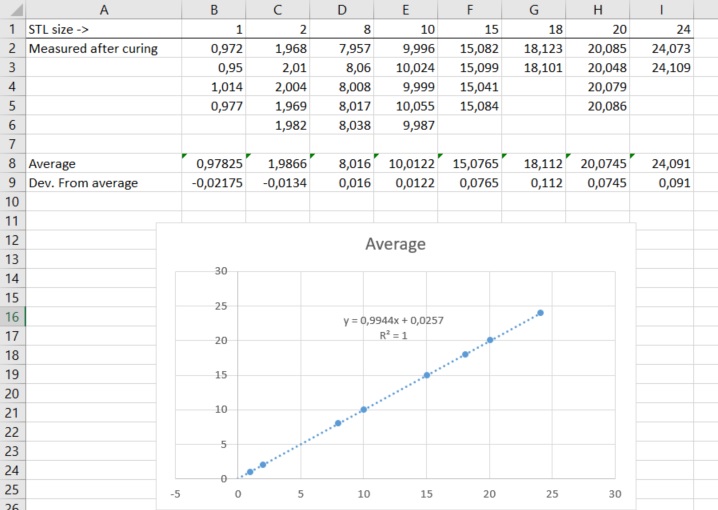
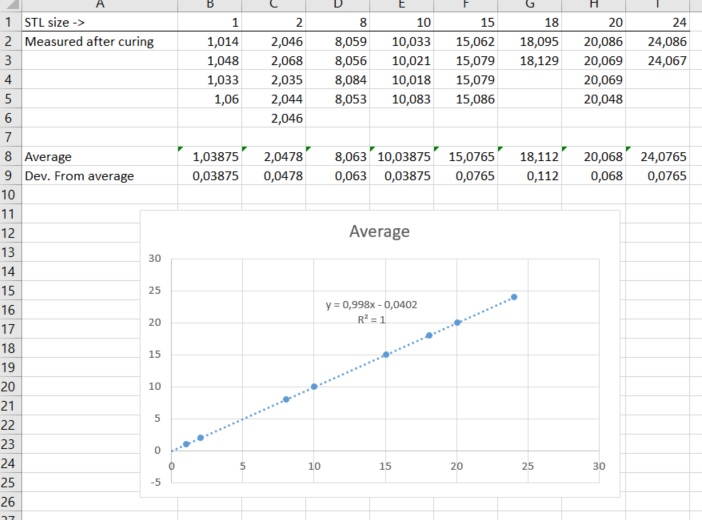
Here you see that small parts shrink less compared to larger parts, which is expected for resin 3D-printing. let’s see if we can optimize this with ‘just’ an off-set value. On average the blocks from 1-24mm thickness are 87 microns too small. When adding 0,1mm in b off-set, the following happens:
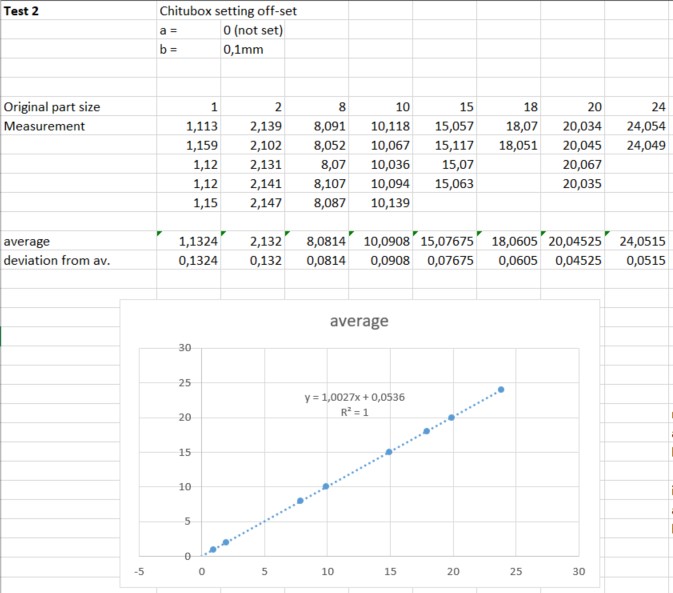
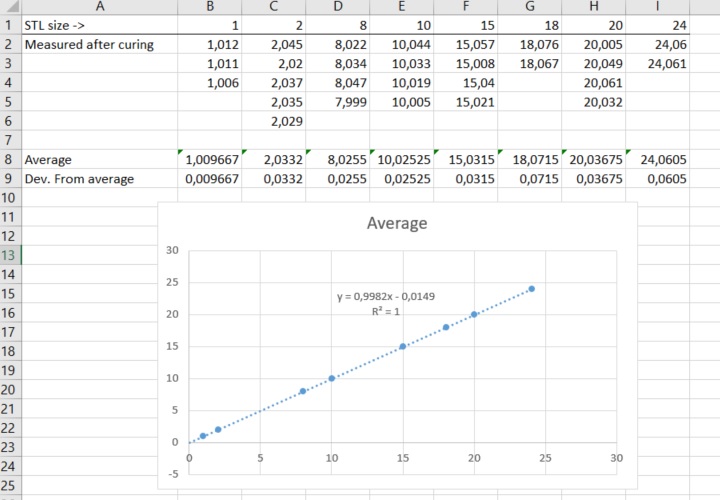
What we see here is that we over-compensated. And the most over-compensation is seen in the thinner parts, while the thicker parts (8-24 mm) are almost acceptable. After this test, we noticed that from the previous test that somehow the a and b values interfere. So we placed -0.05mm at a and reduced the b value to +0.06mm. after printing, washing & post-curing the measurements were better:
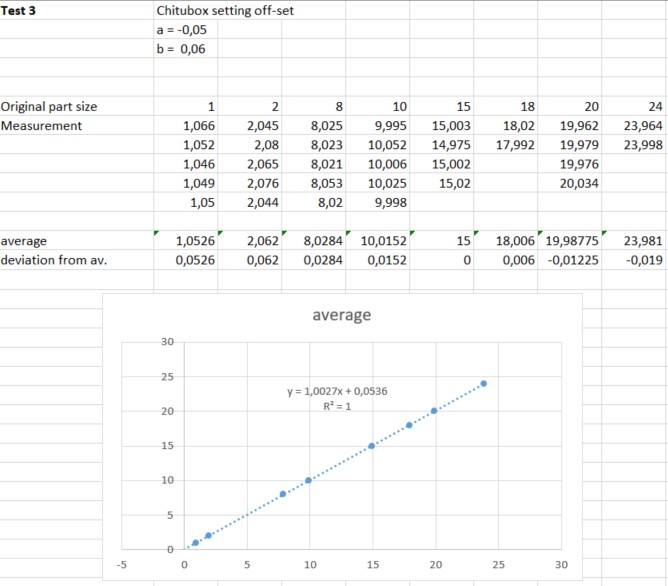
The results are quite okay from this test. What you see is that the thin parts are slightly too big while the bigger parts are slightly too small. This is exactly what happens when a scaling in percentage is not applied. We would leave it like this, as if you change it, either the ends of the spectrum will be off by too much. Of if you print only big and small parts, you can choose to optimize on one end of the spectrum.
Conclusion of chitubox tolerance compensation in V1.9.4 (old version)
As seen in the results above, the outcome is not perfect as we are missing a scaling factor in combination with the off-set. That said, the results are much better compared to no optimization. It should be noted that two methods yield two different results. And in the method that uses also small parts, there is a deviation between the extremely thin walls of 1mm and the thicker walls of 24mm. if you mainly print large parts, you can choose to have the optimization for large parts with the side-note that your small features will be too thick.
Chapter 2: Chitubox V1.9.5 – shrinkage compensation
In Chitubox V1.9.5 you have extra options. next to the off-set in milimeters you can also set a percentage as shrinkage compensation. This is quite similar to the settings you have for professional printers. With our a new resin on the Saturn 3 we tested the options. It was expected that Flame Retardant HDT resin had a higher shrinkage compared to our previous materials. That is why we started with a 1% resin shrinkage compensation (set shrinkage scaling to 101%).
After printing, washing and post-curing, we measured the thickness of various blocks. in the results below you can see that the shrinkage compensation alone does not work properly. as the percentage over a 1mm thick area is less in actual value compared to a thicker part. This means that a 1 and 2 mm block is still too small, while from 8 – 24 mm blocks are too large.
in the next step we reduce the shrinkage factor to 100,8% and add an off-set of 0,03mm. you can find the offset also in the advance setting. check the box that says -tolerance compensation-. and fill 0,03mm in the tolerance field at section b.
After printing with resin shrinkage compensation and measuring again, these are the results.
Now the average thickness is too large. what we forgot is that the off-set counts in 2-ways. meaning that of the block, the left side had an additional 0,03mm and the right side too. resulting in a total addition of 0,06mm. Also the results show that there is still a difference between thick and thin parts. Thicker parts have larger deviations from average compared to thin parts. This is an indication that the shrinkage factor is too high. Next test, XY shrinkage factor of 100,7% and offset of 0,02mm. here are the results:
Now we are getting quite close for both the thin parts and thick parts. Average deviation accross the 1-24 mm thick parts is 37 microns. Since all values are still slightly higher compared to the original file, it is possible to fine-tune a little bit more. although we are nearly there. Last test is with 100,65% scaling and 0,015mm offset. results below:
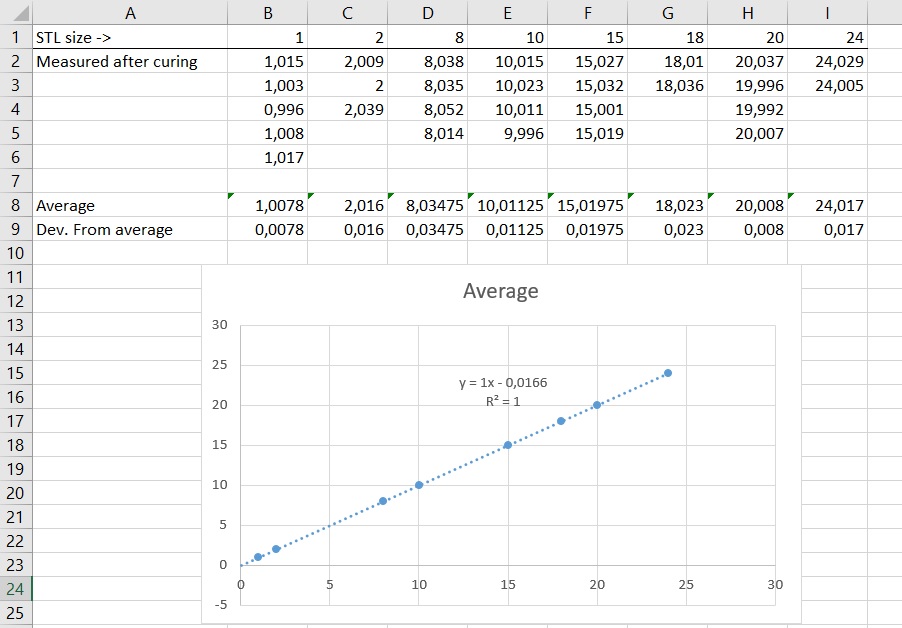
With an average deviation of 0,017mm and maximum deviation at 8mm thickness averaged at 34 micrometer, these settings are very good.
Conclusion of Chitubox V1.9.5 resin shrinkage factor and off-set compensation
The difference in results is clear between chapter 1 (Chitubox V1.9.4) vs Chapter 2 (Chitubox V1.9.5). In the older version your actual parts were very depending on thickness, if they match the original file. For Chitubox V1.9.5 with the extra resin shrinkage compensation percentage in combination with the tolerance compensation (off-set), it is possible to get very close to the STL file regardless of the thickness of the part.