During resin 3D-printing, the liquid photopolymers polymerize and turn into a solid. If the shrinkage is big, it will ruin the dimensional accuracy of your end-part. So you want to limit the amount of shrinkage as much as possible. This could be done by first try to eliminate the most shrinkage by smart material choice. We wrote an article about that earlier. Last thing to do is to optimize your shrinkage and off-set settings in the 3D-printer to compensate of the last bit of shrinkage left. In this article we explain a super fast and accurate shrinkage compensation method.
Why is there shrinkage in 3D-printing resins?
Shrinkage of acrylates and methacrylates occurs during polymerization and is caused by the replacement of long-distance connections via Van der Waals force by strong and short covalent bonds between the carbon atoms of different monomer units. The replacement of these long-distance connections with short distance connections, multiplied over millions of bonds are responsible for the overall shrinkage in the material when it changes from a liquid to a solid plastic. This shrinkage can causes serious problems including build-up of internal stress, which results in defects formation or dimensional changes, which can be responsible for decreased mechanical properties. It is therefore important to develop and use materials with low shrinkage and control the remaining shrinkage properly.
How to compensate of shrinkage in resin 3D-printing?
As pointed out earlier, first thing to do is to start with a good low shrinkage resin. This will eliminate all kind of issues later on. Last thing you need to do is to compensate shrinkage in the 3D-printing software settings. As this is a mathematical solution averaged over the complete part, the values could be quite off when you have a high shrinkage resin. Another factor in this is the type of 3D-printer you are using. In entry-model resin 3D-printers you do not have a lot of compensation options. So often a simple percentage of shrinkage or even manually making the part x% bigger is needed. For the more professional machines you have two options that can help. It is the scaling setting and the offset value.
What do scaling and offset values do to compensate for shrinkage?
The scaling value is easiest to explain. This will make the part x% bigger. So you actually print a slightly bigger part and if it shrinks during printing, your dimensions will be spot on. But this factor alone does not cover the complete compensation. What you will see is that thin parts have a bigger percentage shrinkage compared to thick parts. Meaning if you compensate percentage of shrinkage on thin parts, it will be too much compensated for thick parts, and vice-versa. To add one other factor, offset does fix this in professional printers. This setting will add or delete a set amount of microns off the exposed model, regardless of the cross-section of the model. To combine both parameters you can actually compensate at a very detailed level. Let’s see how it works in practice in the next paragraph.
Compensating for resin shrinkage in practice.
Before diving into the shrinkage compensation, make sure the exposure time and all other print settings are fixed. The reason for this, if you are actually over-exposing of under-exposing your parts, you are compensating a completely different issue and you will never get satisfying results. So first dial in the exposure time before compensating on scaling.
As said before, shrinkage is different for different thicknesses. So what we do is to print a series of blocks. In this standard test series we print a block of 1mm, 2mm, 8mm, 10mm, 15mm, 18mm, 20mm and 24mm. After printing these blocks are washed and post-cured properly, before measuring with an accurate micrometer. In this test we optimized Strong-X resin on a professional 405nm MSLA 3D-printer. If we measure each block without compensation, these are the values:
| Aim (mm) | 1 | 2 | 8 | 10 | 15 | 18 | 20 | 24 |
| Average measurement (mm) | 0,873 | 1,882 | 7,815 | 9,788 | 14,743 | 17,749 | 19,730 | 23,63 |
| Deviation from average (mm) | -0,127 | -0,117 | -0,185 | -0,212 | -0,257 | -0,251 | -0,269 | -0,369 |
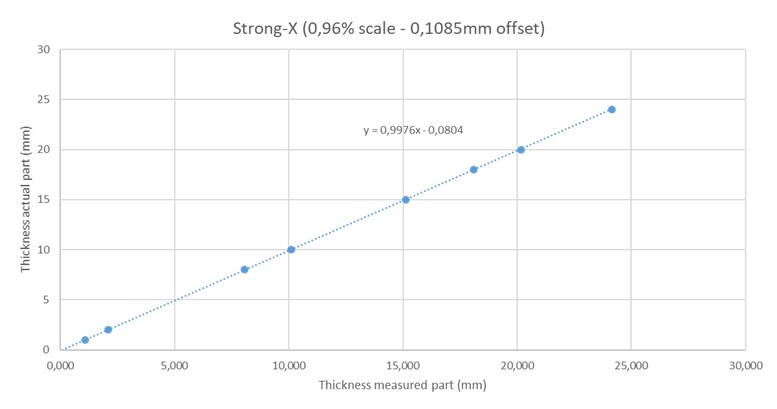
To set it in a graph with a linear trendline and linear equation you will get this.
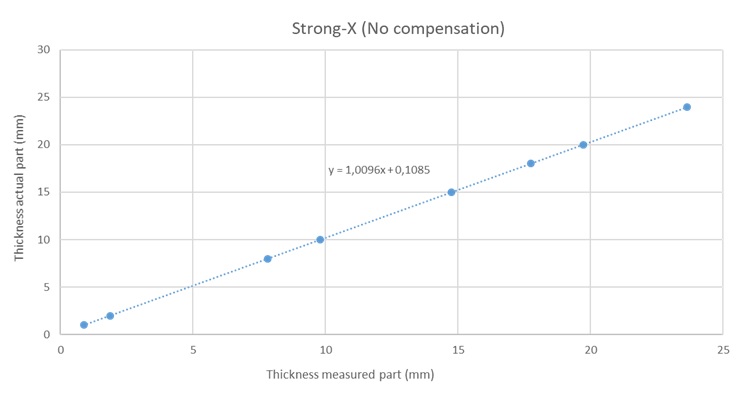
The idea is to get near a perfect linear line with equation y = x, meaning that the input value of thickness is exactly the output (measured) value at any thickness. In practice you can never reach this (will tell you later more about why) and the aim is to get as close to this as you can. So the first step to solve the equation above is to add an offset of 0,1085mm and to add a shrinkage factor of 0,96%. After setting this in the software we measure again.
| Aim (mm) | 1 | 2 | 8 | 10 | 15 | 18 | 20 | 24 |
| Average measurement (mm) | 1,099 | 2,096 | 8,073 | 10,096 | 15,112 | 18,108 | 20,156 | 24,142 |
| Deviation from average (mm) | 0,099 | 0,096 | 0,073 | 0,096 | 0,111 | 0,108 | 0,156 | 0,142 |
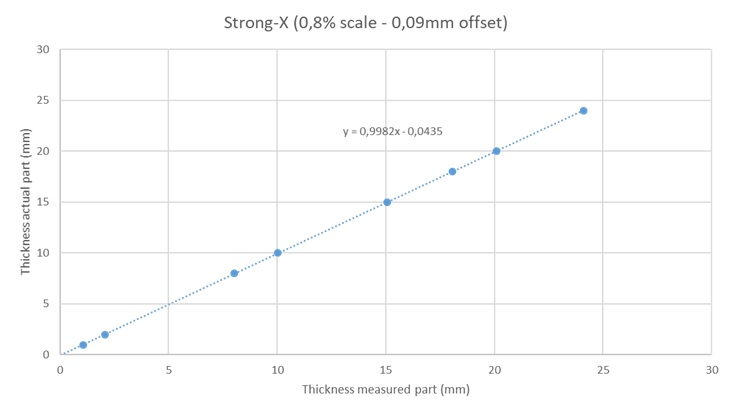
If you look at the results we made a significant over-shoot in our compensation factors. From parts too small, now the parts are over-sized. The good thing to see is that the deviation over the complete measuring window (1 – 24 mm) is quite equal. Both scaling factor and offset will be slightly dialed back to 0,8% scale and 0,09mm offset. Parts will be printed, washed, post-cured and measured again.
| Aim (mm) | 1 | 2 | 8 | 10 | 15 | 18 | 20 | 24 |
| Average measurement (mm) | 1,068 | 2,068 | 8,022 | 10,039 | 15,050 | 18,071 | 20,110 | 24,095 |
| Deviation from average (mm) | 0,068 | 0,068 | 0,022 | 0,039 | 0,050 | 0,071 | 0,110 | 0,095 |
Looking back at the results, we are getting closer to an acceptable compensation level. Still the measured values are slightly too high. A new test will be set at 0,6% scaling and 0,06mmm offset. These values are not calculated anymore, but estimated from the previous measurements. It can be seen that the parts are slightly too big and both scaling factor as offset can be slightly lowered. Parts will be printed, washed, post-cured and measured again.
| Aim (mm) | 1 | 2 | 8 | 10 | 15 | 18 | 20 | 24 |
| Average measurement (mm) | 1,001 | 2,005 | 7,951 | 9,969 | 14,932 | 17,971 | 19,972 | 23,980 |
| Deviation from average (mm) | 0,001 | 0,005 | -0,049 | -0,031 | -0,068 | -0,029 | -0,028 | -0,020 |
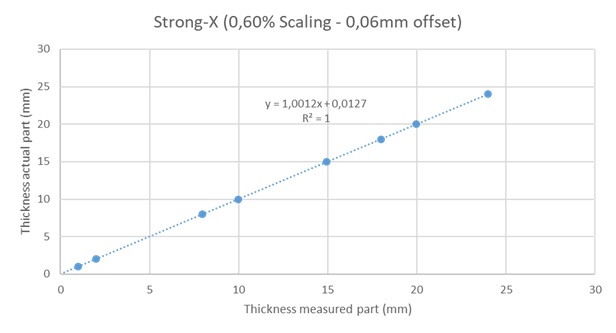
Looking at the latest results, the measured values are quite good. Over the range of 1mm – 24mm the deviation from actual STL file is minimal. You can further optimize this if wanted, but in practice it is a bit pointless. Every printer has a specific pixel size (this one tested is 0,05mm pixel size). So optimizing below the 0,05mm accuracy deviation from STL file is pointless. The reason is that you can maybe get a better value then we just did, but that will be totally different from different orientations and places on the platform. Then the factors come into play if a part is positioned for x% on a pixel and if the printer calculates to expose this pixel or not. So we would advise to optimize until you reach a value below 0,05mm deviation from actual file over most measurement points in your measuring range.
Order your low shrinkage resin here
Team Liqcreate wish you happy printing. If there are any questions or remarks, feel free to contact us at info@liqcreate.com any time.
Support
Do you need any help with 3D printing our SLA, DLP or LCD resins? We can help you! Just look for the question you have below. If you can’t find it, let us know by contacting us!