Proper build‑plate calibration is essential for consistent adhesion and predictable curing behavior on entry‑level MSLA resin printers such as the Elegoo Mars‑series. A correctly calibrated platform ensures that the first layers bond reliably to the build plate. If the platform is tilted or positioned too high above the FEP film, the initial layers may not cure properly, causing prints to detach or fail.
Calibration is recommended when a new printer is installed, after transport, or when print adhesion becomes inconsistent. Single‑point platform mounts, commonly used on early Elegoo Mars models, can gradually shift during regular use and require occasional recalibration.
Why calibration matters on the Elegoo Mars‑series
Entry‑level MSLA printers rely on:
- – a flat, evenly positioned build plate
- – a consistent Z‑zero reference
- – uniform pressure across the first layers
If the platform is not level:
- – the first layer may not adhere
- – one side of the print may detach
- – exposure depth becomes inconsistent
- – dimensional accuracy decreases
Regular calibration prevents these issues and maintains stable print performance across general‑purpose, dental model and engineering resins.
How to calibrate an Elegoo Mars or Elegoo Mars Pro
Follow the steps below to level the build plate on the Elegoo Mars or Mars Pro. These instructions apply to most entry‑level MSLA printers using a single‑point platform mount.
Tools required:
- – M5 wrench
- – A sheet of standard A4 paper
Step‑by‑step calibration procedure
The steps below describe the standard calibration workflow used on Elegoo Mars‑series printers to ensure a correct Z‑zero position and reliable first‑layer adhesion. This procedure applies to most entry‑level MSLA systems with a single‑point platform mount.
Step 1 — Loosen the platform
Tighten the rotary knob to secure the Z‑axis carriage. Loosen the two platform screws using the M5 wrench. The build plate should now move freely.
Step 2 — Place a sheet of paper on the LCD
Position an A4 sheet on the LCD surface. This acts as a feeler gauge for the Z‑zero position.
Step 3 — Home the Z‑axis
On the touchscreen, select: Tool → Manual → Home The Z‑axis will lower until it reaches the home position.
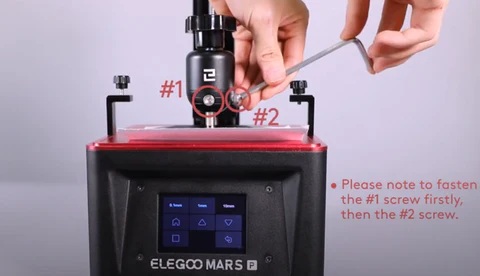
Step 4 — Align the platform
Once the platform stops:
- – hold it gently in the center position
- – ensure it sits flat on the paper
- – tighten the screws while keeping the plate stable
Follow the tightening order recommended by Elegoo (screw #1 first, then #2).
Step 5 — Check paper resistance
Test the resistance of the paper:
- – Too tight: raise Z by 0.1 mm
- – Too loose: lower Z by 0.1 mm
- – Correct: slight, even resistance in all directions
The resistance should feel uniform at the front, back, left and right sides of the platform.
Step 6 — Save the Z‑zero position
Once the resistance is correct, save the current Z‑axis position as the initial layer height.
When to recalibrate
Recalibration may be needed when:
- – prints suddenly detach from the build plate
- – only one side of the print adheres
- – the first layers appear uneven
- – the platform has been removed or cleaned
- – the printer has been moved or transported
Single‑point mounts, such as those on the Mars and Mars 2‑series, can gradually shift during repeated printing cycles.
Additional notes from Liqcreate engineers
If adhesion becomes inconsistent or parts begin to fall off the platform, recalibration is the first step to restore stable print performance. For validated exposure parameters and resin‑specific workflow guidance, visit the Elegoo Mars resin settings database or contact our engineering team for support.
Support
Do you need any help with 3D printing our SLA, DLP or LCD resins? We can help you! Just look for the question you have below. If you can’t find it, let us know by contacting us!