From the beginning of SLA and DLP 3D-printing, rigid resins were the main available materials. Rigid resins are easy to print and do not need a great amount of skill and knowledge about the printing process. With new developments in resin technology, flexible, tough and high elongation resins are widespread available. With the development of Premium Flex, Elastomer-X and Flexible-X, Liqcreate is offering flexible resins for prototyping and industrial use. These flexible materials require a bit extra attention on some areas to get the best results. Mainly on print preparation and post-processing. The following topics are covered in this article.
Liqcreate Premium Flex is a translucent turquoise blue photopolymer resin with great processability and print speed on MSLA and DLP based 3D-printers. 3D-printed parts from this material have exceptional flexibility and a low surface hardness of 63 Shore A. Liqcreate Premium Flex is easy to use on open DLP and LCD / MSLA 3D-printers in the range of 385 – 420nm. Its high elongation and low Shore A hardness makes it perfect for diversity of soft touch and elastic prototypes.
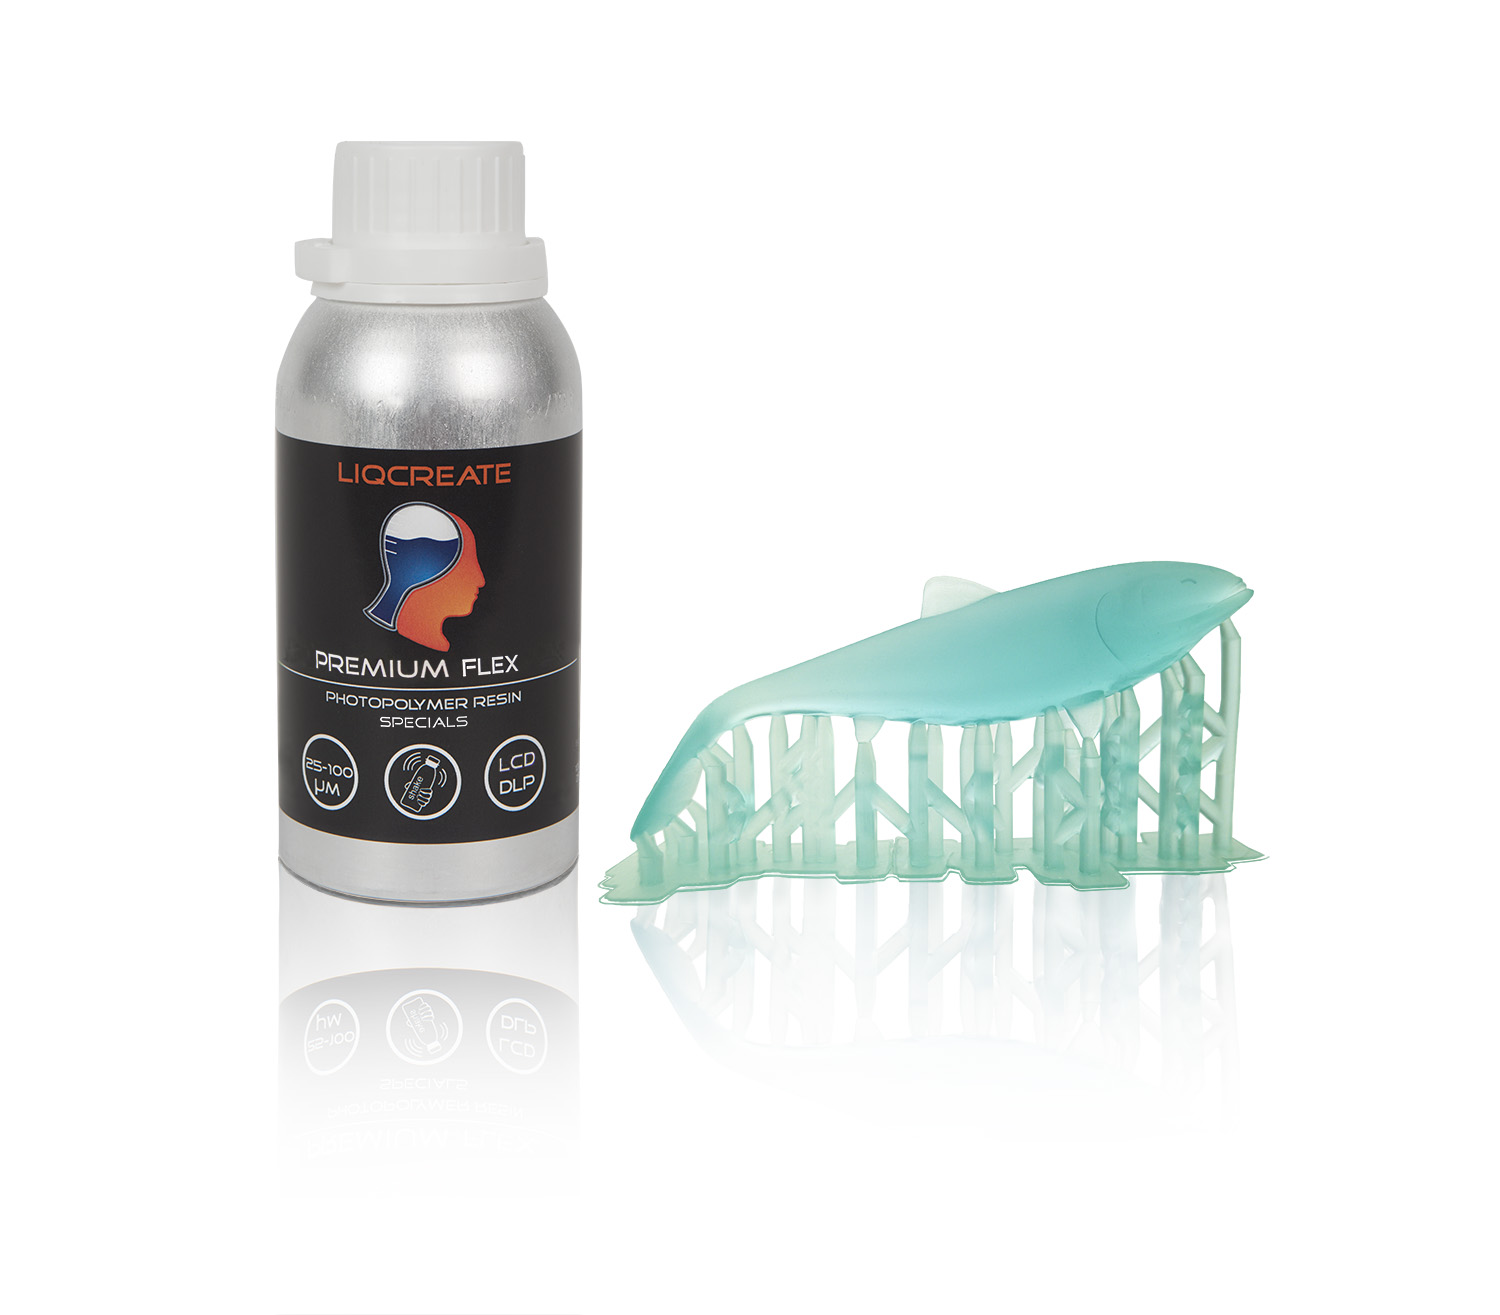
Image by Liqcreate: Premium Flex 3D-printing resin
- Shake before use.
- Support settings for flexible resin
- Why are flexible 3D-printed parts sometimes sticky?
- Post-processing to get non-sticky flexible parts
- 3D-printing parameters.
- Washing process
- Resin post-curing process
- Expected part surface finish.
- How to clean/filter the resin?
- Minimum wall thickness.
- Orientation of flexible resin parts
- Orientation and preparation of hollow parts
- Shrinkage compensation.
- Resin temperature.
- Solving print failures.
- Storage conditions.
- What not to do?
Support
Do you need any help with 3D printing our SLA, DLP or LCD resins? We can help you! Just look for the question you have below. If you can’t find it, let us know by contacting us!
Printer Settings →
1) Shake before use.
For most resin, shaking for a couple minutes is advised, especially after longer storage to get a homogeneous mixture before printing. Same goes for Liqcreate Premium Flex. Shake for a couple minutes and let the resin rest for a couple minutes before using. During shaking the resin is homogenized, but some air bubbles will be present. If you start a print job right after shaking, air bubbles might be present in the first layers of the part.
2) Support settings for flexible resin
An important factor to get high quality 3D-printing flexible parts are the right support structures. These supports can vary for each 3D-printer and for each resin. Rigid resins like Deep Blue, Strong-X, Premium White/Black/Model are easy to print with a combination of medium supports. A different support strategy works best for printing tough and flexible resin. For Premium Flex these settings work well on the standard calibration parts. if you have a bulky part of printing large cross-sections, the thickness of the contact diameter should be larger.
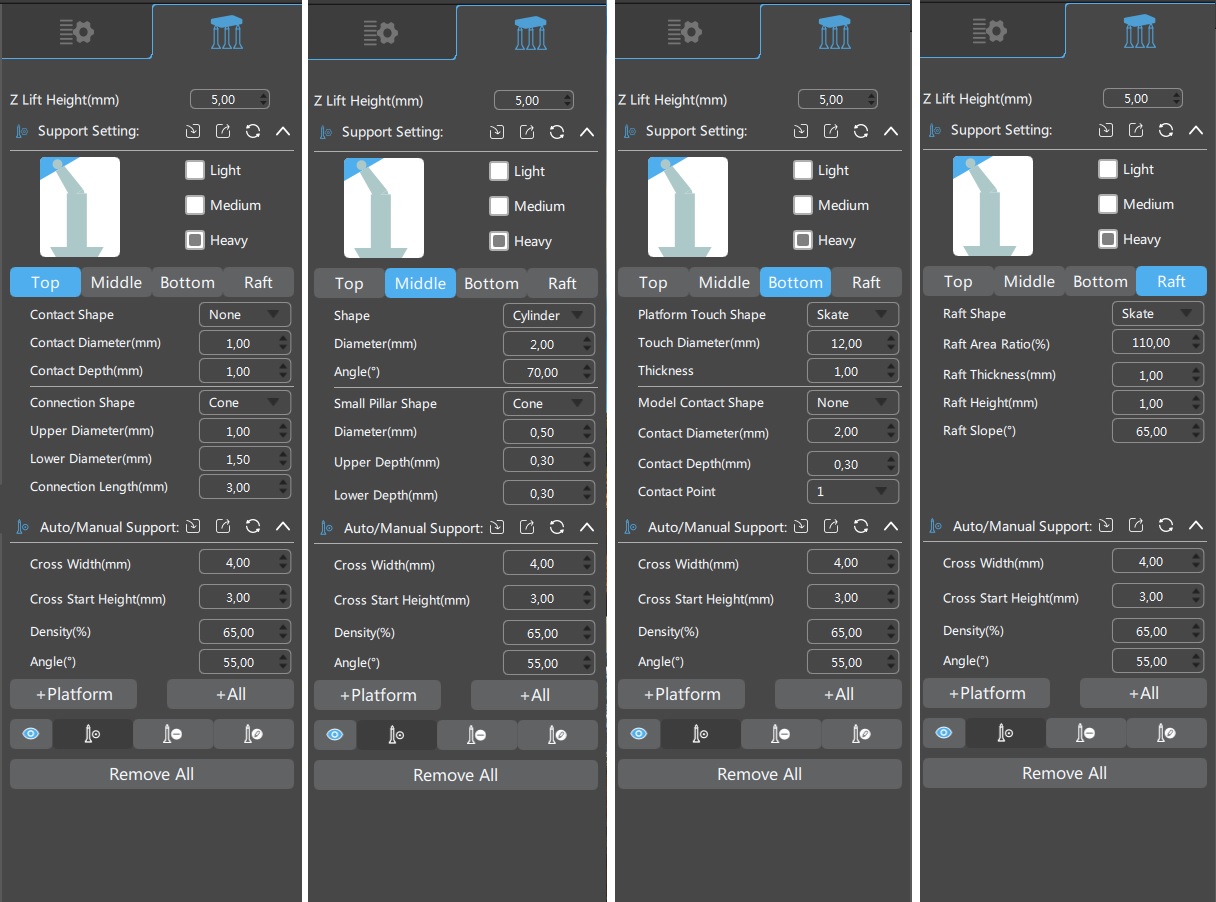
Image by Liqcreate: General support settings as a starting point for Liqcreate Premium Flex resin. Zoom browser to get detailed values.
3) Why are flexible 3D-printed resin parts sometimes sticky?
One of the biggest differences between SLA-based 3D-printing in regard to other 3D-printing technologies is that a chemical reaction has to occur to create a layer. The reaction that occurs is a light induced polymerization of monomers. This specific chemical reaction is a very controlled reaction, leading to the high accuracy of which SLA is known for. However, one of its disadvantages is that the reaction is sensitive to oxygen, which means that an oxygen rich environment may disrupt the reaction.
When too many reactive particles are reacting with oxygen, a half-cured resin will be the end-result leaving a sticky or tacky surface. During a top-down SLA, DLP or MSLA / LCD printing process, the resin is cured on the bottom of the resin tank and there is not enough oxygen present to disrupt the process. However, oxygen is present during post-curing (in air), which will be the main cause of surface stickiness.
4) Post-processing to get non-sticky flexible resin parts
Post-processing is an essential step in resin 3D-printing. It is important to post-process 3D-printed parts properly to avoid sticky parts. There are a few methods to reduce stickiness of a resin 3D-printed part. It is best to follow them all if you are facing issues with sticky parts. The methods are based on:
- – 3D-print process settings
- – Washing process
- – Post-curing process
- – What not to do?
5) 3D-printing parameters.
Liqcreate Premium Flex 3D-printing resin is designed for open compatibility on 405nm and 385nm DLP, MSLA, LCD and laser-based resin 3D-printers. It is important that the 3D-printer is open for 3rd party resins and parameters can be changed. Over- and under-curing parts can lead to a sticky surface which can not be fixed anymore later in processing. Therefor it is important that you have a good exposure time for each layer. A lot of parameters are already prepared and listed here. Click on your actual printer to see if Liqcreate Premium Flex parameters are available. If that is not the case, send an e-mail to our technical team at info@liqcreate.com and they will try to help.
6) Washing process
After getting a high quality resin 3D-printed object, the parts need to be cleaned and post-cured. Washing is an important step. The washing step ensures that all residual unreacted resin is washed off and can’t react with oxygen during post-curing. We advise to wash with IPA, Ethanol (preferably >85%) or the Liqcreate resin cleaner. Resin cleaner instructions can be found here. For Ethanol and IPA it is advisable to use 2 rinsing baths. One with used solvent and one with fresh solvent. Wash the parts preferably ultrasonic, and otherwise under agitation for 2 minutes in the used solution, followed by 3 minutes in the fresh Ethanol/IPA. The second rinse in fresh IPA/Ethanol will make sure no resin is left on the surface.
7) Resin post-curing process
After a part is washed properly, it should be UV post-cured. But is very important that before post-curing, the part should be completely dry. This can be done by putting it on a bench and wait 30 minutes, by (slightly) heating up the parts or by blowing with compressed air. The dry parts should already feel quite non-sticky and can be post-cured. Read this article to know more about the best UV post-curing parameters of a specific resin.
In the medical field, often a more professional method is used to eliminate oxygen during post processing and thus reduce stickiness of 3D-printed parts. Often the parts are post-cured in a Nitrogen chamber. This will result in completely non-sticky objects. For more Premium Flex, we would recommend to post-cure in an oxygen free atmosphere. This would be either in a Nitrogen chamber, or immersed in a transparent jar of water or glycerol during the first minutes of post-curing.
8) Expected part surface finish.
If printed and post-processed properly, you should be able to see the pixel lines of parts printed with Premium Flex at least on the sides of the part. When parts look fuzzy, then the print parameters are often not correct. Contact info@liqcreate.com for assistance.

Image by Liqcreate: Premium Flex 3D-printing resin.
9) How to clean / filter the resin?
When a part failed during printing, it is always advised to clean your resin tank. This is usually done by filtering the resin to make sure all rigid plastic pieces are gone. If cured resin parts are present when you start a new print, they can damage your FEP film of even your LCD screen. A standard resin filter will work sufficiently to filter Premium Flex resin when the resin is 25°C / 77°F.
10) Minimum wall thickness.
It is possible to print fine details with Liqcreate Premium Flex 3D-printing resin. However, large thin areas can warp or parts can bend during printing and post-processing. Warpage and moving of thin parts during printing can even lead to print failures. It is therefore advised to maintain a minimum wall thickness for these large areas. It is difficult to give an accurate guide on wall thickness as this is depending on the total design. You can print quite thin parts locally. Although if a part is big and has thin walls all over the part, it is not advised.
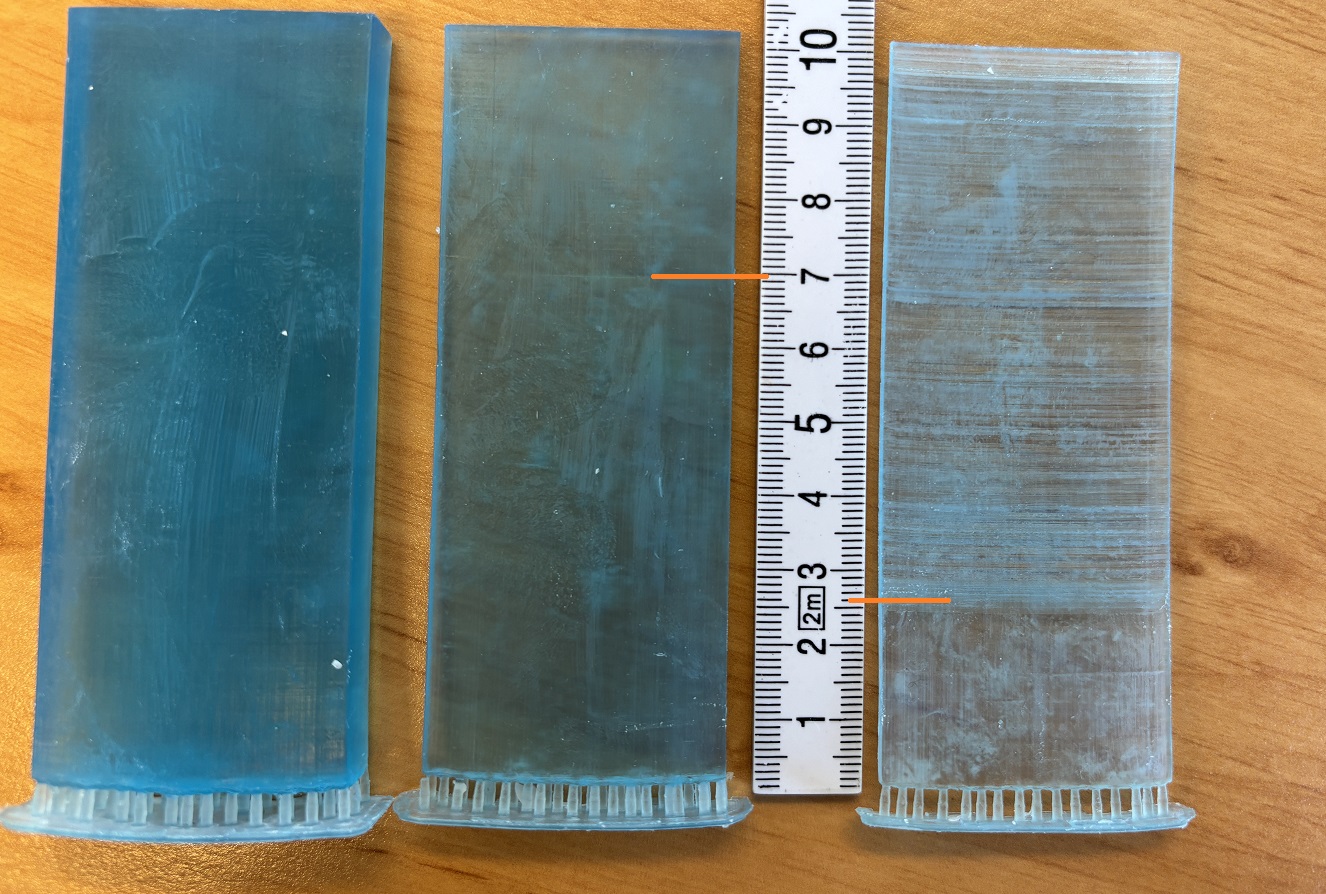
Image: From left to right, Premium Flex resin 3D-printed part at 0,1mm layer thickness on supports, left one is 10mm, middle 5mm and part on the right 2mm thick. Visible layers are marked by an orange line in the pictures.
As you can see in the test above, thick lines are visible when the part is not stable anymore. With 10mm thick parts, these were not visible across the height of the part. This was the case when printing with supports and directly on the platform. In the 5mm thick part, these lines were starting to show at 70mm length. For the 2mm thick part it happens even earlier, around 26mm height. These lines can be a starting point of a print failure or a initiating point for the final part to break and should be avoided. It is more visible in straight parts then in organic parts, as organic parts have more support in the part itself and can’t bend that easy.
11) Orientation of flexible resin parts
Just like all other parts, it is important to always support local low points and overhangs for flexible resin. Big overhangs are difficult to print due to the softer green state of our Tough-X, Premium Flex and Flexible-X resin during 3D-printing. These overhangs can be minimized by smart orientation of the file and placing support structures on the overhangs. If it is possible for your design, then the easiest way to print this material is directly on the build plate. If your part require support, always minimize overhangs and big “flat surfaces”. A flat surface is a surface that is perpendicular to the build plate, as shown in the image below. This is the worst option to support a flexible resin for 3D-printing.
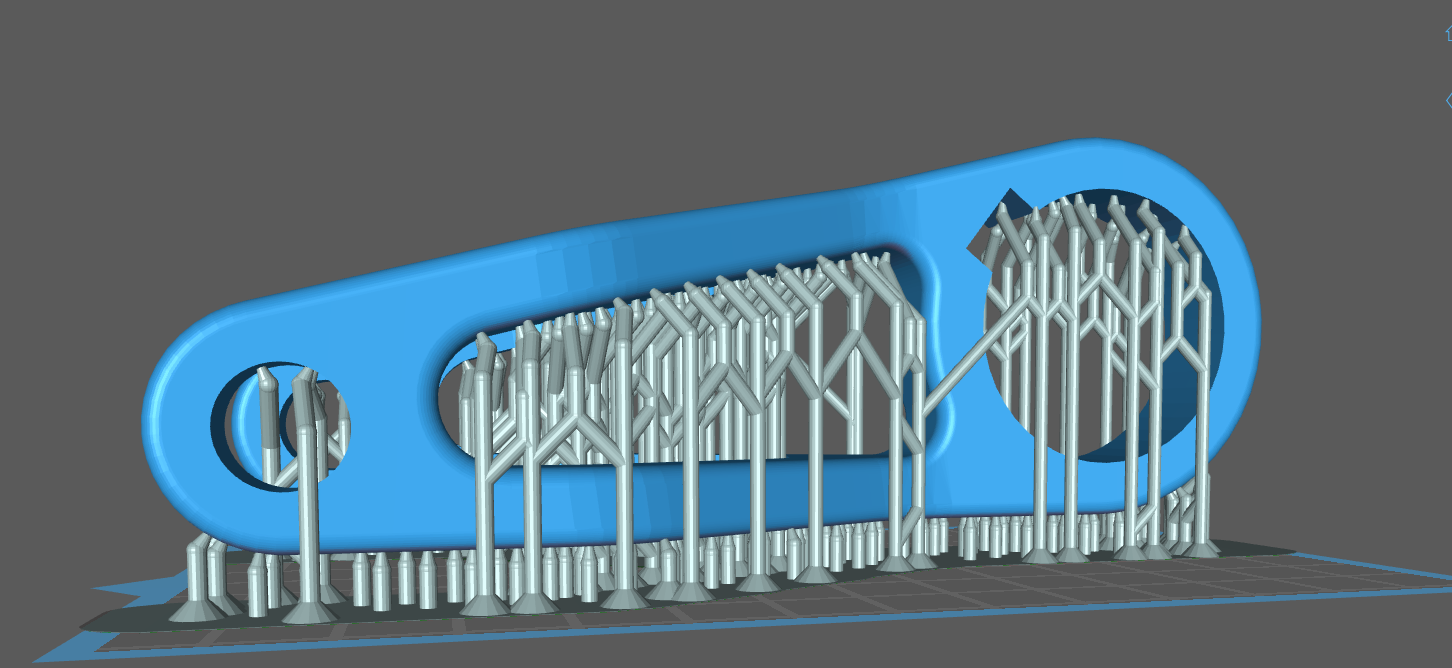
Image: Try to avoid orientations like the image above with Premium Flex resin. Parts with a lot of flat surfaces are difficult for flexible 3D-printing resins.
When supports are required, try to minimize overhangs and flat surfaces as shown in the image below.
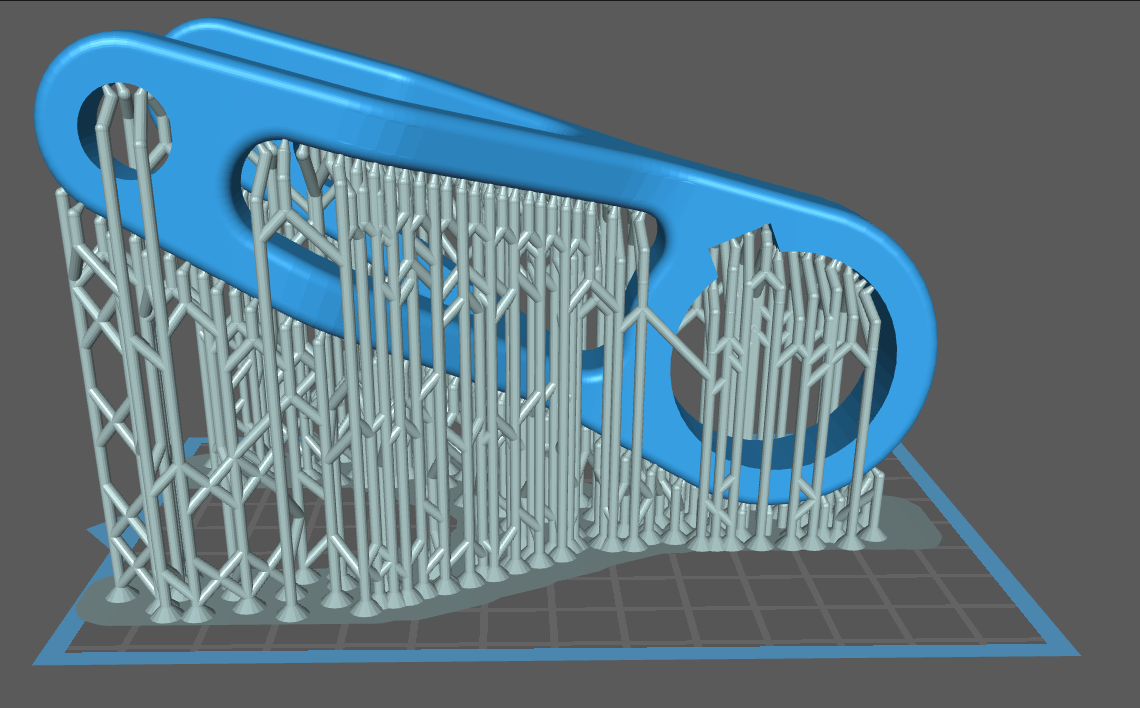
Image: If supports are required, use an angle ~30° to support your part for Premium Flex resin.
With flexible resins it is more difficult to print overhangs and therefor a larger area should be supported with the support settings explained in chapter two. A test file was printed to determine the angle that can be printed without supports.
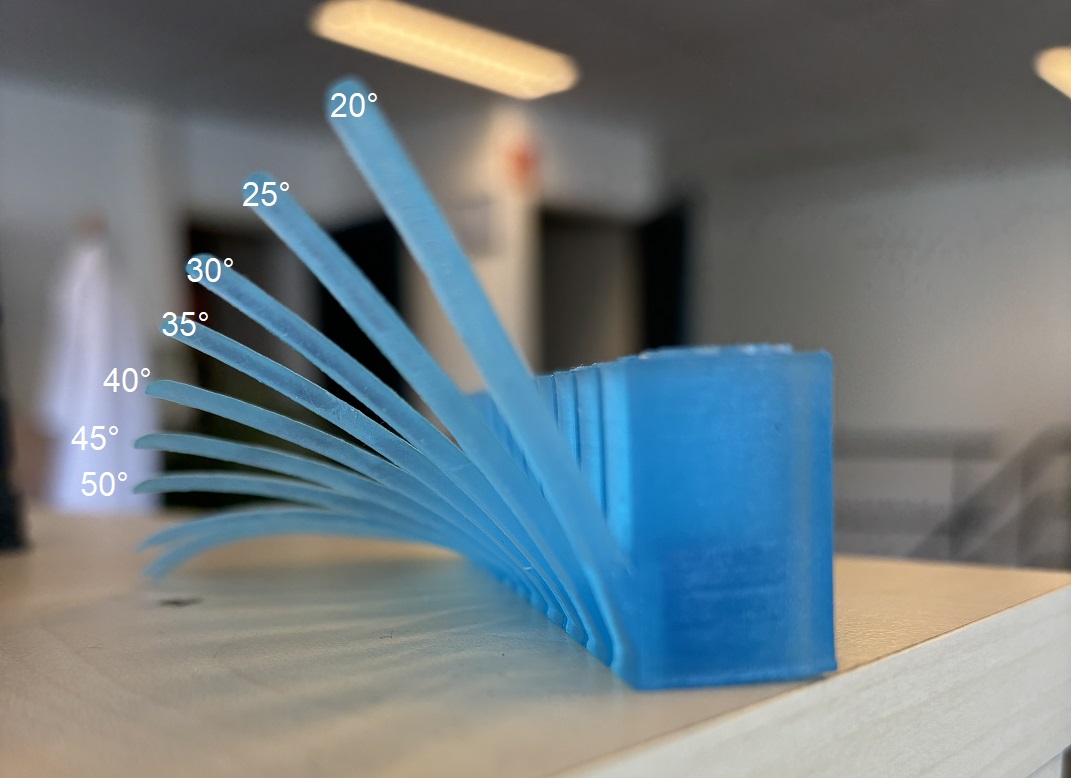
Image by Liqcreate: Testing the angle at which supports are needed for Premium Flex 3D-printing resin
The bars are placed in an angle from 20° to 70° and are 2 mm in thickness. The part was completely printed, but from an angle of 30° it starts to bend and loses accuracy significantly. So it is advised to support even the smallest over-hang.
12) Orientation and preparation of hollow parts
When printing hollow parts, or parts with hollow areas like the hollow cylinder below, it is important to place the part on supports. Opposing of what has been said before. For hollow parts the quality will be worse when 3D-printing directly on the build plate. During the movement of the platform, there is a pressure build-up in the part, giving it extremely bad layer lines and sometimes even cracks within these layer lines, as seen on the left picture below. Placing it on supports will have the same effect as placing a venting hole, to regulate pressure in the part during 3D-printing to finally get a good quality part, as shown in the right part (supports have been removed).
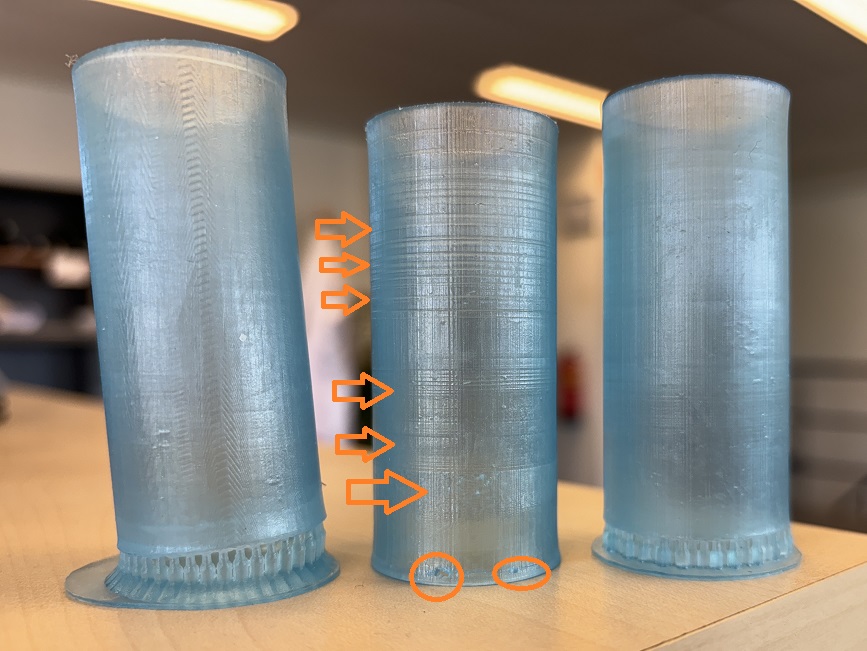
Image: 3D-pinted test parts with Liqcreate Premium Flex resin. Hollow part without supports on the middle and with supports on the left (5° angle) and on the right (0° angle). Supports have the same effect as a venting hole, to regulate pressure in the hollow areas during 3D-printing. This has a positive effect on the part quality and success rate of 3D-printing with flexible resin.
13) Shrinkage compensation.
Tested on the Elegoo Mars 3, the shrinkage compensation in Chitubox to get better accuracy can be found in the picture below. If you need super accurate parts, it is worth to read this article. As that article explains that the accuracy for thick and thin parts may deviate.
With these settings three test blocks of 40,00 – 30,00 and 20,00 mm were printed and optimized. We found that the best results were without any compensation as the resin shows low shrinkage in this range. Measured values of these blocks were respectively 39,96 mm, 30,00 mm and 20,06 mm. With the limited options Chitubox offers for compensation, these work well in the range of 30-40mm thickness. As you can see the thinner parts are too thick and within Chitubox it is difficult compensate for both thick and thin parts.
Image by Liqcreate: Premium Flex 3D-printing resin shrinkage and offset values for accurate printing.
14) Resin temperature.
It is advised to print with Liqcreate Premium Flex resin at least at 20°C / 68°F and maximum at 25°C / 77°F. printing at lower temperature causes random failure in the material.
15) Solving print failures with Liqcreate Premium Flex resin.
There are a lot of common resin 3D-printing issues. The most common printing issue with this resin is a failure at the support tips. If this happens, then the support tip thickness and intersection in the model are too small. In this article you can find 10 common resin 3D-printing fails and how to solve them. If you have need support, send is an e-mail at info@liqcreate.com and our technical team will try to assist.
16) Storage conditions.
Store the product in its original bottle, plug and cap at minimal 5°C / 41°F and maximum 30°C / 86°F. Avoid sources of heat, radiation, static electricity, sunlight and contact with food.
17) What not to do?
There are a few things that would definitely give sticky parts. The first step not to do is to rinse a part that is not completely clean with water. Water and resin won’t mix and give a dirty, sticky surface. Next to water, post-curing not completely clean or dry parts will also lead to a sticky surface. Once a part is UV Post-cure, it is nearly impossible to get the sticky / tacky surface off. It is therefore advised to give a bit extra focus to the whole process to prevent printing parts again.
Team Liqcreate wish you happy printing. If there are any questions or remarks, feel free to contact us at info@liqcreate.com any time.
Premium Flex
Liqcreate Premium Flex is a translucent turquoise blue photopolymer with great processability and print speed on MSLA and DLP based 3D-printers. 3D-printed parts from this material have excellent flexibility and low surface hardness of 63 Shore A. Liqcreate Premium Flex can be used on open DLP, MSLA and LCD 3D-printers in the range of 385 – 420nm. Its high elongation and low Shore A hardness makes it perfect for diversity of soft touch and rubber-like prototypes.
Key benefits |
3D-Printer compatibility |
| · High Elongation | · Anycubic Series |
| · Soft touch | · Elegoo Series |
| · Easy to print | · Phrozen Series |
| · High flexibility | · And many more |