With the ongoing developments in afforable desktop resin 3D-printers, Anycubic and Elegoo – just one week from each other – announced the next leap in resin 3D-printing with their new 12K resolution LCD screens! Online you will find a lot of information on both printers, comparing specifications or reviewing the printers itself. As an independant resin provider, working both with Anycubic, Elegoo and most other brands in resin printing hardware, we try to compare both printers. With hundreds hours of printing time on both machines, optimizing 18 Liqcreate resins, we hope to give a good view on how these machines operate and what results can be expected from their 12K resolution LCD screens. Learn more about Saturn 3 vs. Photon M5s
Please note: since we are making a big article with plenty of tests and printing hours, it is not done yet and will be updated regularly.
Print time at last update:
12-07-2023: Arrival of printers. Start printing Liqcreate resins right away.
25-08-2023: Anycubic Photon M5s – 84 prints completed, 59054 layers printed.
02-10-2023: Anycubic Photon M5s – 152 prints completed, 97283 layers printed; ACF film replaced for 100 micron FEP.
19-12-2023: Anycubic Photon M5s – 190prints completed, 120560 layers printed – Test finished
Elegoo Saturn 3 – Unknown as layer count is not available on this printer. Very comparable usage as the printers are both running full-time
Printer specifications of the Anycubic Photon M5s vs. Elegoo Saturn 3 – 12K resin 3D-printer.
The available specifications of the Elegoo Saturn 3 Ultra vs. the Anycubic Photon M5s are listed below.
| Elegoo Saturn 3 | Anycubic Photon M5s | |
| LCD screen | 12K | 12K |
| Pixels | 11520* 5120 | 11520 * 5120 |
| Print size (L x W x H) | 218 x 123 x 250 mm | 218 x 123 x 200 mm |
| Pixel size | 0,019 in X and 0,024 in Y | 0,019 in X and 0,024 in Y |
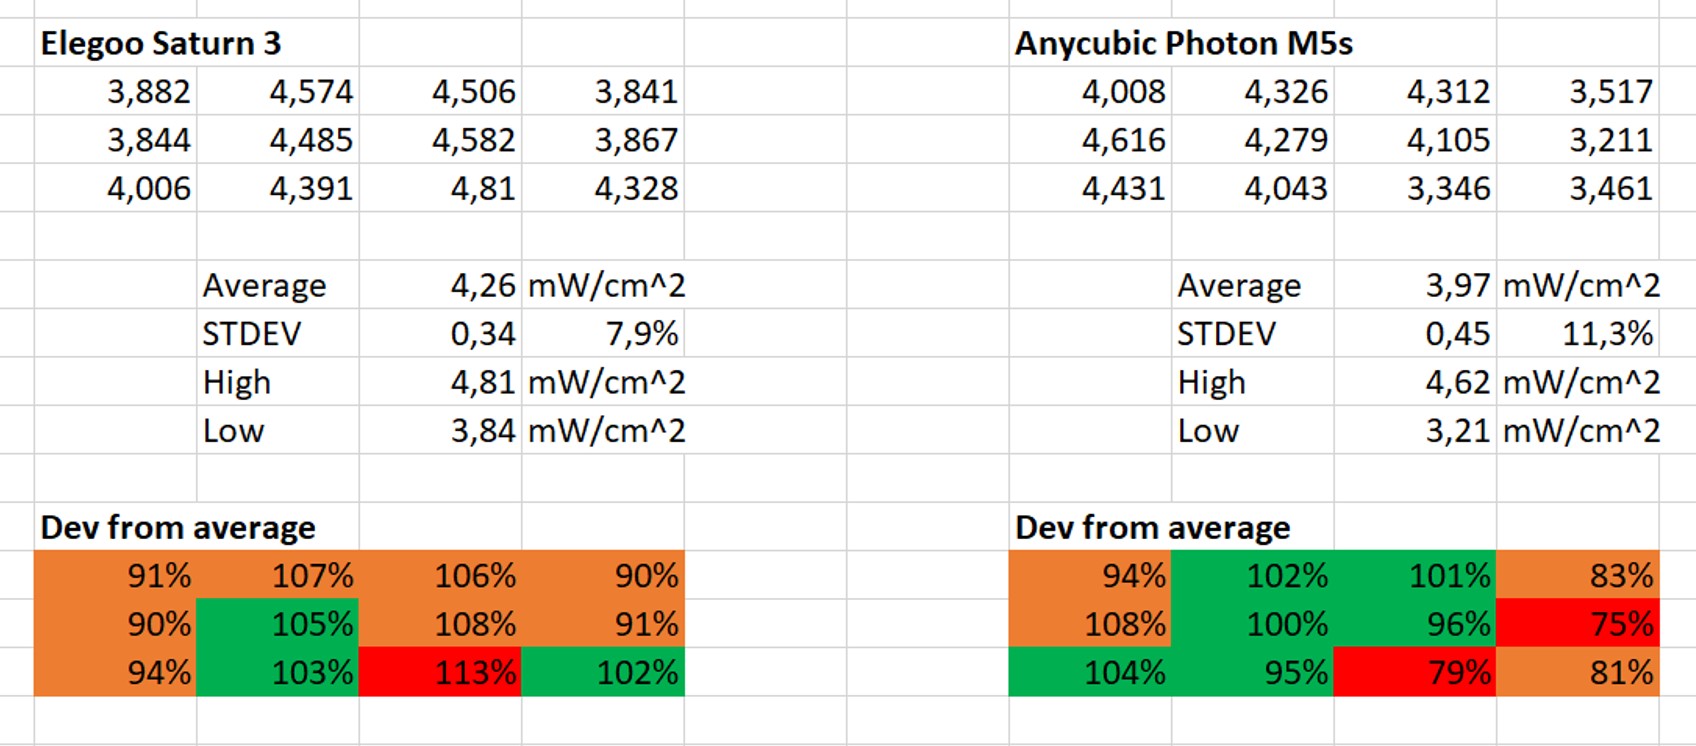
| Light intensity* | 4,05mW/cm2 (~9,4% dev) | 4,52mW/cm2 (~7,1% dev) |
*Light intensity measured on the machines when printing a full white area. Measured on 12 different spots across the platform.
Light intensity of the Anycubic Photon M5s vs. Elegoo Saturn 3 – 12K resin 3D-printer.
Measured with the Chitubox UV intensity meter for 405nm resin 3D-printers on 12 spots on the platform during actual printing of a full white exposed area.
Measurements when age of the printer was around 1 week and approx. 14 builds finished.
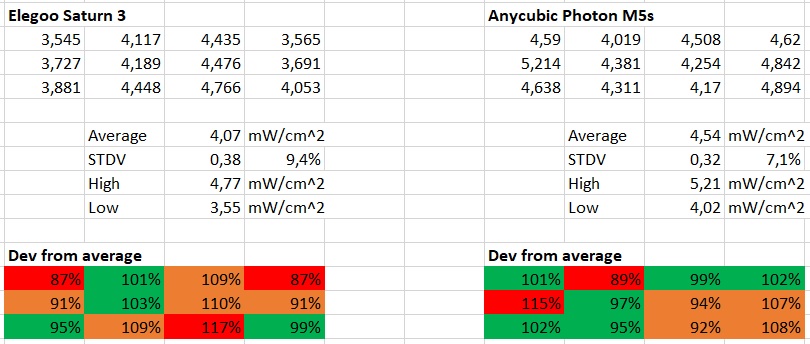
From the results above, what is a bit worrying for both machines after the 4th generation of printers, is the light uniformity. To be clear, both are purchased printers when they were just launched, measured at the same time in our lab. With professional printers we would like to have an uniformity of 95-105% around the average (average is 100%). With both printers there are some weak and strong spots on the platform. How this translates to other entry level printers you can find here. What this usually means in operations; you want a print to succeed at the lowest power on the platform, meaning that you will likely over-expose a bit for the parts that are on the higher end. Some resins are more sensitive with this compared to others. Let’s see in the long-term testing if this is anything to worry about.
Light intensity after x weeks.
After approx. 5 months use with 190 prints done and 120560 layers printed, the machine power was measured again:
Resin compatibility & printing times Saturn 3 vs. Photon M5s.
Our engineers have dialed in 8 resins already on the Elegoo Saturn 3 and 7 different Liqcreate resins on the Anycubic Photon M5s. Exact settings and latest updates can be found in the links. If you compare the resins that have been optimized on both the Saturn 3 and the M5s, it seems that the UV power is not the only factor. Some resins need slightly less exposure time on the Saturn 3 while others have that effect on the Photon M5s. Roughly it can be said that on average it is quite similar. The data is presented below to form your own conclusion:
| Resin | Layer thickness | Saturn 3
Exposure time (seconds) |
Photon M5s
Exposure time (seconds) |
| Bio-Med Clear | 100 µm | 5,0 | 7,5 |
| 50 µm | 3,5 | 6,0 | |
| Strong-X | 100 µm | 10,0 | 8,0 |
| 50 µm | 8,0 | 7,0 | |
| Stone Coal Black | 100 µm | 8,0 | 8,0 |
| 50 µm | 7,0 | 6,0 | |
| Premium White | 100 µm | 4,5 | 3,5 |
| 50 µm | 3,5 | 2,5 | |
| Premium Black | 100 µm | 4,4 | 3,5 |
| 50 µm | 3,9 | 3,0 | |
| Premium Model | 100 µm | 4,5 | 4,5 |
| 50 µm | 3,5 | 4,0 | |
| Premium Tough | 100 µm | 8,5 | n/a |
| 50 µm | n/a | n/a | |
| Wax Castable | 100 µm | 6,0 | 3,5 |
| 50 µm
Thin parts |
3,0 | 3,0 | |
| 50 µm
Reg. parts |
4,0 | 4,0 | |
| 25 µm
Thin parts |
2,5 | 2,5 | |
| 25 µm
Reg parts |
3,0 | 3,5 | |
| Premium Flex* | 100 µm | 4,0 | 3,8 |
| 50 µm | 3,5 | 3,5 | |
| Clear Impact | 100 µm | 12,0 | 9,0 |
| 50 µm | 10,0 | 7,5 | |
| Deep Blue | 100 µm | 7,0 | 7,0 |
| 50 µm | 6,0 | 5,0 | |
| ESD | 100 µm | 8,0 | 8,0 |
| 50 µm | 7,0 | 7,0 | |
| Tough-X* | 100 µm | 12,0 | 16,0 |
| 50 µm | 10,0 | 14,0 | |
| Flexible-X* | 100 µm | 14,0 | 14,0 |
| 50 µm | 10,0 | 12,0 | |
| Elastomer-X* | 100 µm regular | 14,0 | 20,0 |
| 50 µm regular | 12,0 | n/a | |
| Hazard Glow | 100 µm | 9,0 | 9,0 |
| Composite-X | 100 µm | 9,0 | n/a |
| 50 µm | 7,5 | n/a | |
| Dental Model Pro Beige | 100 µm | 5,5 | 6,0 |
| 50 µm | 4,2 | 5,0 | |
| Dental Model Pro Grey | 100 µm | 4,0 | 4,7 |
| 50 µm | 3,5 | 4,1 | |
| Gingiva Mask | 100 µm | 10,0 | 10,0 |
| 50 µm | 8,0 | 8,5 |
12K screen resolution, and straight lines.
It is reported multiple times in several reviews that both the Elegoo Saturn 3 and the Anycubic Photon M5s have weird straigth lines on the surface. some say that it is only visible when zooming in with a microscope or camera. but we found that it is easily visible by the naked eye when printing surfaces have flat surfaces parallell to the z-axis. for organic shapes this is not really visible. Most people blame the ACF liner (new type of FEP film) which are in the machines when they are send to customers. After we changed the ACF liner film to a regular 100 micron FEP, we printed the same part on the Anycubic Photon M5s printer again in Liqcreate Bio-Med Clear resin at 0,1mm and kept all settings the same, see the differences yourself below.
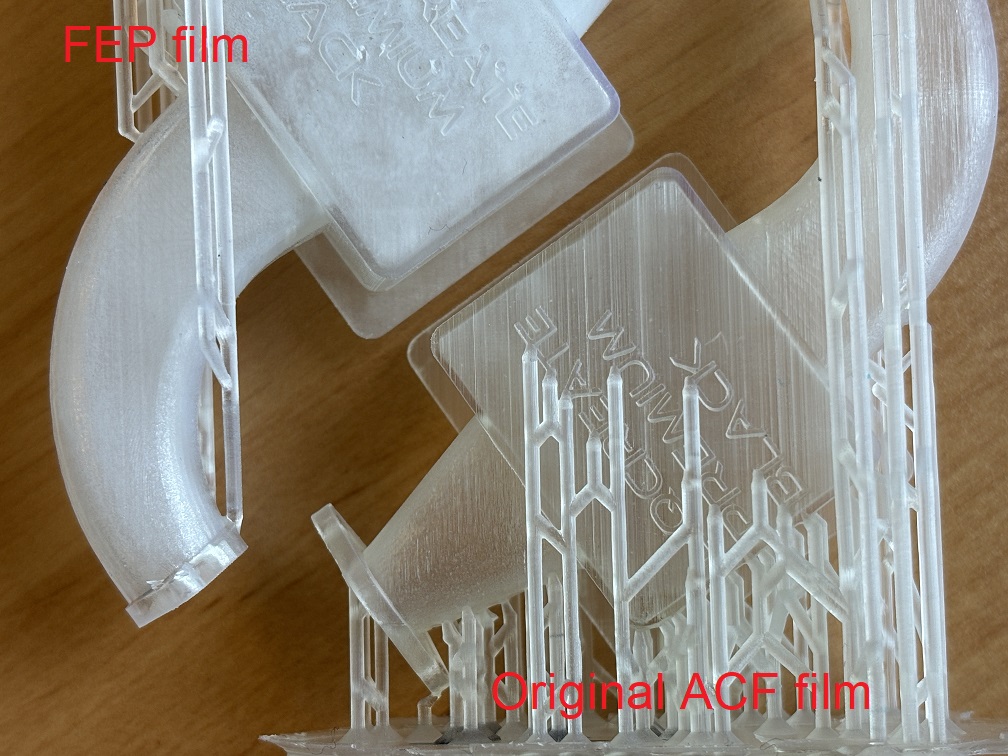
Next to the very visible lines, also the part comes out more clear with the ACF film compared to the FEP. on the left you see the regular FEP which does not have that many lines, but the part has a more frosty surface after washing and drying.
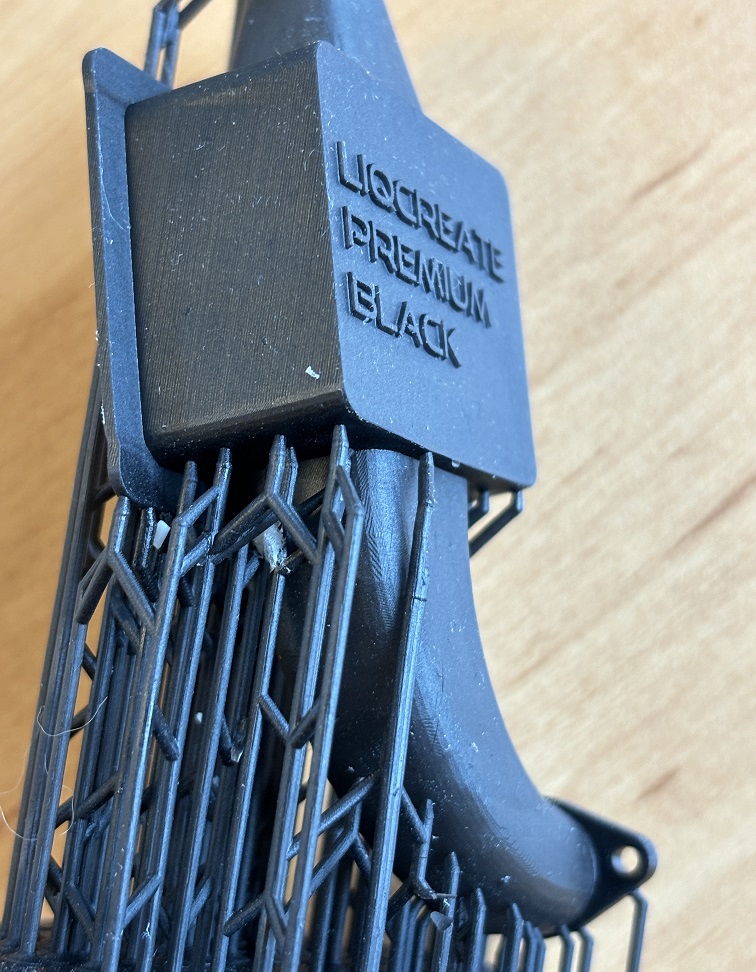
We noticed that for clear resins this is much more visible. when we printed Premium Black resin on the Anycubic Photon M5s there were much less visible lines. unfortunately the part is in a different orientation so it is not a 1-on-1 comparison, but it is clearly much better on the standard ACF film.
ACF liner vs. FEP film Saturn 3 vs. Photon M5s.
We started running both 3D-printers with the stock ACF liner. The Mono M5s machine tells to change the film every 10.000 layers, but we decided to change the ACF film after 97.283 layers. When we just started with the ACF liner, we noticed that after a failed print, the leftover cured part in the resin tank did not stick to the ACF film at all. But after a week of intense usage, it seems to behave more like regular FEP! it seems like the effectivity of the ACF liner is wearing out after a few weeks.
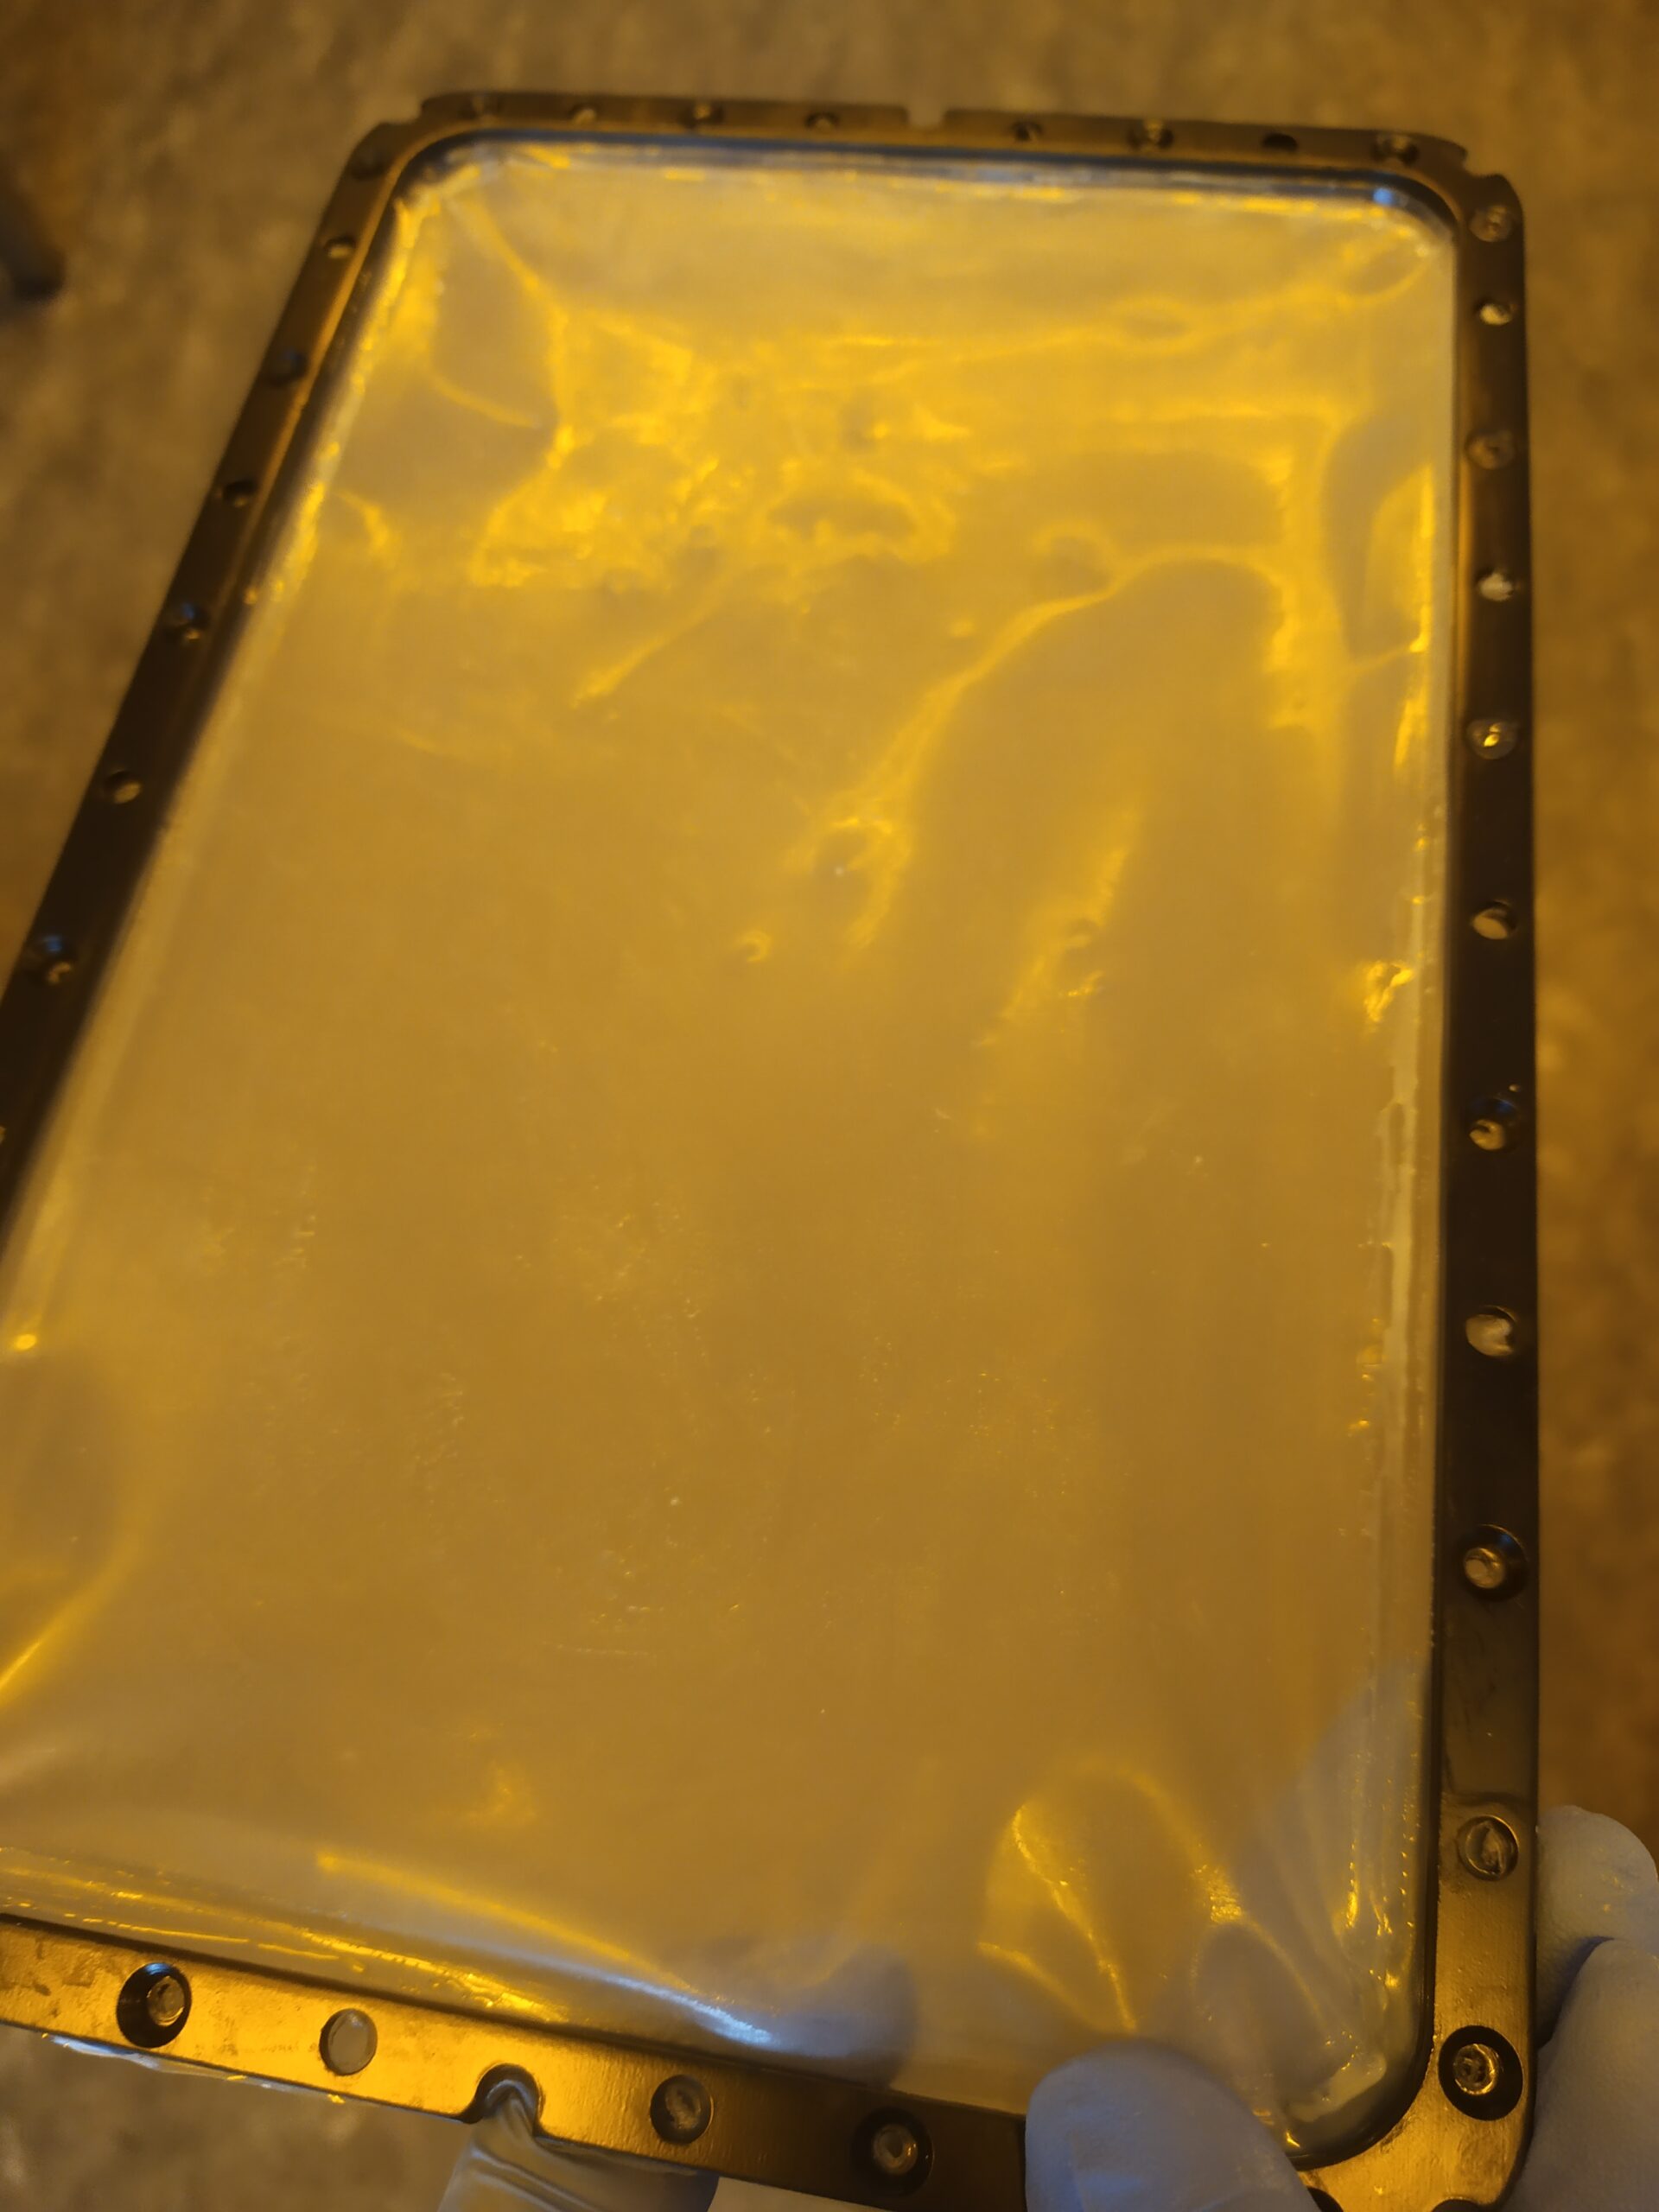
Image: Our AFC film after 152 prints / 97.283 layers. few dents, usually we would not replace the film yet. Since the M5s is already telling us since layer 10.000 that we have to replace it, we decided to finally listen to the printer.
Extra functions on the Photon M5s
the Anycubic Photon M5s has a few extra functions. There is a resin detection function which, a print failure function and the build plate can’t be calibrated anymore as it is fixed.
With the Anycubic Photon Mono M5s in our laboratory we feel that after hundreds hours of printing, the platform calibration is fine and didn’t show any issues with the regular resins. With the higher viscous resins (Composite-X and Flame Retardant HDT) the adhesion to the build plate is difficult. We are still figuring out how to get this solved in the settings. The resin detection function is a nice tool that tells before the job if you have to fill it more. The auto failure I switched off after one week. In most cases it worked well. but as we are dialing in resins, also there will be quite some failed jobs. Just one time the printer ‘measured’ a failure when the part was still good and printing very thin supports.
Additionally, there is one feature not really mentioned. one time there was a power failure in the laboratory and after restarting, the printer continues at the next layer. It must be said that every pause in a print will create a visible layer in the part, this continuation after power failure looked like a line that you can see if you pause the print halfway.
Issues with Saturn 3 vs. Photon M5s Anycubic.
Both printers in our lab were working quite well and giving expected results from these type of entry level machines for the first two months. Since we launched our settings, several of our customers are verifying our settings. With the Elegoo Saturn 3 we have not heard any complaints yet. With the Anycubic Photon M5s we are trying to support our customers that have issues with the automatic platform calibration and lower light-output compared to our printer. We are also struggling to get settings for the higher viscous materials (Composite-X & Flame Retardant HDT resin) as the resin calibration is not optimal for that.
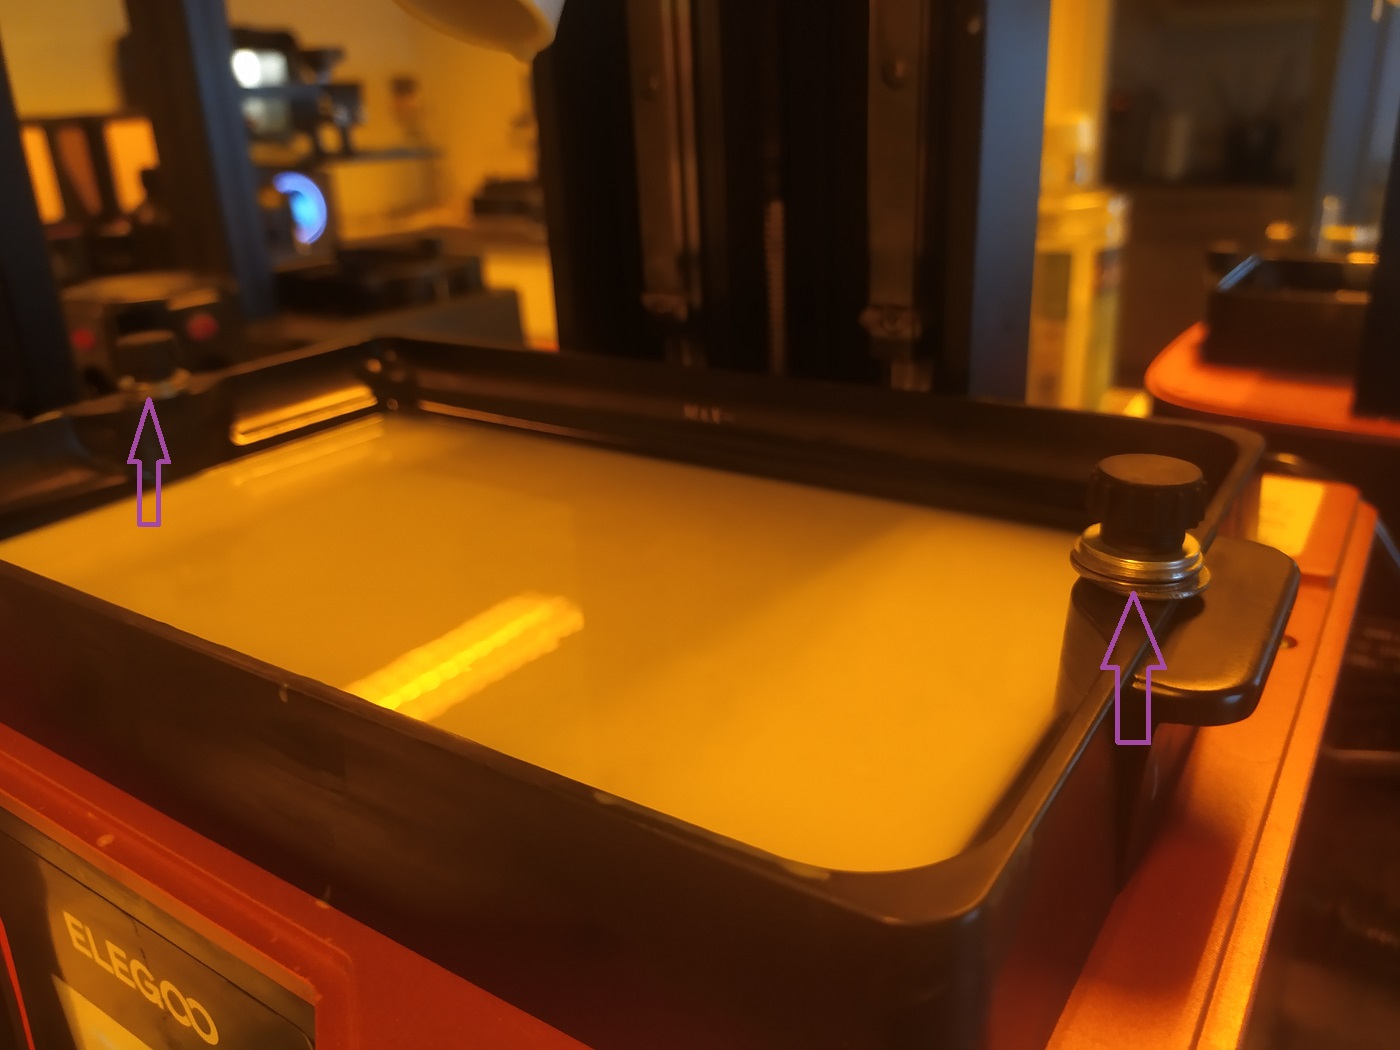
With the Elegoo Saturn 3 there are less extra functions so less parts that can fail. One strange flaw is that the build tray buttons had some extra space so the build tray was slightly loose on one sight. we solved that by adding some metal rings and it worked. And one time the exposure was stuck in the first layer and did just expose. as it was noticed only half an hour later, the printer got quite warm as you can imagine after 30 minutes exposure of one layer. We let the printer cool for one day and inspected it again. The LCD screen did not show any errors afterwards, but the build tray screws were even looser. Easy to fix, but not the most elegant solution.
Elegoo Saturn 3 vs. Photon M5s for dental applications.
Some of our dental partners are pioneering with the Photon M5s and Saturn 3 and asked help to dial in resins. Next to the standard settings like exposure time etc, for dental applications it is also important that dies fit exactely in the model. After dialing in the M5s, the following settings in the advanced tab worked for die fitting:

How does this work? With normal exposure of the LCD, the dies don’t fit nicely and are way too tight. this will cause the model to break if you push the die in completely. by adding an offset / tolerance compensation of -0,05mm at the a setting only (see above). the die gets extra room in the model to fit nicely without changing the outer dimensions of the die. on the right picture below the die doesn’t fit with the standard settings while the the offset is applied to the model on the left.
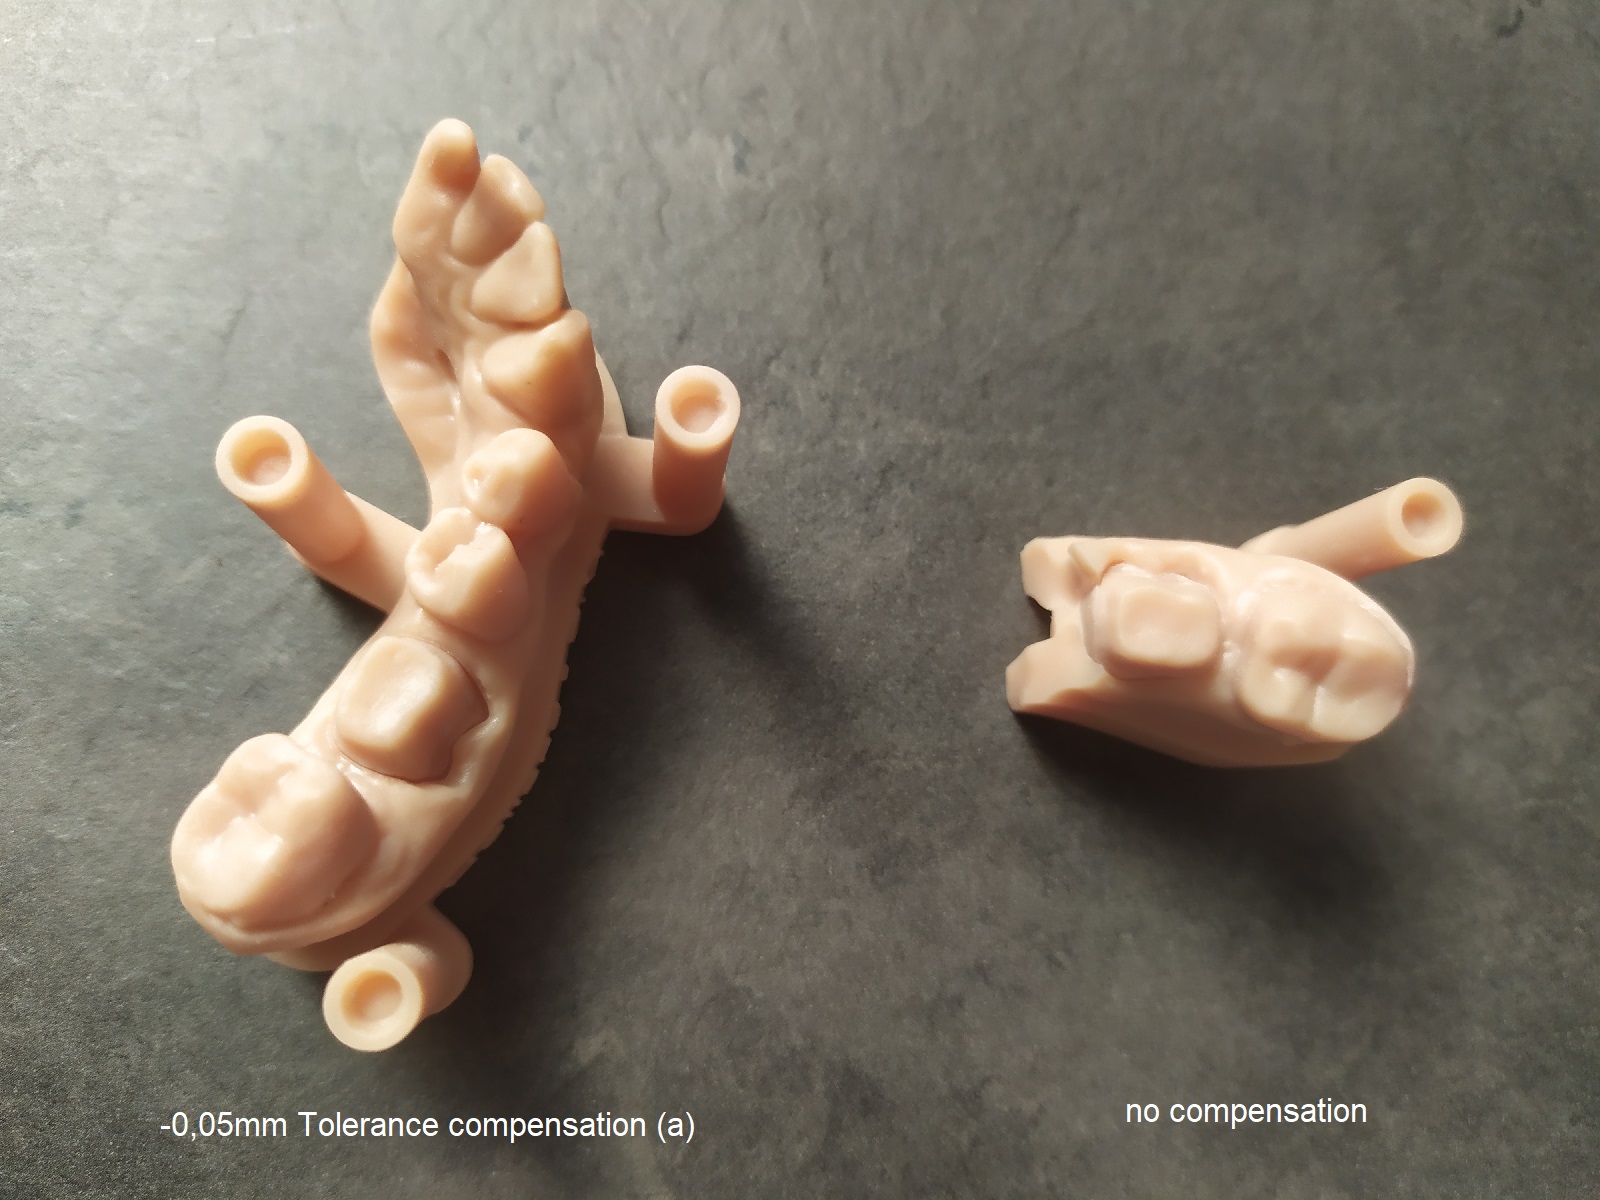
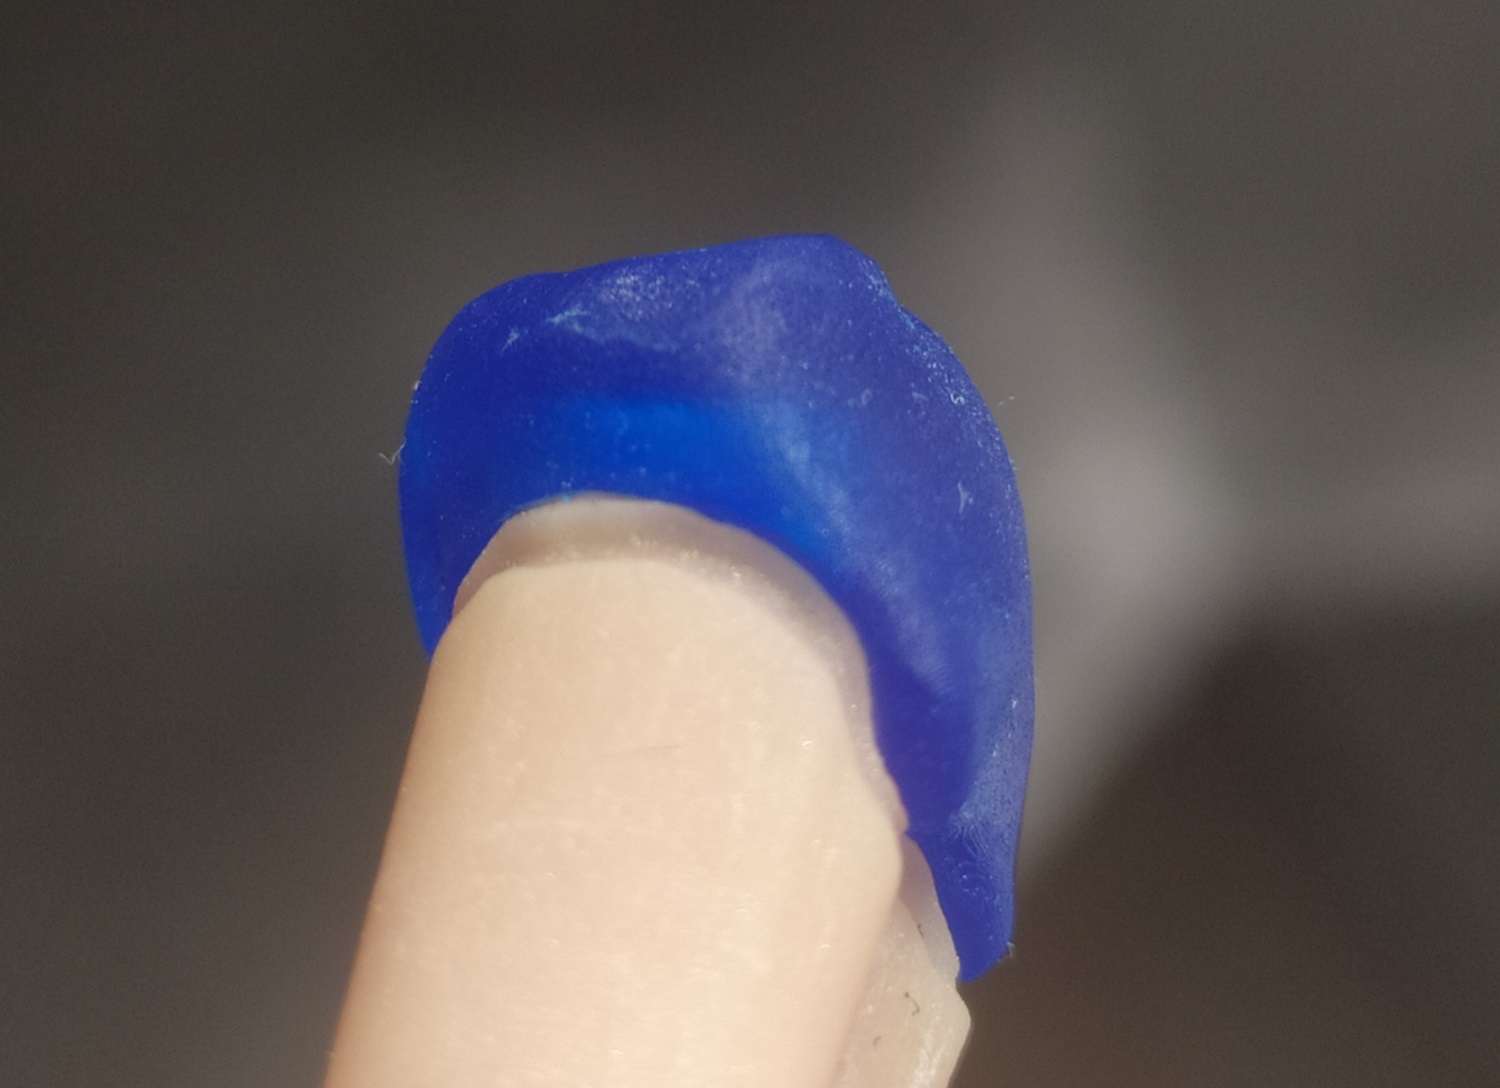
When printing a crown in Liqcreate Wax Castable resin without any offset or shrinkage settings, it fits nicely on the die.
Very similar results were obtained with the Saturn 3 vs the Photon Mono M5s resin printer.
Print performance after hundreds hours Saturn 3 vs. Photon M5s.
Print performance after long-time use is difficult to judge. we see some change in UV power from the printers. But have not noticed any big changes in performance of the Saturn 3 vs. the Photon M5s after using it for months.
Shrinkage compensation test Saturn 3 vs. Photon M5s.
With the new Chitubox (V1.9.5) there are some extra and wonderful functions to get more accurate parts. After optimizing our Flame Retardant HDT (UL94 V0 high HDT 3D-printing resin) on the Elegoo Saturn 3, we noticed that the results were very good. You can read the full story here if you scroll down to chapter 2. Summarized, the accuracy and settings of the final optimization cycle can be found below:
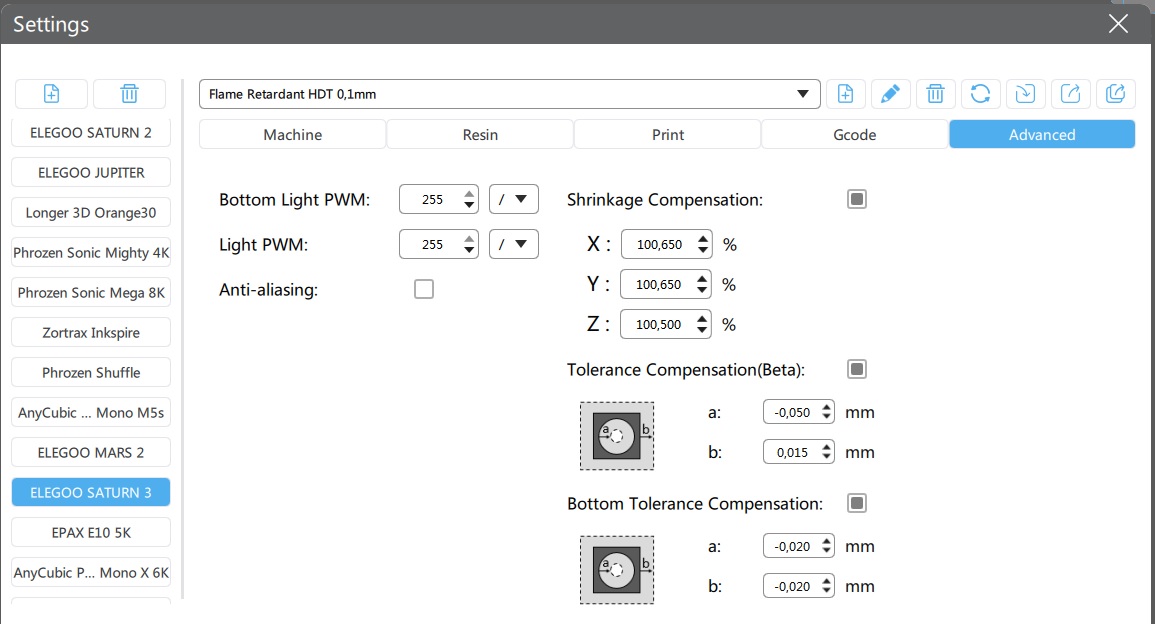
Image: Chitubox shrinkage and compensation settings for Liqcreate Flame Retardant HDT.
This results in the following accuracy measured on blocks:
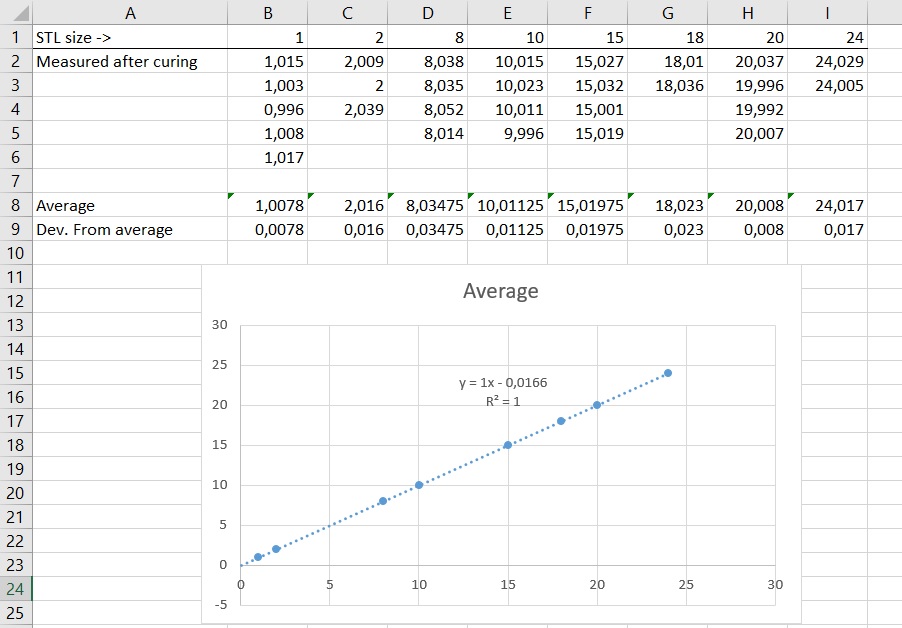
With these settings eight sizes of blocks were printed in multiples and measured and optimized. The results from the final settings can be found in the table below.
| STL thickness | Average thickness | Deviation of average in mm |
| 1,00 | 1,008 | 0,008 |
| 2,00 | 2,016 | 0,016 |
| 8,00 | 8,035 | 0,035 |
| 10,00 | 10,011 | 0,011 |
| 15,00 | 15,020 | 0,020 |
| 18,00 | 18,023 | 0,023 |
| 20,00 | 20,008 | 0,008 |
| 24,00 | 24,017 | 0,017 |
In the table you can see that the average deviation over the 1 to 24mm thickness is around 17 micrometers. This is quite close to the maximum accuracy you can reach with this type of printer.
Support
Do you need any help with 3D printing our SLA, DLP or LCD resins? We can help you! Just look for the question you have below. If you can’t find it, let us know by contacting us!