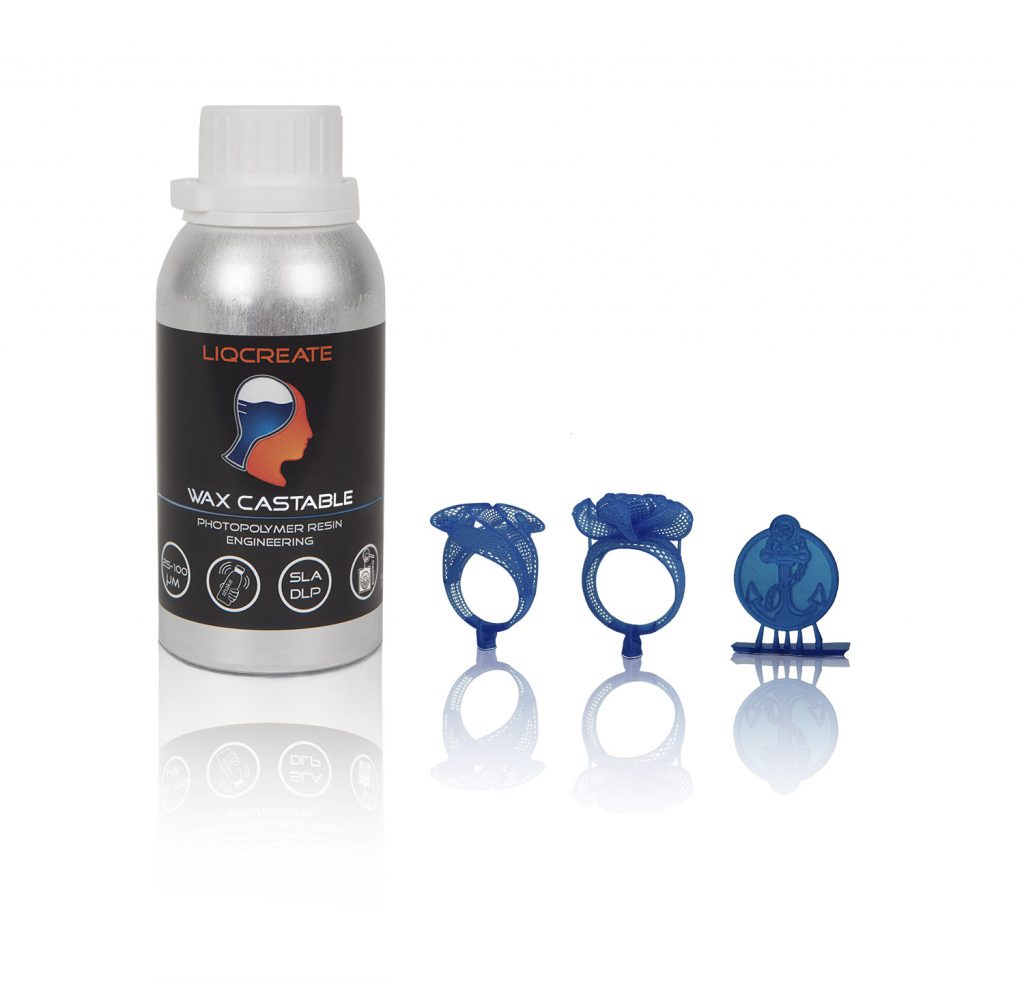
Liqcreate Wax Castable is a blue wax-based photopolymer with reliable processability and accuracy on LCD/MSLA, DLP and laser based 3D-printers. 3D-printed parts from this material captures intricate features and show crisp details. This wax-based material offers smooth surfaces with clean burnout for a reliable casting process. Create custom made elegant organic geometries with positive and negative engravings according to your preferences. Liqcreate Wax Castable creates perfect casting patterns for jewelry, dental and industrial parts. This article is designed as guidance for 3D-printing jewelry parts with Liqcreate Wax Castable resin.
The following topics are covered in this article:
- Caution: Wax in resin turns solid below 18°C / 64°F.
- Shake before use.
- 3D-printing parameters for 3D-printed wax-based jewelry resin.
- Support settings.
- Cleaning, washing and post-curing your part.
- Pixels visible in print & cast
- How to clean/filter the resin?
- Investment material for Wax Castable resin
- Burn-out schedule for Liqcreate Wax Castable resin
- Resin shrinkage and casting shrinkage
- Part surface finish or sticky surface.
- Resin printing temperature.
- Storage conditions.
- Additional documentation
- Troubleshooting
We wish you a great journey with our Wax based Castable resin. If you have printed or casted a great part and want to be featured in our social media, or have any questions about the product or processing, send us an e-mail to info@liqcreate.com
Support
Do you need any help with 3D printing our SLA, DLP or LCD resins? We can help you! Just look for the question you have below. If you can’t find it, let us know by contacting us!
Materials →
1) Caution: Wax in resin turns solid below 18°C / 64°F.
Due to the significant amount of wax, Liqcreate Wax Castable will solidify around 17 – 18˚C / ~64°F. It is not advised to use this product in environments with temperatures below 18˚C. storage or transport of Liqcreate Wax Castable below 18˚C is not a problem. Before processing, it is necessary to heat-up the product to its liquid phase. This can be done by leaving the product for a couple hours at room temperature or by placing the packaging in a warm area (without direct light, in the original packaging) up to 50˚C for 20 minutes.
2) Shake before use.
Shaking the (closed) bottle with resin for a couple minutes before you pour the resin in the resin tank. Especially after longer storage to get a homogeneous mixture before printing. After shaking let the resin rest for a some minutes so the air bubbles can move to the surface before printing. If you start a print job right after shaking, air bubbles might be present in the first layers of the part.
3) 3D-printing parameters for Liqcreate Wax Castable resin
It is important that the 3D-printed jewelry resin parts are flawless to get the best casting results. Layer thickness of 0,05mm and lower are advised along with a well calibrated resin 3D-printer. Find the parameters of your printer here, or send an e-mail to info@liqcreate.com for more information about printer settings and compatible 3D-printers.
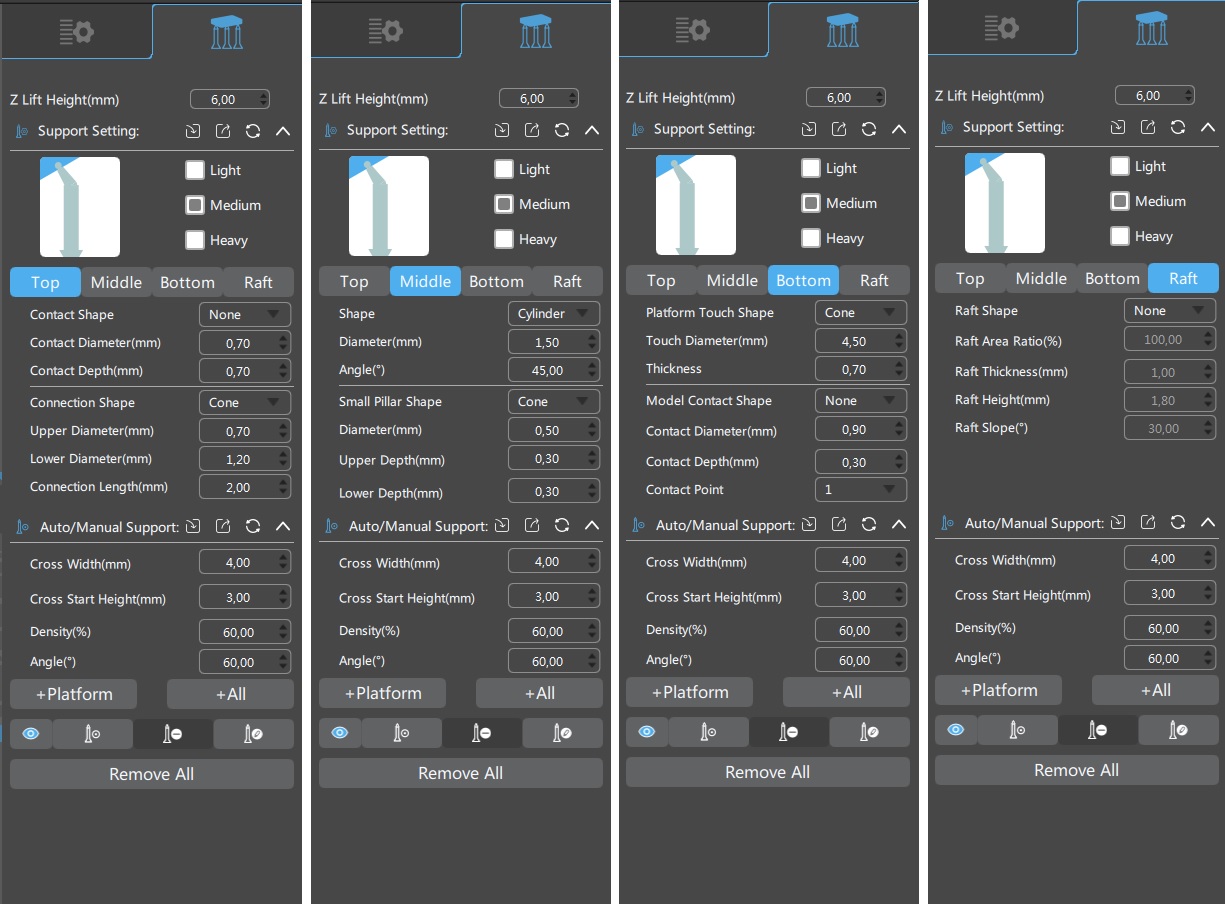
4) Support settings
Support settings are depending on the type of resin in combination with the type of printer, release mechanism, material on the bottom of the resin tank and also the secondary settings like print speed. Also the size of the part plays a role. Large and solid models need much more supports compared to small rings. With the extreme growth of available resin 3D-printers in the past years, it is impossible to give validated support settings for each printer. In this section you can find settings for some generic printers, design and print speed. We tested a standard design with different settings. If your part is more bulky / large cross-section for each layer, then the support tip thickness or intersection might need to be increased.
5) Cleaning, washing and post-curing your Wax Castable part.
After printing, take the parts off the platform and wash them. Wash them in alcohol or IPA (not below 18°C / 64°F) in two cycles of three minutes, preferably under agitation or ultrasonic. The second wash should be done in fresh solvent to get a clean and crisp surface. After the second wash, let the part sit on your desk for 10 minutes and inspect your part. The part should be clean, with a matte finish and free from any resin or contamination. If that is the case, then continue to post-curing. Otherwise perform the second washing cycle in fresh solvent again.
Parts are ready for post-curing after 10-15 minutes resting time after washing. Post-cure them for at least 15 minutes. This way the surface is fully cured and ready for casting. If no Anti-aliasing or blurring settings are used, in perfectly printed and washed parts should the layers should be clearly visible. An example of a part that is printed and washed correctly can be found in the image below. It should be noted that the investment material, and thus also the casted metal parts will have these visible likes as well. If that is not wanted, grinding before casting, or using Anti-aliasing or Blur settings can help reduce the layer effect.
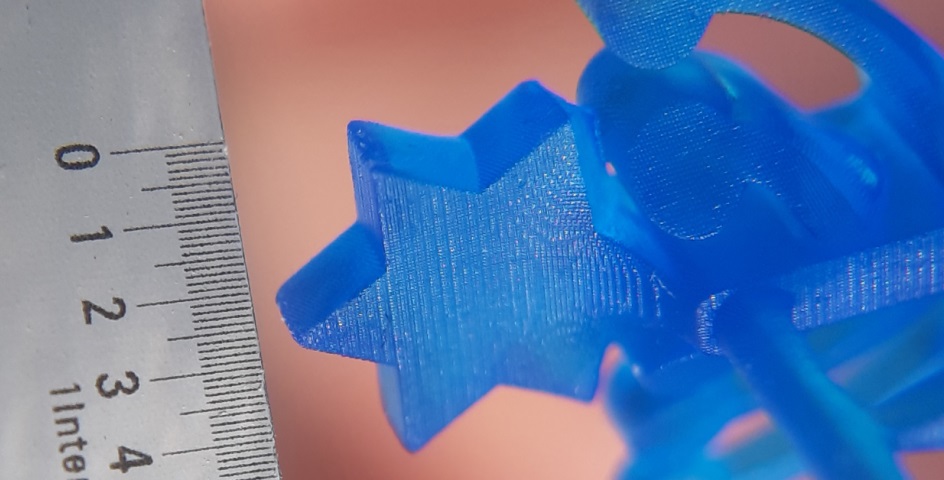
6) Pixels visible in print & cast
In the image above you can see perfect pixels in every direction of your part. for most engineering or (non-castable) dental purposes this is great as it is a 1-on-1 copy of your parameters. For castables it is a bit different as the metal will duplicate these pixels and you probably want a smooth surface. Anti-Aliassing settings might be a solution. they are a bit complicated but the article in the link can give some guidance. Alternatively, adding a thin wax layer on the model or polishing the print before casting (after UV-curing) are an option to reduce the layer effect and visible pixels.
7) How to clean/filter the resin?
When a part failed during printing or you see some sem-plastic pieces floating around, it is always advised to clean your resin tank. This is usually done by filtering the resin to make sure all rigid plastic pieces are gone. If cured resin parts are present when you start a new print, they can damage your bottom of your resin tank/FEP film of even your LCD screen or glass place in case of an DLP/SLA printer. A standard resin filter will work sufficiently to filter Wax Castable resin. Make sure the resin is above 20°C / 68°F so it is liquid and can pass through the filter easily.
8) Investment material for Wax Castable resin
Choosing the right investment material when using 3D-printed wax resin patterns is very important. Resin and also Wax-based resins have a higher thermal expansion compared to regular wax. The investment material should be strong enough to survive this expansion and not crack. For jewelry applications, our beta-partners have had great success with Prestige Unicast investment material. Our dental partners at 3D-Dental Store are using both N&V and Ambervest investment materials with success for casting dental applications.
9) Burn-out schedule for Liqcreate Wax Castable resin
We followed the instruction of the investment material (Prestige Unicast). The following burn-out schedule is used:
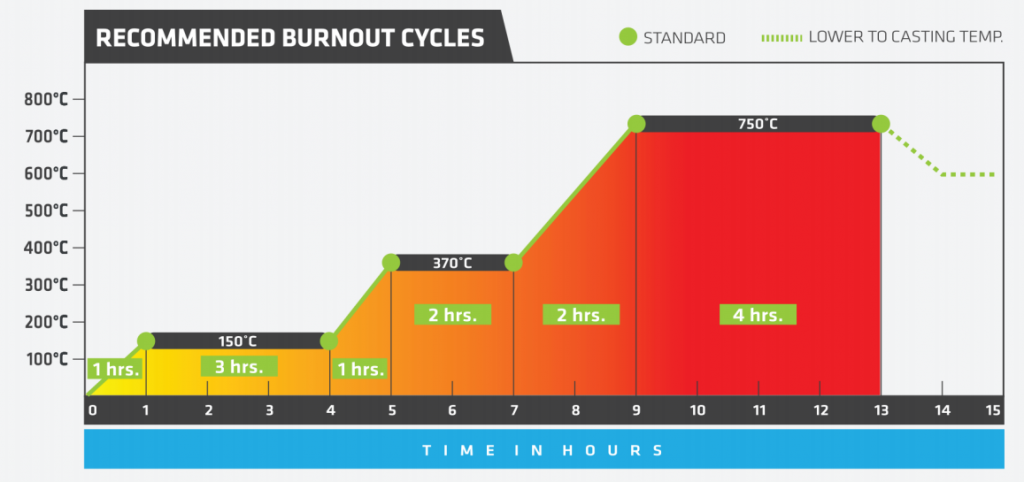
Parts have a matt finish after casting and polishing is necessary to get high-gloss metals. As a reference we shared a picture below of a printed part, freshly casted part and on the right side a (partly) polished part.

10) Resin shrinkage and casting shrinkage
When resin changes from liquid to solid, it will shrink slightly. This happens during 3D-printing but also in UV post-curing. Next to that there might be a small shrinkage of the object when the resin is burned-out and metal is poured in the cavity. It is important to consider this shrinkage for jewelry as a ring might be one size smaller if not compensated right. Let’s start by shrinkage during 3D-printing and post-curing. you can compensate this in the slicer software. In this link you can find shrinkage parameters for a range of popular printers. For one of the printers tested it looks like this:
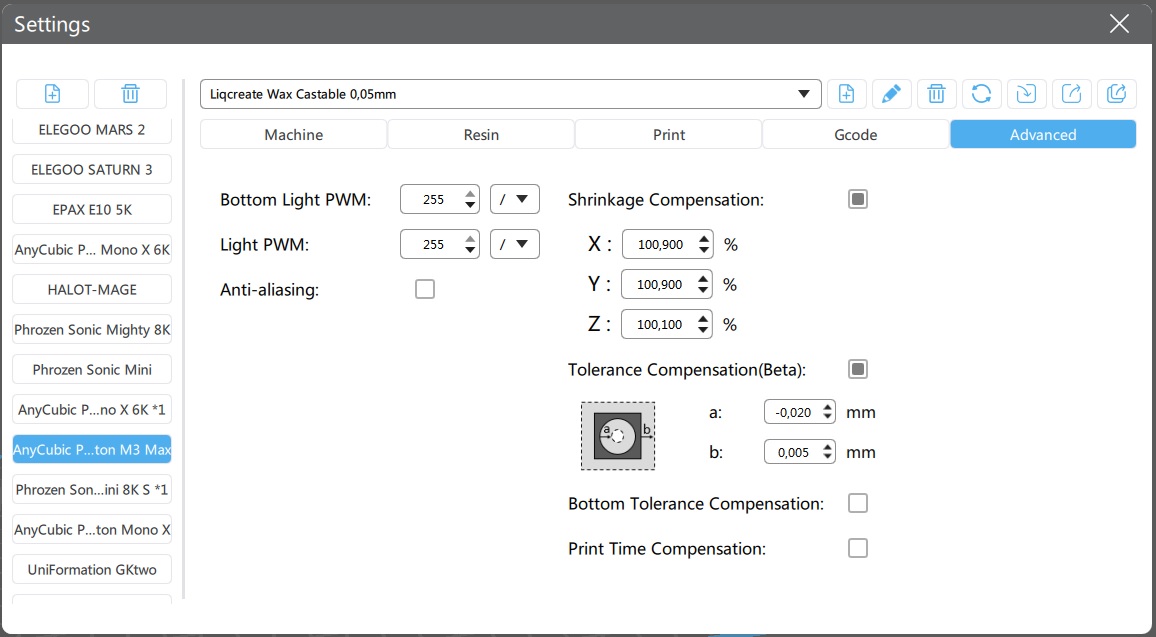
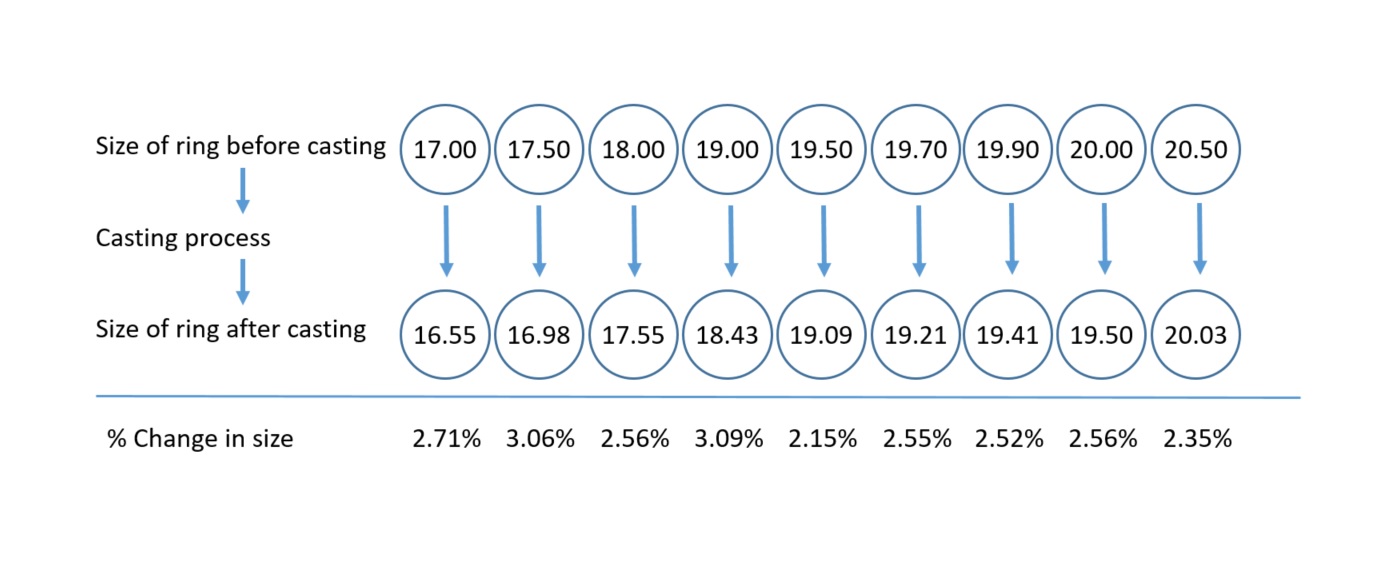
Next is the shrinkage during casting. One of our customers tested a range of ring sizes before and after casting. On average the shrinkage during casting is 2.62%. To produce accurate ring sizes it is advised to increase the shrinkage either in the design or slicer parameters to compensate.
12) Resin printing temperature
It is advised to print with Liqcreate Wax Castable resin at 20°C / 68°F and a maximum of 25°C / 77°F. printing at lower temperature causes random failure in the material. Excessive heating can lead to faster de-mixing of the resin and is not advised.
13) Storage conditions
Store the product in its original bottle, plug and cap at minimal 5°C / 41°F and maximum 30°C / 86°F. Avoid sources of heat, radiation, static electricity, sunlight and contact with food. As explained before; when you store the bottle of resin below 18°C / 64°F the resin will solidify like wax. Controlled heating of the resin to above that point is needed before printing. you can check that the resin is completely liquid without any ‘lumbs’ of wax before printing.
14) Additional documentation
- – Liqcreate Wax Castable product
- – Post-curing settings
- – Liqcreate Wax Castable resin for dental applications
- – 3D-printing settings for Liqcreate Wax Castable
- – Shrinkage compensation for Liqcreate Wax Castable
- – Anti-aliasing and blur to reduce pixels with Liqcreate Wax Castable
15) Troubleshooting
In this section we cover the most questions on some known issues that can occur. If you are still running into issues, reach out to us at info@liqcreate.com for assistance. As the printing, post-processing, preparation and casting process is quite extensive, a small issue somewhere in the process can cause an unwanted end-result. Please provide us with additional information when reaching out for assistance:
- Which printer brand and type was used?
- Which resin used?
- Screen-copy of your printing parameters
- Was the printed part successful?
- Picture of the printed part
- What kind of post-processing (washing & cleaning) did you use?
- Which investment material did you use and what was the flask size?
- Which burn-out cycle did you use?
- What was the temperature of the flask and the temperature of the metal during pouring?
- What kind of defects were visible in the metal part and which type of metal did you use?
Solve printing issues with Liqcreate Wax Castable resin.
The investment material will take over every detail of the printed part. Meaning that the quality of the 3D-printed wax-like model needs to be as perfect as possibly. Printing with Wax Castable resin can be slightly more difficult compared to other resins, due to the Wax present in the resin. At temperatures below 18 degrees Celsius / 65 degrees Fahrenheit, the resin will solidify. It is important that the resin is completely liquid during printing. Also the room temperature were you are using the Wax Castable resin should be at least at 20°C. Usually the resin wont solidify during printing, however, when printing in a cold room, the droplets left on the platform can solidify. This will make the washing process more difficult. It is important that the washing solvents are also at least 20°C to prevent solidification during washing.
A lot of 3D-printers have already been optimized with Liqcreate Wax Castable resin. Find out if your printer is listed here. Send an e-mail to info@liqcreate.com if your printer is not listed. Most of the settings have been optimized on filigree designs, these are thin designs which often require a longer exposure time. If you have more bulky designs, the exposure time can be lower for your parts.
Wax Castable resin does not stick to the build plate
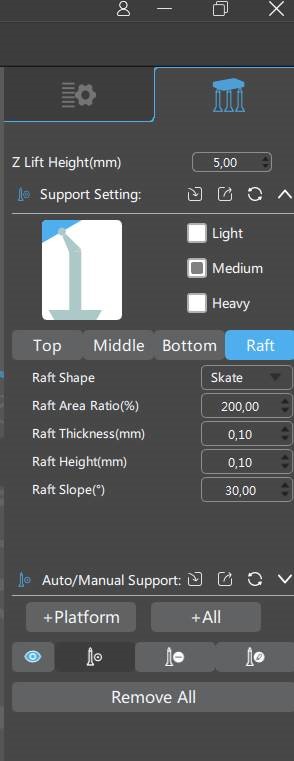
We have noticed that the wax inside the resin gives a low adhesion to anodized alumina platforms, like the Elegoo Mars series. To get the parts to stick to the platform better, it is advised to make some support changes. The raft of the supports has a big area and often pulls the part from the platform. To change the raft settings, printing will be much easier. Changing the raft height and raft thickness to 0,1mm will fix most of these issues.
Solution if engravings are not sharp after printing
The basics is of course the print parameters. If your part is over-cured or under-cured, then the engravings and other details won’t be sharp. If your print parameters are correct, then it might be the print orientation. Especially for rings with engravings, the orientation of your part is very important. For rings with engraging it is advised to place the rings under a 20 degree angle instead of printing vertical. The reason is that the chance of overcuring your engravings is far lower in this position. For best orientation see the image below. If you still have questions if your orientation or settings are good, don’t hesitate to contact us at info@liqcreate.com
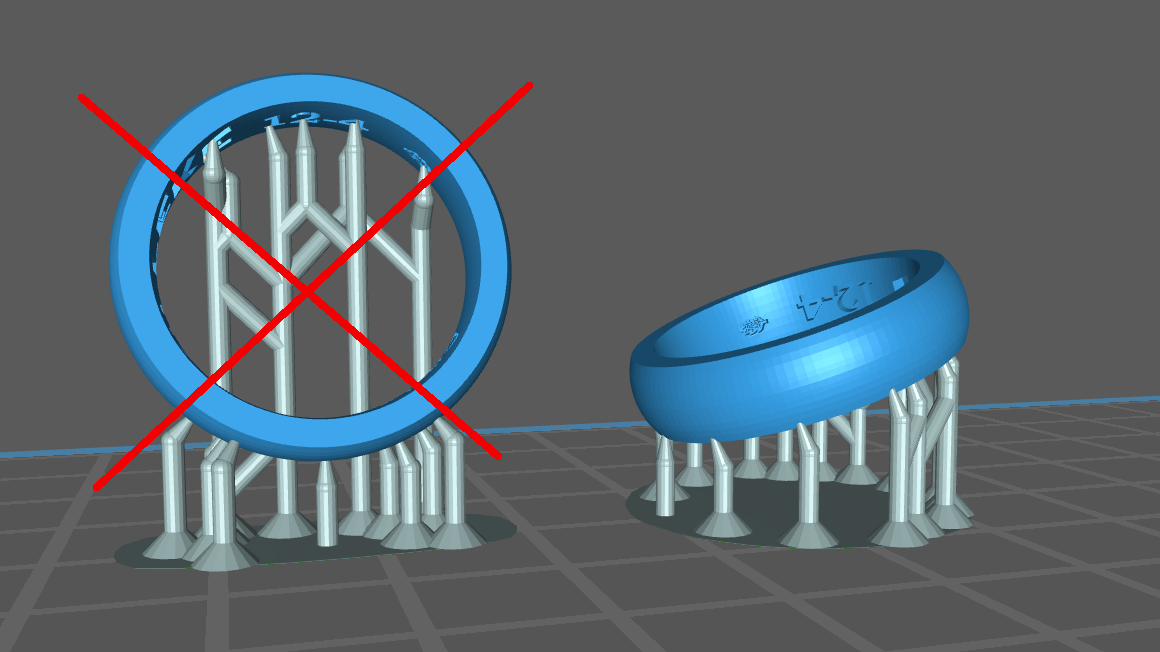
image by Liqcreate: Jewelry ring positioning on the platform. Always place the rings and other jewelry files in an angle to get better quality parts.
What to do when the resin is thick or even solid?
Due to the wax presend in our product, Liqcreate Wax Castable will solidify around 17 – 18˚C / ~64˚F. It is not advised to use this product in environments with temperatures below 18˚C / 64˚F. storage or transport of Liqcreate Wax Castable below 18˚C / 64˚F is possible. Before processing, it is necessary to heat-up the product to its liquid phase. This can be done by leaving the product for 5 hours at room temperature or by placing the packaging in a warm environment (without direct light, in the original packaging) up to 50˚C for 20 minutes. For instance a closed bottle on a radiator or hot bucket of water for 20 minutes will do the trick.
Sharp lines and pixels visible in cast (& in 3D-printed jewelry resin part)
The investment material will take over every detail of the printed part. If the printed model has lines, these will be visible in the casted part as well. There are a few methods to solve this. first one is to set anti-aliasing and blurr in the printing software. For chitubox this is available in the advanced settings. With the Mars 3 we were able to get most of the pixel lines out by setting the AA to Grey level 0 and the Blurr to level 2, see image below. Alternaively, you can grind/polish them out or add a small layer of wax on top to blurr it. but the fastest method is by setting it in the software. Note that all machines are slightly different and might need different settings. Also not all lines are completely gone, but most of them are definitely less pronounced and easier to process further.
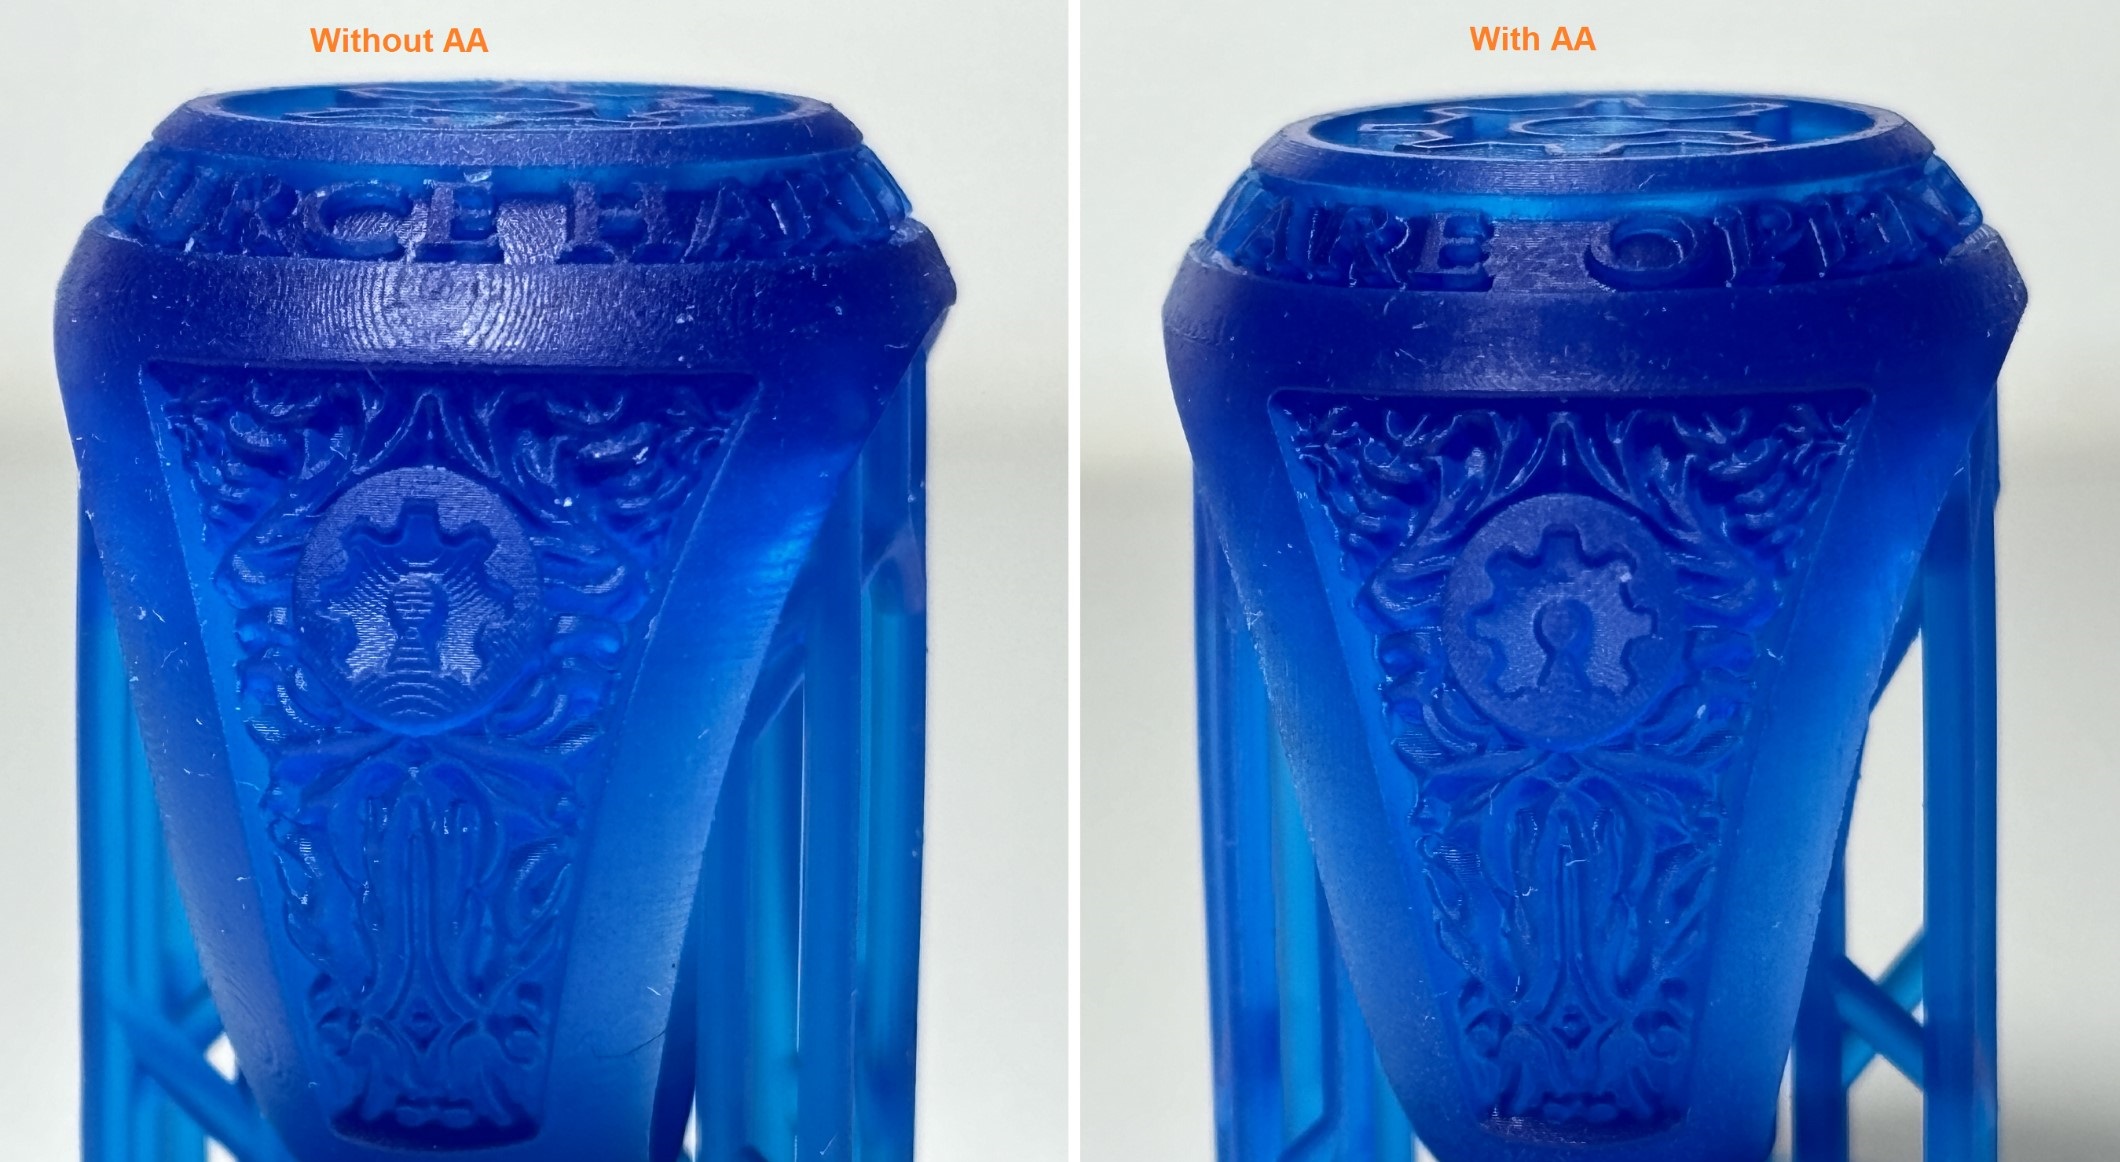
image by Liqcreate: Jewelry ring from thingiverse thing:358031 to test AA in 3D-printed resin jewelry parts.
Casting issues
Bad casting surface
Bad casting surface (like the skin of an orange) can be caused by:
- 1) Too high temperature of the flask during casting
- 2) Too high temperature of the alloy during casting
- 3) surface of the casted part was not properly cured or cleaned.
- 4) Flask over-heat during burn-out (do not increase over 750°C / 1382°C).
Gas porosity in part
Gas porosity can be caused by:
- 1) Low quality alloy (or too much recycled material)
- 2) Flask temperature too high
- 3) Metal temperature too high
- 4) Inspect thermocouples in oven to make sure that the temperature is right.
Cracking of investment material
Cracking of the investment material can be caused by:
- 1) Use of not suitable investment material (Wax Castable requires a stronger investment material that can hold the higher thermal expansion of the material during burn-out)
- 2) Incorrect preparation. That could be incorrect powder to water ratio, too long mixing time or use of regular tap water instead of distilled water.
- 3) Leave at least 1 cm gap between the printed resin parts and the flask limits. Smaller gaps can be the cause of cracks in the investment material.
Flashing of metal cast
Flashing be caused by:
- 1) Incorrect powder/water ratio of the investment material.
- 2) Work time of investment too long as the slurry start to set while still under vacuum.
- 3) Casting the material with too much force or moving the flask too early.
- 4) Flask over-heated during burn-out.
Engravings not clear
Engravings that are filled or not clear can be caused by:
- 1) Engravings not sharp in printed part
- 2) depth of the engraving incorrect as engravings should never be deeper compared the width.
- 3) Deeper engravings need a harder investment material, that can be done by increasing the rest time of the flask after pouring the investment material.
Bubbles present
bubbles in the casted jewelry can be caused by:
- 1) Incorrect powder-water ratio in the investment material (investment material too thick).
- 2) Faulty vacuum process.
Incomplete casted part
Incomplete casted jewelry parts can be caused by:
- 1) Too low alloy or flask temperature during pouring.
- 2) Inadequate spruing.
- 2) depth of the engraving incorrect as engravings should never be deeper compared the width.
- 3) Deeper engravings need a harder investment material, that can be done by increasing the rest time of the flask after pouring the investment material.
Water markings on jewelry casted part
Water markings on the jewelry can be caused by:
- 1) Incorrect powder-water ratio in the investment material (too much water).
- 2) Investment not set – wait longer after pouring.
We wish you a great journey with our wax based castable 3d-printing resin for jewelry, dental and engineering. If you have printed or casted a great jewelry part and want to be featured in our social media. Or have any questions about the product or processing of jewelry with Liqcreate Wax Castable resin, send us an e-mail to info@liqcreate.com
About Liqcreate Wax Castable resin
Liqcreate Wax Castable is a wax-based resin, perfect for manufacturing jewelry, dental and industrial parts using the direct investment casting method. Liqcreate Wax Castable is easy to use on open LCD, MSLA and DLP based 3D-printers in the range of 385 – 420nm. 3D-printed parts from this material captures intricate features and show crisp details. This wax-based material offers smooth surfaces with clean burnout for a reliable casting process. Create custom made elegant organic geometries according to your preferences with excellent casting for positive and negative engravings.
Key benefits |
3D-Printer compatibility |
| · High precision | · Asiga Max and Pro 4K |
| · Wax based | · Phrozen3D series |
| · Clean & ash-free burnout | · Elegoo & Anycubic series |
| · Excellent casting of engravings | · And many more |